Hello everyone! Crazy that we are now already into February! I set a goal this year to start recording the amount of food I am growing from the garden and just keep a visual record for fun! I will do a monthly round-up and let you know how much I have grown and share some of the food I have made with those harvests. Keep reading to see just how much I harvested in January!
Front Garden
Another one of my goals is to grow a years supply of pumpkin which I estimate to be about 1 large or 2 small pumpkins a month. I created a new garden bed out the front in a car space beside the carport. Pumpkins need a lot of space and I just had so much unused space out the front so it was a great solution.
I started off strong with my Lakota pumpkins in the ground around October. I harvested these in January and the vines have pretty much died off now. I have trimmed them back and I’m hoping they will go another round. I also had some Butternut start growing from the compost I put in the bed so that was a welcomed bonus! In some of the empty spaces, I have now planted more pumpkin such as the Kent which I’m hoping to get some decent sized pumpkins in the coming months.
The Lakota Pumpkin is apparently kind of like squash and you can eat the skin.
Backyard Garden
Out the back, we built two new Pallet Planters bringing the total to x4 large and 1 small. The larger ones are roughly about 1.2m x 1.2m square and the smaller one 0.5m x 0.5m. I created a video of the process as i often get questions on how we make them.
Pallet 1 – I have Lebanese cucumbers growing and I have been picking them daily in January! This is my first successful attempt at cucumbers because they usually don’t last through a 40degree day. This time I think I had more success because they were in the pallet planter so had a decent amount of healthy soil and I could bring them undercover on hot days.
Pallet 2 – Tomatoes and Basil. Classic companion planting and the bees are loving the basil flowers. I also had a few compost volunteers (rockmelon, watermelon, pumpkin) which i am leaving now that the Tomatoes have pretty much finished.
Pallet 3 – Small pallet has a white apple cucumber growing. I haven’t got anything from it yet but hopefully, this will continue my cucumber harvests through Feb/March.
Pallet 4 – Newly planted with x4 chilli plants, Armenian Cucumbers and some rainbow radishes.
Pallet 5 – I planted some corn seeds in this new planter but our dog kept sleeping in it so I had very little strike rate. I ended up getting some corn seedling on sale at the farmers markets for 50c so I have now planted those and he has luckily stopped using it a bed haha.
Back fence garden – Things are chugging along in the back fence garden. The hot days and sandy soil mean the smaller plants slow down considerably. The fruit trees are all doing ok though and I have a few feijoas on the way!!!! These are my pride and joy and are in their 4th year. Last year I got two baby fruit so I’m hoping for some decent harvests in the coming years. Pretty much a currency over here among the Kiwis 😂
My new carport garden has well outperformed the back but that was all the pumpkins. x8 Pumpkins so far. January I also launched my YouTube channel! I have experienced a lot of technical difficulties being a complete novice when it comes to video and editing but I will get the content rolling in shortly so make sure you subscribe!
Holly 🌱
MY GARDENING ESSENTIALS // Fertiliser spray gun: https://bit.ly/366nL1t Retractable Hose: https://bit.ly/2TSC0Bo More gardening tools: https://bit.ly/32IQmbD
DISCLAIMER: Links included in this description might be affiliate links. If you purchase a product or service with the links that I provide I may receive a small commission. There is no additional charge to you! Thank you for supporting my page so I can continue to provide you with free content!
When I first started gardening here I remember googling ” how to keep plants alive in a heatwave?” 😅 Welcome to Perth summer gardening! I have always struggled with how hot it gets here in Perth in summer. After 7 years here, the 40degree days don’t get any easier! We have a large amount of thermal mass at our house with concrete and paved areas so it can get so hot in my garden! One of the main reasons I decided to make pallet planters on wheels was to be able to grow more food during the hot summer months by being able to have them undercover on hot days. Watch how we made them here.
How to keep plants alive in a heatwave
If you are experiencing a heatwave or have days of hot weather ahead of you, here are a few tips I use to try and get my plants through!
🌱 WATER | Give a good deep water early in the morning. This will allow time for the moisture to reach the roots before it evaporates.
🌱 SHADE | If your plants are in containers move them undercover or to a shady area of your garden. Otherwise, try and rig up some temporary shade using shade cloth or even umbrellas to keep the direct sun off your plants during the hottest part of the day.
🌱 PROTECT THE SOIL | Ensure you have a good layer of mulch or ground cover over your entire garden. This will protect the soil from being exposed to direct sun and reduce the amount of water loss through evaporation.
🌱 BUILD SOIL | This is something that should be continually worked on by composting and adding more fibre and leaf matter to your soil. Sandy soils like we have here in Perth allow all the water to drain away and can become severely water-resistant. But by consistently mulching, composting and adding green matter, you will not only grow strong, healthy plants but also protect your plants from future dry spells. Healthy soil is key!
🌱 REPLENISH | As the sun goes down and the temperatures start to drop again, give your plants another well-earnt drink. This should help their leaves perk back up again.
🌱 SAVE SEEDS | If you notice a certain plant seems to survive better than others in hot weather, make sure you save the seeds at the end of the season. That way you can futureproof your garden by growing strong plants that you know will grow well in your exact climate.
My favourite watering tools are:
Retractable Hose with 7 spray nozzle and water flow adjuster: Control exactly how much flow you want to each plant with an easy retractable hose system. CLICK HERE for more info.
Deep root waterer and soil breaker: Helps get water directly to the roots without any runoff or loss of water from evaporation. CLICK HERE for more info.
Weeper hose works great for drip-feeding water and allowing the plants to absorb more. CLICK HERE for more info.
Happy Gardening!
Holly 🌱
MY GARDENING ESSENTIALS // Fertiliser spray gun: https://bit.ly/366nL1t Retractable Hose: https://bit.ly/2TSC0Bo More gardening tools: https://bit.ly/32IQmbD
DISCLAIMER: Links included in this description might be affiliate links. If you purchase a product or service with the links that I provide I may receive a small commission. There is no additional charge to you! Thank you for supporting my page so I can continue to provide you with free content!
Are you growing Zucchini but the fruit seems to shrivel and die before being ready? If so, you may have a pollination issue. Hand-pollinating Zucchini is super easy to do once you know how. Today I will share 4 east steps with images so you can maximize your Zucchini harvests! This also works with Pumpkins, Melons, and Cucumbers.
Step 1: Identify a Male and Female Flower
Firstly, to hand pollinate Zucchini you need to know how to identify the male and female flowers. The best time to do this is early in the morning when the flowers are open.
Female Flower
The female zucchini flower has a small fruit at the base.The centre stigma of the female flower has multiple parts to form a circular shape.
Male Flower
The male flower has just a plain stem and flower with the centre stamen a single point covered in pollen.
Generally, the plant will produce a bunch of male flowers first which is nature’s way of attracting pollinators to the garden. Then it will alternate between male and female. I like to plant a few of the same variety as sometimes you can have female fruit but no male flowers open. Early mornings are best because the flowers will be open and then they will close up to capture the pollen.
You can either use a paintbrush to simply transfer the pollen from the male stamen to the female stigma but I find it easier to remove the male flower and use that to transfer the pollen.
Step 2: Pick a male flower
Pick the male flower and remove the petals.
Step 3: Dab pollen onto female Stigma
Then you are left with a pollen-covered stamen to transfer onto the female flowers.Transfer the pollen onto the female flowers to hand pollinate Zucchini.
This will make sure your zucchini are getting pollinated so you can enjoy the abundant crop!
This method can be used for other fruiting vegetables such as pumpkins, melons, cucumbers. I tend to use a small paintbrush for the melons and cucumbers though as the flowers are much smaller and delicate.
It is also important to try and attract wildlife to your garden for natural pollination, to find out what flowers to plant, click below.
Do you hand pollinate in your garden? Leave me a comment below.
Holly 🌱
MY GARDENING ESSENTIALS // Fertiliser spray gun: https://bit.ly/366nL1t Retractable Hose: https://bit.ly/2TSC0Bo More gardening tools: https://bit.ly/32IQmbD
DISCLAIMER: Links included in this description might be affiliate links. If you purchase a product or service with the links that I provide I may receive a small commission. There is no additional charge to you! Thank you for supporting my page so I can continue to provide you with free content!
I much prefer offering natural and sustainable solutions rather than a pointless list of negative things not to do. But this topic is something I am very passionate about and something new gardeners often get caught up in (including myself when I first started growing food many years ago). You will find my list of natural pest management remedies below 🙂
When you first start growing food you will get slugs and snails eating your new precious veggies and will want to INSTANTLY fix the situation. I see some newbie gardeners pour on huge amounts of snail bait to combat the hungry predators. This is POISON, not only will it kill the slugs and snails but is also deadly to cats and dogs. Now, if it can kill dogs, having it covering the soil and getting watered in and absorbed into the soil that your vegetable will feed on, especially those root vegetables, cannot be good for us.
If you’re reading this and thinking…I do this..you are not alone. It is something that has been a “norm” for way too long. But the first step you can take is safely throw out your poisonous slug bait. I would place it in something that animals can’t get into in case it crosses paths or they get into the bins. Even better, contact your local council to find the best way to safely dispose of it.
Watch my latest video
There are plenty of ways to naturally combat pests and have safe and nontoxic vegetables for your family.
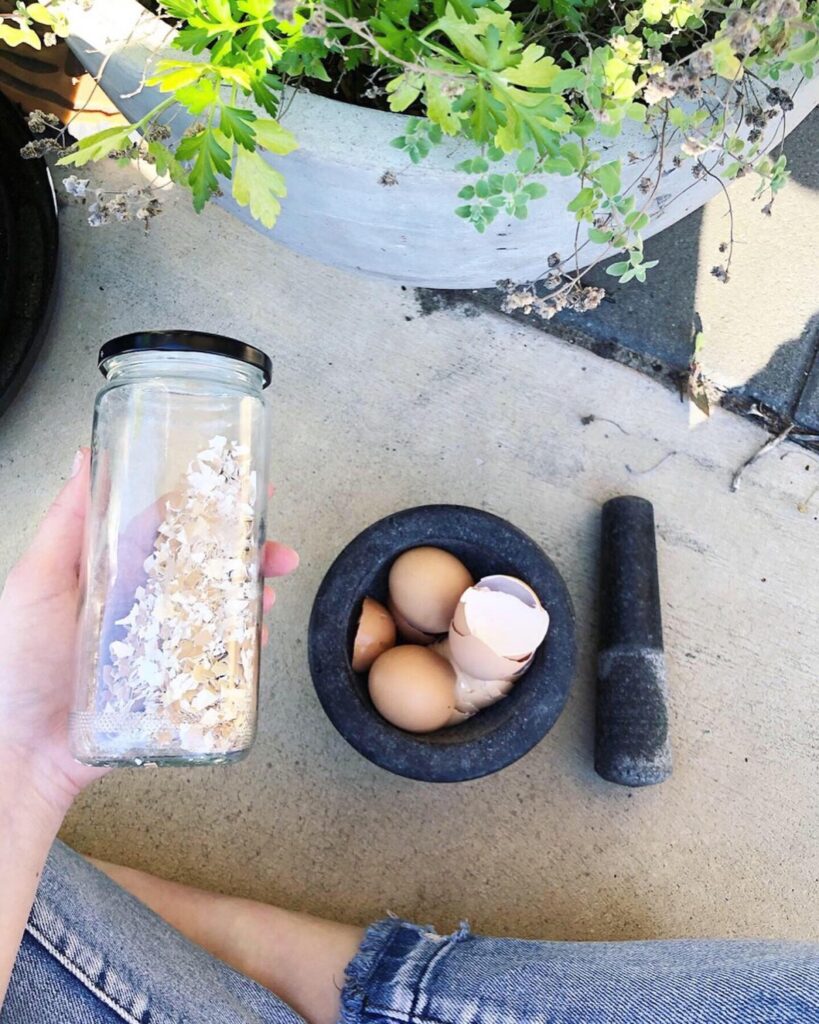
Eggshells – Save your eggshells and dry in the oven on low. Then crush into small pieces and place in a jar. Sprinkle this around the base of your vegetables and the slugs and snails do not like the surface so will stay away. It also adds some beneficial calcium to your soil.
Plant extras – Plant a few extra plants in different areas of your garden so that if one gets attacked you still have plenty 🙂
Encourage beneficial insects – Plant diversity and flowers to create habitats and attract beneficial insects. You could even make an insect hotel using lots of different sized sticks and logs for them to live 🐞🐝
Manually remove – Go out and check your garden and remove the pests by hand. I often do this when I am on the phone, its a great way to multitask.
Beer Traps – Cheaper the better, there is no need to use up any fancy craft beer. Place little containers around your vegetable patch and this will capture the slugs and snails before they get to your precious veggies 🍺
Coffee grounds – Often your workplace or local cafe will be throwing these out anyway. Sprinkle around the base. Only add a small amount as it will change the PH of the soil ☕️
Companion Plants – Often very fragrant plants will repel pests. These are plants such as: Marigolds and Rosemary 🌼🌿
Soapy Water – this is great for aphids. All my dishwashing liquid is non-toxic and greywater friendly so I just mix up some diluted in water and paint it on the new growth that is affected by aphids. This is the last resort though as it may harm beneficial insects too. Try and isolate the coverage.
Chilli spray – Mix up some chilli powder in some water and spray on your affected plants. I have read crushed garlic as well but that is bad for dogs so I would avoid.
Healthy Soil – growing healthy soil by composting and mulching helps keep your plants strong and healthy 💪 this means that if they do get bugs they can survive and thrive after an infestation.
Sacrificial plants – Usually one plant will just get attacked and I just leave it. It usually means the bugs will only eat that plant and the rest will be fine! Sorry for that one plant but it’s feeding nature…🌿
Chickens and ducks are also a great way to integrate natural pest management into your garden. Win-win 🐛🦆
MY GARDENING ESSENTIALS // Fertiliser spray gun: https://bit.ly/366nL1t Retractable Hose: https://bit.ly/2TSC0Bo More gardening tools: https://bit.ly/32IQmbD
DISCLAIMER: Links included in this description might be affiliate links. If you purchase a product or service with the links that I provide I may receive a small commission. There is no additional charge to you! Thank you for supporting my page so I can continue to provide you with free content!
Planting Flowers for the Bees is high on my current list of gardening goals. Bees are such an important element in the garden and it wasn’t until I really started trying to grow my own food that I realised just how important they are! Previously, although, I knew they were important for pollination, I had mixed feelings towards bees because my dad is deadly allergic. One Bee sting will quickly send him into anaphylactic shock and growing up this was such a scary reality. Today, I continue to learn more and more about bees and I am amazed at how incredible they really are.
Trying to grow food without pollinators can be hard and sometimes impossible without intervention. If you have ever tried growing pumpkin or watermelon you will understand what I mean! It is so important that we try and look out for our bee friends and provide them with healthy, organic, pesticide-free gardens. I am constantly planting flowers for the bees and also letting things go to seed, so there is always an abundance of flowers and bees in my garden.
Having water available for the bees is also another great idea, especially in Perth’s warm climate. If you have a bird bath you can place a flat rock in it so that the bees can stop by for a drink. Below are some of the plants that I grow and the Bees love!
Top 5 Flowers for the Bees
1. Rosemary – This is my number one plant for the bees. There is always a hive of activity on my rosemary plant and I love seeing so many bees in my garden. Of course, it is a staple in the kitchen as well!
2. Borage – Bees love borage flowers and they are so pretty and edible too! They are usually blue, pink or white but often you get this fantastic tie-dye effect!
3. Lavender – is such a great fragrant addition to the garden and you can make natural perfumes, beauty products and it is also edible! Lavender is so easy to grow from cuttings so you can just cut off a stalk and plant it in other areas of your garden or pot up and give as a gift to your family and friends.
4. Sunflowers – These have to be one of my favourite flowers! The bees love them and they are an absolute show stopper in the garden. Sunflowers are also known to be soil remediators and extract any toxins in the soil.
5. Zinnia – I am new to growing zinnia but I absolutely love them! They come in so many amazing colours (even green!) and the flowers are also edible! These are now a much-loved staple in my garden. I even grew them down the side of a fence with very poor soil and they thrived.
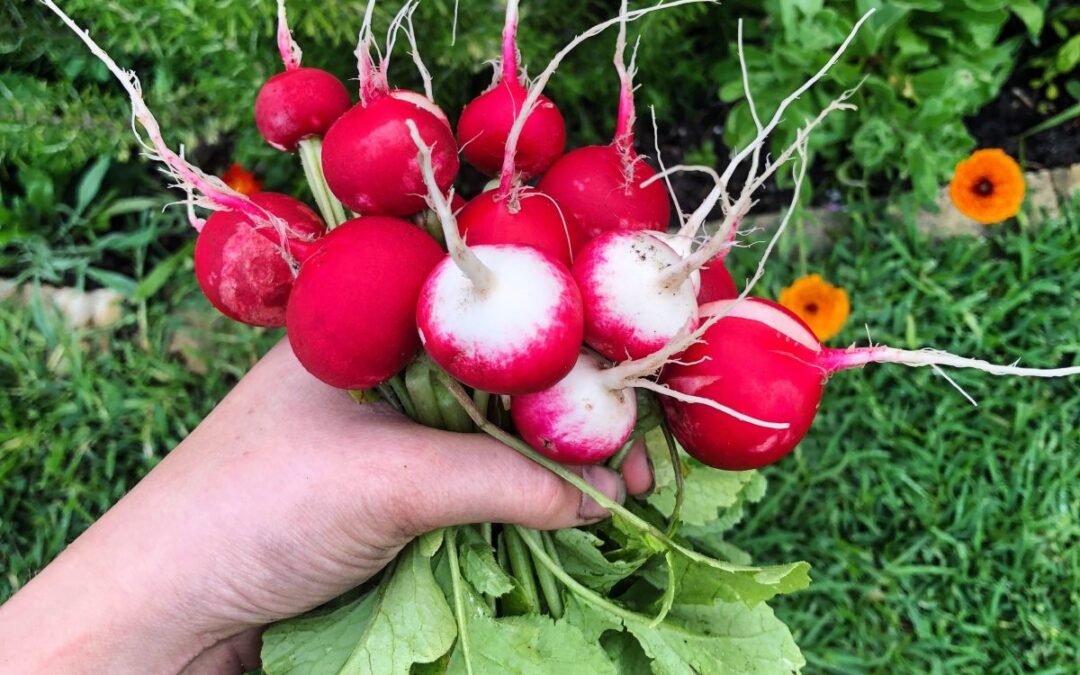
Bonus – The other thing I do let some of my veggies go to seed. Diversity in the garden is important and you will see different types of bees like different flowers. Radish flowers for example, always attract our native Blue Banded bees which are amazing to watch! Having a diversity of plants and insects in your garden will help create a thriving ecosystem.
Take the time to slow down and observe your garden and you will start to recognise which flowers are attracting beneficial insects. You may even find some you have never seen before! Most weekends I have my morning coffee in the garden and just spend some time observing without any distractions. We are often so busy trying to do something that we lose sight of all the little things going on.
This weekend I challenge you to give it a go! Make a coffee and spend just 10 minutes or so sitting in the garden or nature and observe. And if you can plant some more Flowers for the Bees.
Holly ✨
MY GARDENING ESSENTIALS //
Fertiliser spray gun: https://bit.ly/366nL1t
Retractable Hose: https://bit.ly/2TSC0Bo
More gardening tools: https://bit.ly/32IQmbD
DISCLAIMER: Links included in this description might be affiliate links. If you purchase a product or service with the links that I provide I may receive a small commission. There is no additional charge to you! Thank you for supporting my page so I can continue to provide you with free content!
Absolutely! Growing edible plants in the shade is not only possible but can also be beneficial for many crops. One of the most important aspects of designing a productive edible garden is observing your environment and understanding your garden’s unique conditions. This principle, outlined in David Holmgren’s Permaculture Principles, emphasizes observation and interaction as key factors in successful gardening.
Understanding how sunlight and shade move across your garden throughout the year will help you plan your planting strategy. Rather than planting a full-sun-loving tree in an 80% shaded area and wondering why it struggles (been there, done that!), thoughtful observation will lead to better plant selection and higher yields.
Why Grow Shade-Tolerant Edible Plants?
Many gardens have areas that receive limited sunlight due to trees, buildings, or fences. Instead of letting these areas go to waste, take advantage of them by planting shade-loving edible plants. While growth may be slower in the shade, this can be an advantage, as it reduces bolting in leafy greens and extends harvesting periods.
If you’re looking for productive plants to grow in shady spots, here are my top recommendations.
Tips for Growing Edible Plants in the Shade
Growing shade plants requires some adjustments to maximize success:
Expect slower growth – Less sunlight means plants will take longer to mature.
Use shade strategically – Leafy greens often thrive in partial shade, especially in warm climates.
Improve soil quality – Shade gardens benefit from rich, well-draining soil and plenty of organic matter.
Water less frequently – Shady areas retain moisture longer, reducing water needs.
10 Best Edible Plants for Shade
1. Nasturtiums (Tropaeolum majus)
A personal favorite! Nasturtiums thrive in partial shade and are incredibly versatile. The leaves, flowers, and seeds are all edible, adding a peppery kick to salads. They also attract beneficial insects and act as a natural pest repellent.
2. Sweet Violets (Viola odorata)
Also known as English Violets, these beautiful little plants make an excellent ground cover in shady areas. The flowers are edible and can be used in salads, desserts, or herbal teas.
3. Lettuce (Lactuca sativa)
One of the easiest crops to grow in the shade! Inhot climates, lettuce actually performs better in partial shade, as it prevents the leaves from wilting or becoming bitter.
4. Chives (Allium schoenoprasum)
Chives do well in both sun and shade, making them a versatile addition to any garden. Use them to add a mild onion flavor to omelets, salads, and soups. The flowers are also edible!
5. Kale (Brassica oleracea var. acephala)
Kale grows well in low-light conditions due to its large, energy-efficient leaves. While it may grow a bit slower in the shade, this can be a positive if you prefer a steady, manageable harvest.
6. Radish (Raphanus sativus)
Radishes are quick-growing and shade-tolerant, making them perfect for filling gaps in the garden. They thrive in partial shade and add a crunchy, peppery flavor to dishes. The great thing about Radishes is that they are ready to harvest from seed in just 30 days! Don’t love Radishes raw? Try this delicious Roasted Radish Salad! Game Changer!
7. Asian Greens (Bok Choy, Tatsoi, Choy Sum)
These fast-growing leafy greens thrive in the shade and produce a continuous harvest. They are excellent in stir-fries, salads, or soups.
8. Parsley (Petroselinum crispum)
Parsley tolerates shade well and grows at a steady pace, preventing waste from overproduction. It’s packed with vitamins and minerals, making it a nutrient-dense choice for shady gardens.
9. Sweet Potato (Ipomoea batatas)
While full shade is not ideal for large tubers, sweet potatoes can still produce a decent harvest in partial shade. Their sprawling vines make a fantastic ground cover, suppressing weeds and protecting the soil.
10. Rocket (Eruca vesicaria)
Also known as arugula, rocket grows well in shade and has a strong, peppery taste. It’s a great addition to salads, pizzas, and pestos.
Want more Plant ideas? Watch my Video for 21 Edibles to grow in the Shade
Growing edible plants in the shade is a smart way to make the most of every inch of your garden. Whether you have dappled shade under trees or a fully shaded wall, there are plenty of delicious and nutritious plants you can grow successfully. Want even more ideas? Watch my latest video for 21 edible shade plants! 🌱
👉 [Watch the Video Here]
What shade-loving edible plants do you grow? Leave a comment below! ⬇️
Holly🌱
MY GARDENING ESSENTIALS // Fertiliser spray gun: https://bit.ly/366nL1t Retractable Hose: https://bit.ly/2TSC0Bo More gardening tools: https://bit.ly/32IQmbD
DISCLAIMER: Links included in this description might be affiliate links. If you purchase a product or service with the links that I provide, I may receive a small commission. There is no additional charge to you! Thank you for supporting my page so I can continue to provide you with free content!