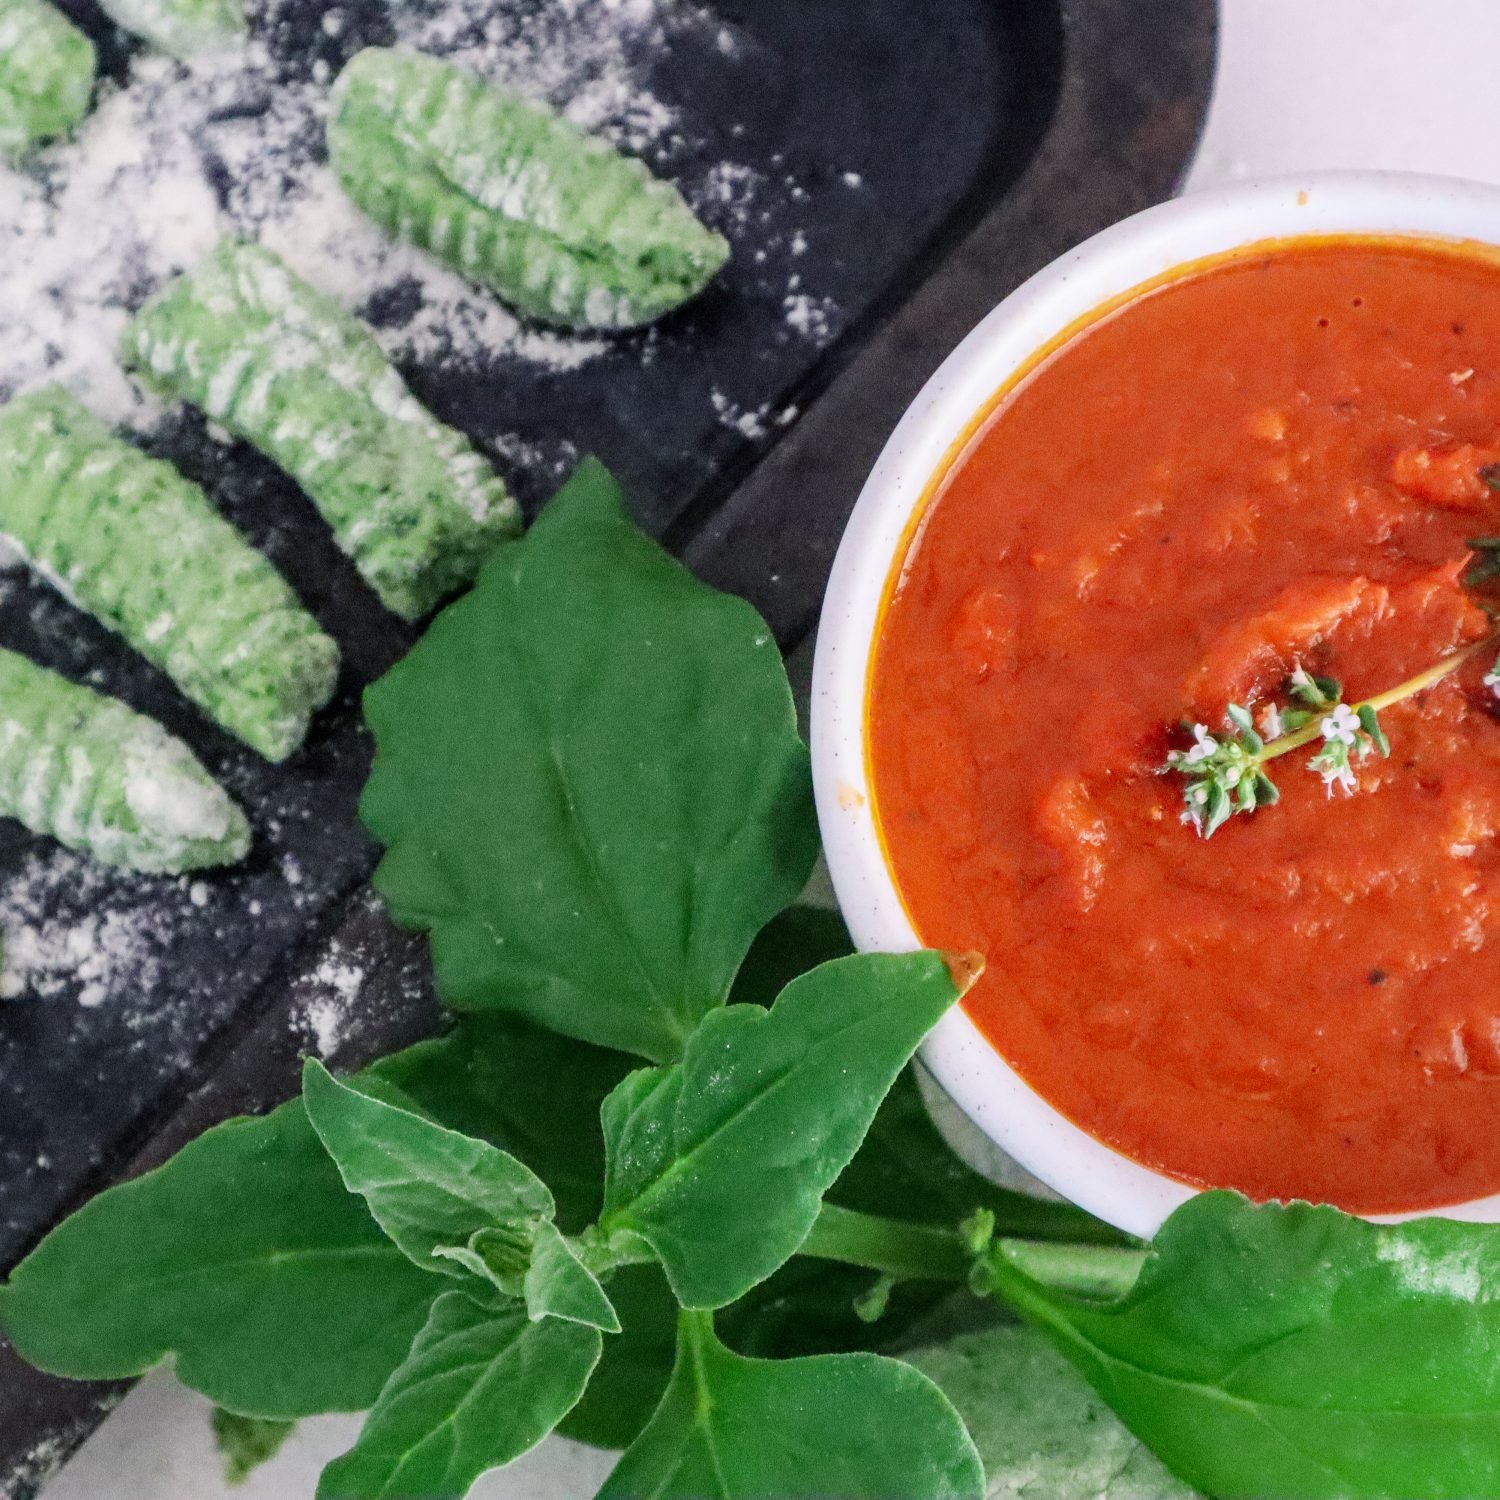
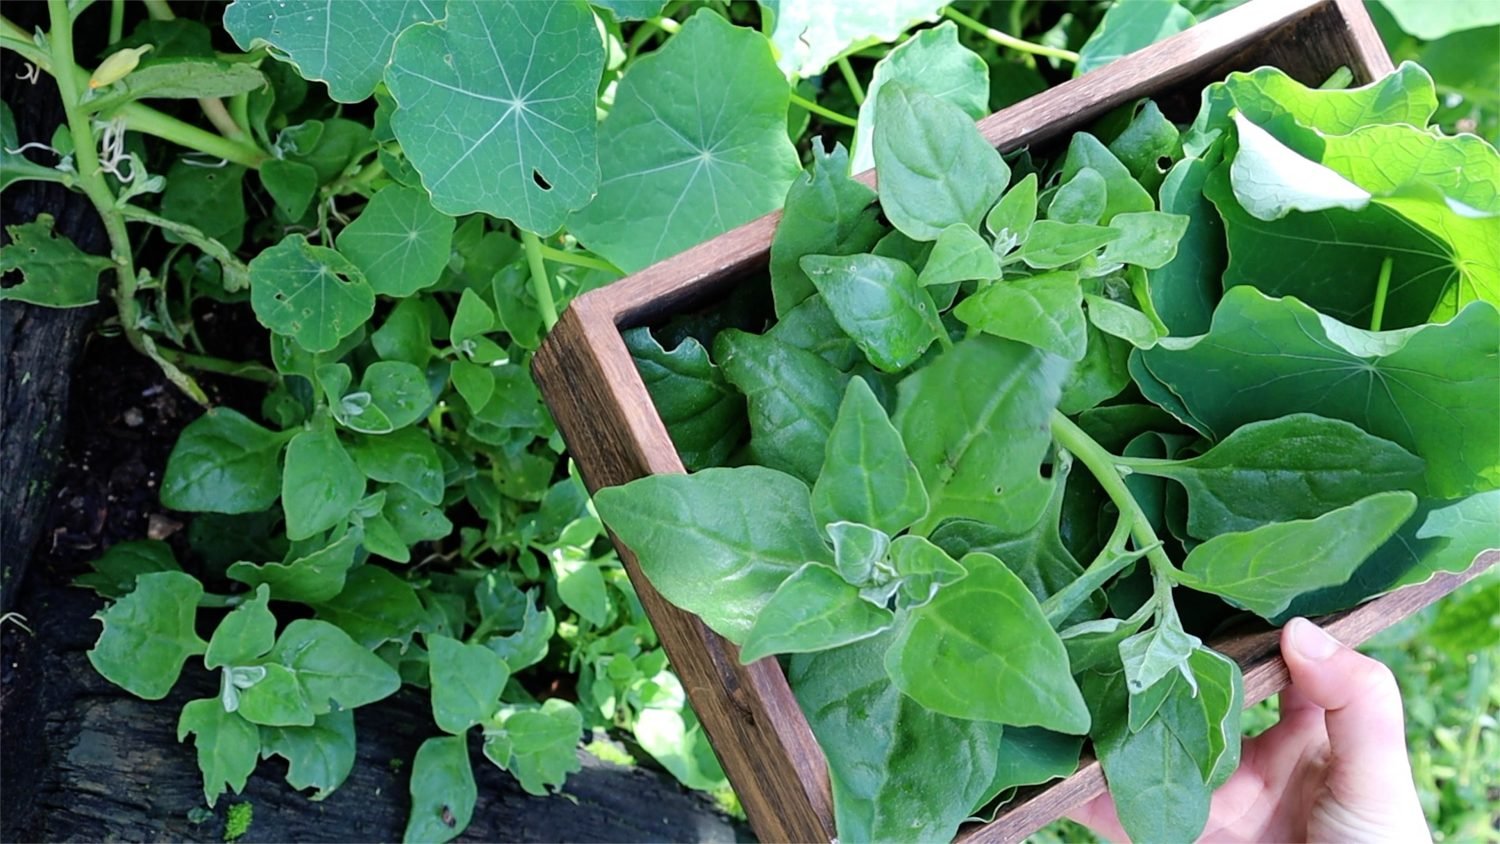
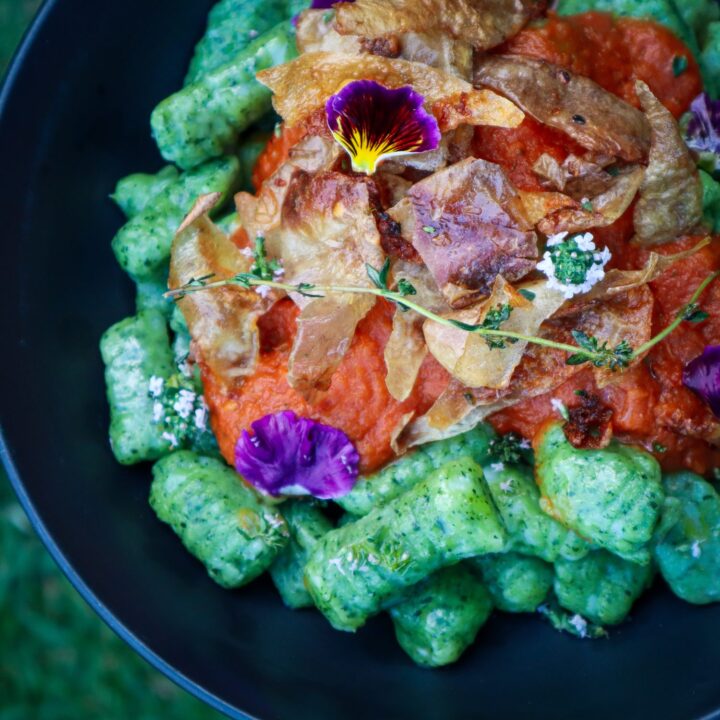
Soft pillowy spinach gnocchi with crispy potato skins. Serve with herbed butter or the simple roasted tomato sauce recipe. Delicious! Unlike most spinach varieties the NZ Spinach / Warrigal greens produce in abundance over the summer! This edible ground cover is a powerhouse in the garden and pairs well with so many dishes. Spinach gnocchi is so vibrant and delicious! Making gnocchi can seem scary but this recipe has just 4 ingredients and is so worth it! I have used NZ spinach but you could swap it out for regular spinach, chard, or any other leafy greens you have growing in the garden.
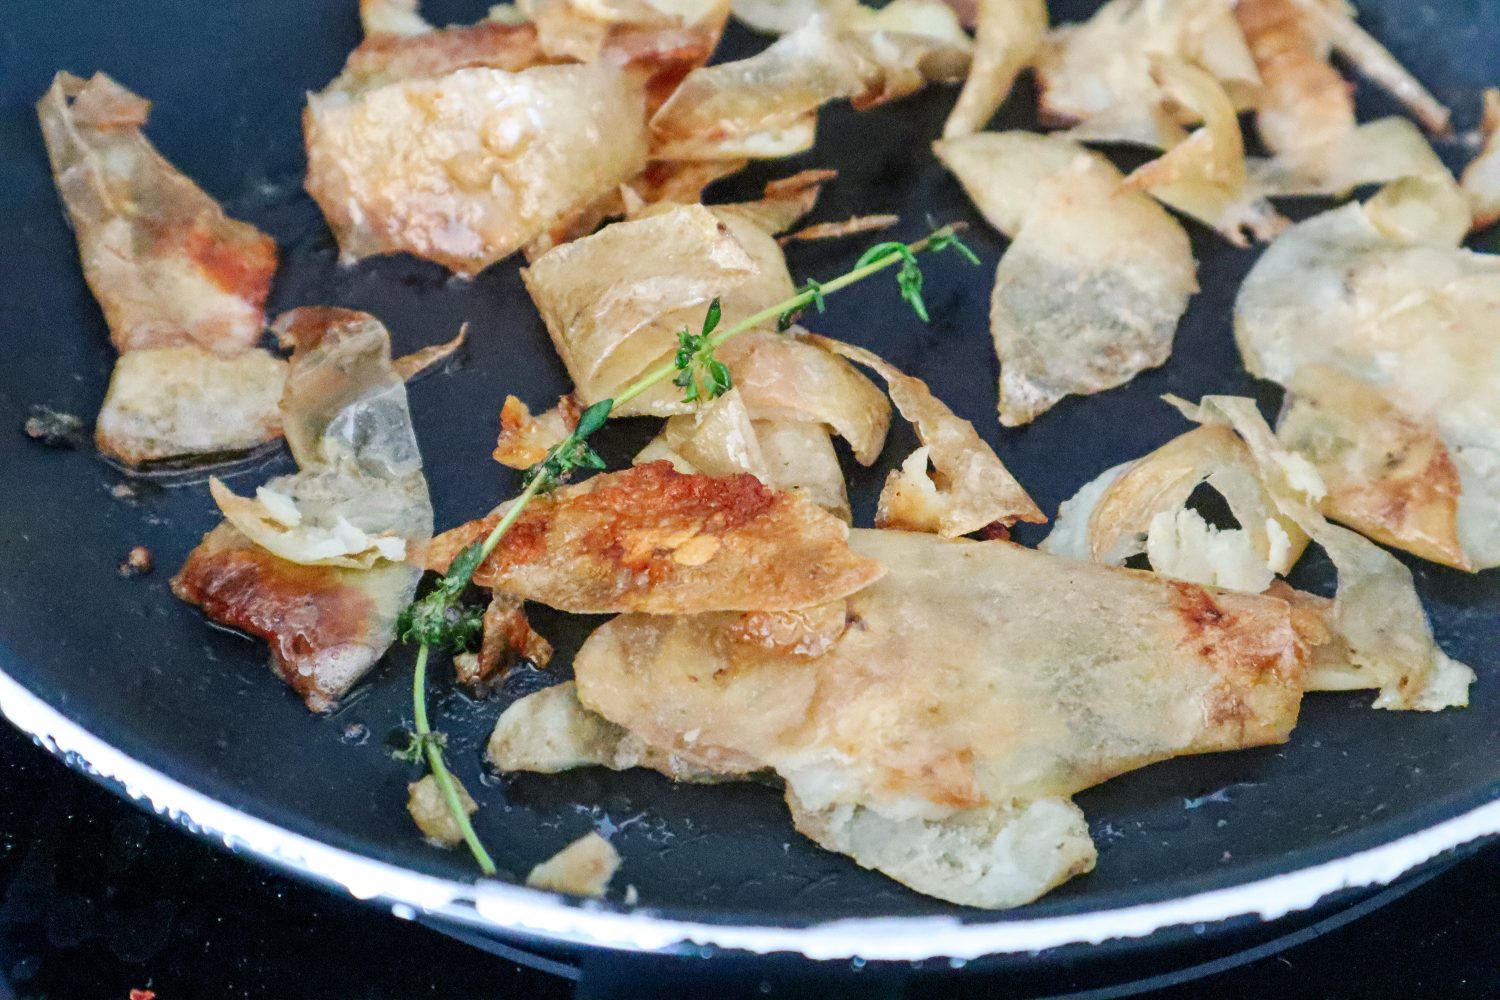
Most recipes call for the skins to be removed so after the potatoes are baked we fry them up and add them on top for a low-waste delicious meal!
Which Potatoes work best?
Floury potatoes work best (not waxy) such as Desiree, Yukon Gold, and Creme Royle. AVOID – Red Royle, Kipler. Normal “white potatoes” at the supermarkets tend to be quite waxy. This means your gnocchi will have more little lumps in but still possible.
Can I use different greens?
Yes! I love my recipes to be flexible with what is in season and growing in my garden. Try swapping NZ spinach for: Chard (remove stalks and fry them up to add to the dish), other spinach varieties, Kale, Beetroot leaves, Sweet potato leaves, or a mixed combination!
NZ Spinach Gnocchi with Crispy Potato skins
Yield: serves 4
Prep Time: 45 minutes
Cook Time: 1 hour30 minutes
Total Time: 2 hours15 minutes
Soft pillowy spinach gnocchi with crispy potato skins. Serve with herbed butter or the simple roasted tomato sauce recipe. Delicious!
Ingredients
Spinach Gnocchi
4 medium-large potatoes (see notes)
2 cups NZ Spinach (or other leafy greens such as chard or spinach)
1 1/4 cups flour (see notes)
1 tsp salt
Crispy Potato Skins
1-2 sprigs of fresh Thyme
1 TBSP Butter
Instructions
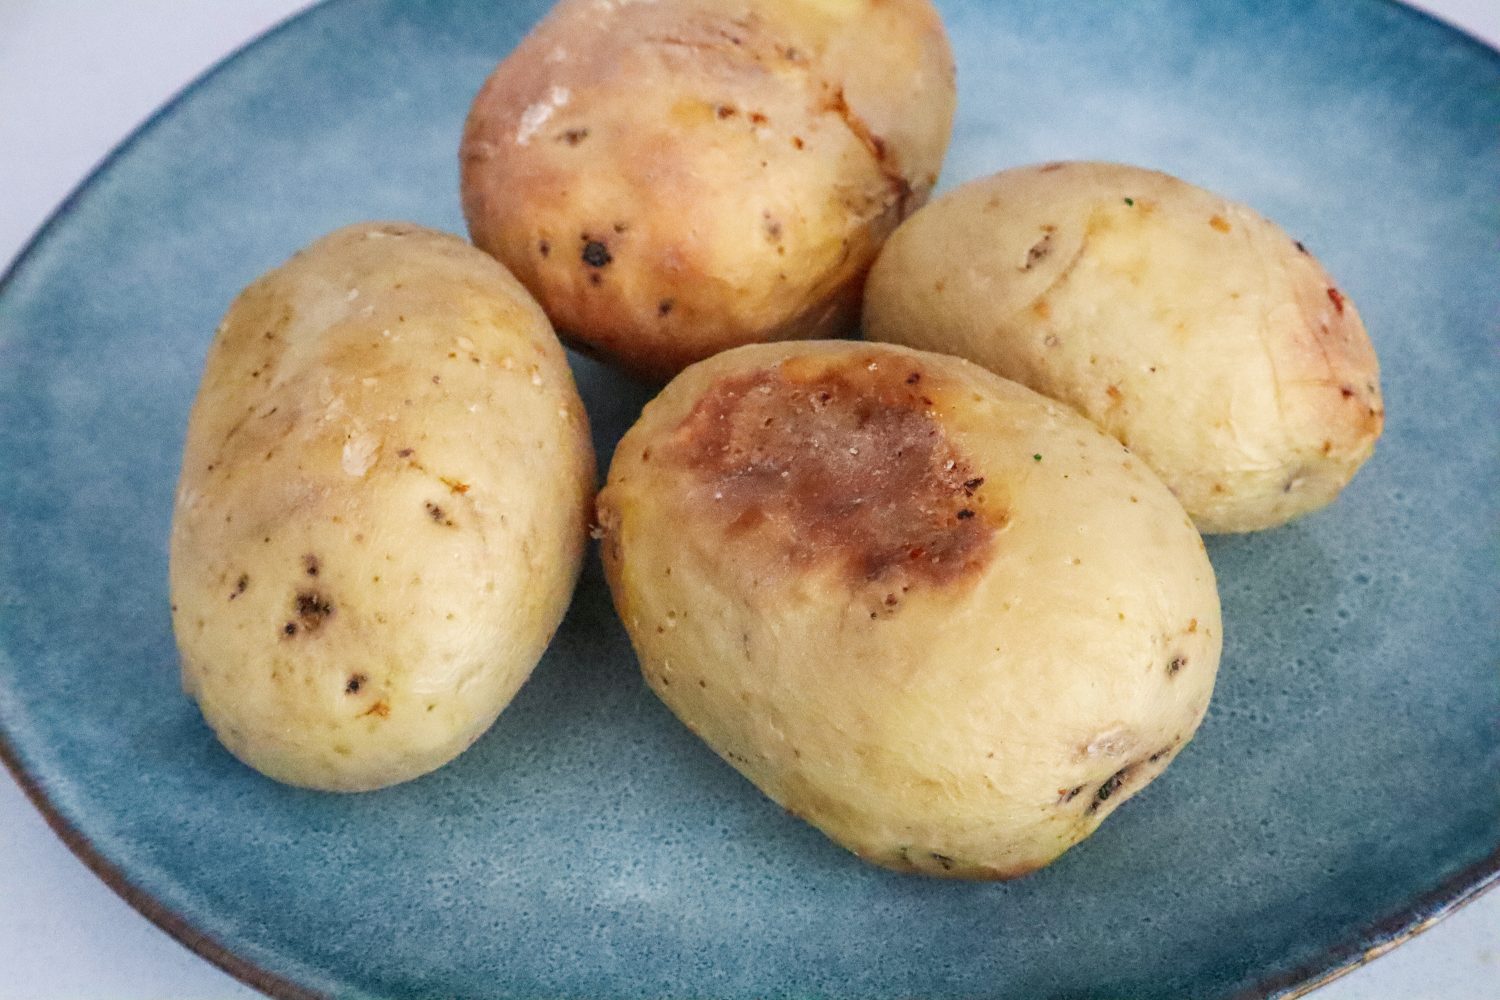
Preheat oven to 180 degrees. Wash your potatoes and stab holes all over with a fork. Sprinkle with 1/2 tsp of salt and bake for 45-1hour or until a fork easily goes right through. If some are larger than others keep them in a little longer. You don't want any hard potato bits for this.
While the potatoes cook blanch your greens. Remove hard stems and cook them in simmering water until vibrant green (40 seconds - 1 minute) then plunge into a bowl of iced water. Strain and blitz using a blender or mixer until a puree. Add a splash of water if needed to get blended.
Remove potatoes from the oven and allow them to cool (until you can easily peel them).
Peel the skins off using a knife or just peel them back with your fingers. They are quite easy to peel once the skin is cooked and slightly golden. Don't waste these delicious skins! Put them on a plate and set them aside.
Mash the potatoes into a fine mash. Use a potato ricer or a potato masher and fork to get all the little lumps out.
Add mashed potato to a bowl and mix in 1/2 cup of greens puree and 1 tsp salt. Mix until fully combined.
Add in flour in parts and mix to form a dough. You may need a little less or a little more flour depending on how much moisture was in the potatoes and greens. You want it to still be slightly sticky but easy enough to roll. Similar to cookie dough. The more flour you add the tougher they get so try to keep less is more approach but it needs to be workable.
Divide the dough into 1/4s and roll long sausage lengths onto a floured surface. Cut into 1-inch lengths.
Have a floured tray or plate ready to put your finished gnocchi on.
Using your thumb push down and roll each gnocchi piece over the back of a fork or a gnocchi board ($4 at most kitchen stores) to create the lines. This is optional. The lines make them look the part and also allow more space for flavour to cling to.
In a pan add butter and thyme and fry potato skins until crispy. Set aside.
There are two ways to cook gnocchi - boiled or pan-fried, both are delicious. For this recipe, I used the boiling method because I was serving it with crispy potato skins. To boil add your gnocchi to a pot of boiling water seasoned with salt. Cook until they float to the surface (roughly 1 minute). Do this in batches so you don't overcrowd the pot and all the gnocchi have room to float to the surface. Strain and add to a serving bowl. To pan fry - add butter or oil to a pan (chuck in some more thyme and cook the gnocchi until slightly golden on each side)
Pour over hot tomato sauce or herb-infused brown butter and top with crispy potato skins.
Notes
Make the tomato sauce at the same time while you wait for your potatoes to cook. Tomatoes can be roasted in the oven along with the potatoes.
Choosing potatoes - Floury potatoes work best (not waxy) such as Desiree, Yukon Gold, and Creme Royle. AVOID - Red Royle, Kipler. Normal "white potatoes" at the supermarkets tend to be quite waxy. This means your gnocchi will have more little lumps in but still possible.
Flour - low protein flour is best for Gnocchi but all-purpose flour also works.
Made extra? Freeze your uncooked gnocchi pieces on a floured tray and once frozen add them to a freezer bag or container. Next time you want a meal simply pull out and boil from frozen or defrost and panfry.
Simple Roast Tomato Sauce
Yield: 2 cups / 400-500g
Prep Time: 10 minutes
Cook Time: 45 minutes
Additional Time: 5 minutes
Total Time: 1 hour
Simple and delicious tomato sauce. Staple condiment and the backbone of so many garden-to-plate dishes!
Ingredients
6-8 medium tomatoes (or 2-3 cups of cherry tomatoes)
2-3 Garlic cloves
1 tsp salt
4 TSBP Olive oil
1 medium brown onion
1 TBSP Balsamic vinegar
5-6 sprigs of fresh thyme (2inch long)
1/2 cup fresh basil
1/2 tsp chilli flakes
Instructions
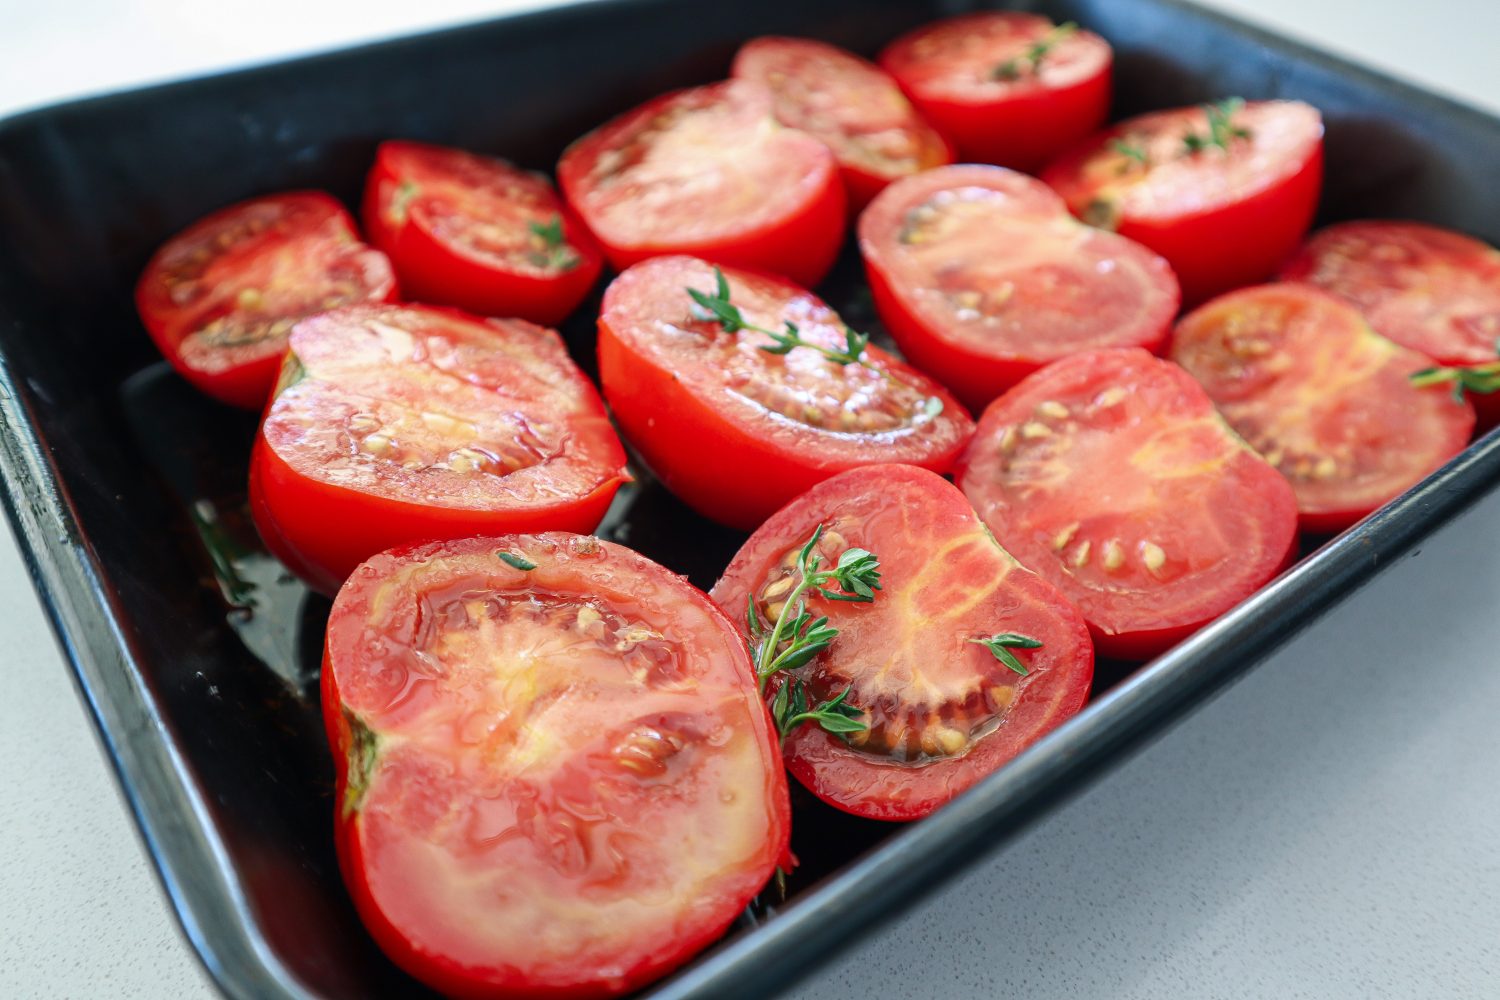
Preheat oven to 180 degrees Celcius. Drizzle roughly 1 TSBP oil in a roast dish.
Cut tomatoes in half and add to the roasting dish skin side down. Add Garlic cloves (skin on) and thyme throughout the tomatoes.
Drizzle another TBSP of olive oil on top and season with salt.
Roast for 40-45 minutes until cooked and slightly golden. Time will be significantly less for cherry tomatoes (20 minutes).
While the tomatoes are roasting, dice the onion and add to a pan with 1 TBSP olive oil. Cook until soft and slightly brown. Pour in the balsamic and deglaze the pan (get all the delicious flavour off the bottom). Remove from the heat.
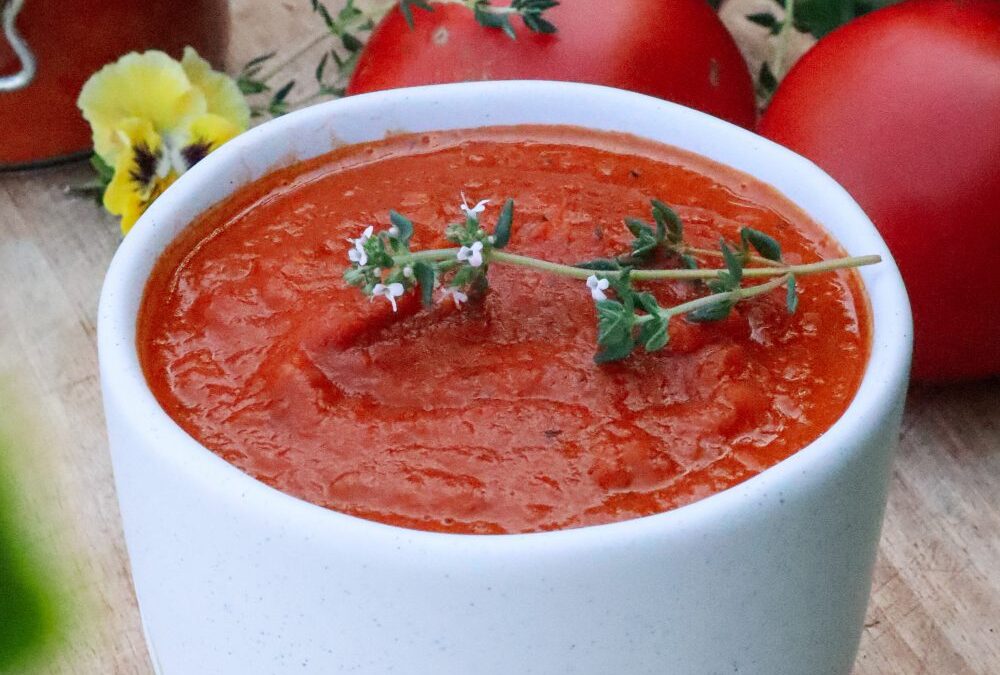
Remove the garlic from the skins and add the roasted ingredients to a blender (or jug and use a stick mixer). Allow the tomatoes to cool slightly before blitzing so the mixture isn't piping hot. Add in the chopped fresh basil, chilli flakes, and cooked onions. Blitz to combine. Smooth or chunky however you prefer.
Taste and season with extra salt or chilli to your liking.
Notes
Tomatoes will have varying amounts of liquid. If you get a lot of liquid in the bottom of the roasting dish, pour some to the side and blitz then add if you want a runnier sauce.
Add excess to a jar and keep in the fridge for 2-3 days or freeze for longer storage.
There is nothing quite like the taste of homemade tomato sauce! This recipe is so easy – basically, just cook and blitz and you have the most incredible tomato sauce to pour over pasta, pizza base, or dip crunchy potato wedges into. Add fresh herbs from your garden and it’s a winning combo. Try this sauce poured over spinach gnocchi for a mouth-watering garden-to-plate dinner.
Simple Roast Tomato Sauce
Yield: 2 cups / 400-500g
Prep Time: 10 minutes
Cook Time: 45 minutes
Additional Time: 5 minutes
Total Time: 1 hour
Simple and delicious tomato sauce. Staple condiment and the backbone of so many garden-to-plate dishes!
Ingredients
6-8 medium tomatoes (or 2-3 cups of cherry tomatoes)
2-3 Garlic cloves
1 tsp salt
4 TSBP Olive oil
1 medium brown onion
1 TBSP Balsamic vinegar
5-6 sprigs of fresh thyme (2inch long)
1/2 cup fresh basil
1/2 tsp chilli flakes
Instructions
Preheat oven to 180 degrees Celcius. Drizzle roughly 1 TSBP oil in a roast dish.
Cut tomatoes in half and add to the roasting dish skin side down. Add Garlic cloves (skin on) and thyme throughout the tomatoes.
Drizzle another TBSP of olive oil on top and season with salt.
Roast for 40-45 minutes until cooked and slightly golden. Time will be significantly less for cherry tomatoes (20 minutes).
While the tomatoes are roasting, dice the onion and add to a pan with 1 TBSP olive oil. Cook until soft and slightly brown. Pour in the balsamic and deglaze the pan (get all the delicious flavour off the bottom). Remove from the heat.
Remove the garlic from the skins and add the roasted ingredients to a blender (or jug and use a stick mixer). Allow the tomatoes to cool slightly before blitzing so the mixture isn't piping hot. Add in the chopped fresh basil, chilli flakes, and cooked onions. Blitz to combine. Smooth or chunky however you prefer.
Taste and season with extra salt or chilli to your liking.
Notes
Tomatoes will have varying amounts of liquid. If you get a lot of liquid in the bottom of the roasting dish, pour some to the side and blitz then add if you want a runnier sauce.
Add excess to a jar and keep in the fridge for 2-3 days or freeze for longer storage.
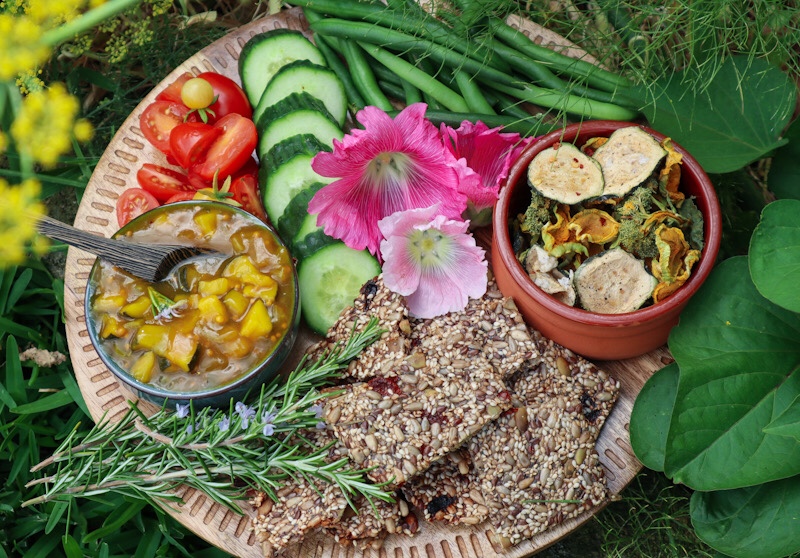
Make the most of your abundant Cucumber harvest with these delicious, quick, and easy refrigerator pickles. Turmeric has anti-inflammatory properties and the Apple Cider Vinegar has anti-microbial properties and anti-oxidants. These quick pickles are great for adding to sandwiches, salads, burgers, and of course a cheese platter!
Quick Sweet & Sour Turmeric Pickles
Yield: 2 jars
Prep Time: 10 minutes
Cook Time: 3 minutes
Additional Time: 2 days
Total Time: 2 days13 minutes
Sweet and sour Refridgerator pickles are so quick and easy to make!
Ingredients
2-3 Medium Cucumbers or two jars of whole small pickling Cucumbers
1 cup Apple Cider Vinegar
1 cup Water
1 TBSP Mustard Seeds
2 TBSP Sugar
1 tsp Salt
1 tsp ground Turmeric powder
Instructions
Sterilise your jars by heating them in the oven face down at 120degrees Celsius or in the dishwasher on high heat. Sterilise the lids in a bowl by pouring boiling water on them.
In a saucepan add your vinegar, water, sugar, turmeric, salt, and mustard seeds (*optional chili flakes see notes) and bring to a simmer.
Slice your Cucumbers into spears or round slices and place them in the clean jar.
Pour over your pickling liquid and secure the lid. Carefully place the jar upside down to cool. This helps create a secure seal.
Once the jars are close to room temperature, turn them up the right way and add them to the refrigerator.
They will be ready to eat after 48 hours and use within a month or two.
Notes
Add sliced Red Onion, Dill, or Chilli flakes to your cucumber pickles for extra flavour.
This recipe also works with Zucchini in replace of Cucumbers too.
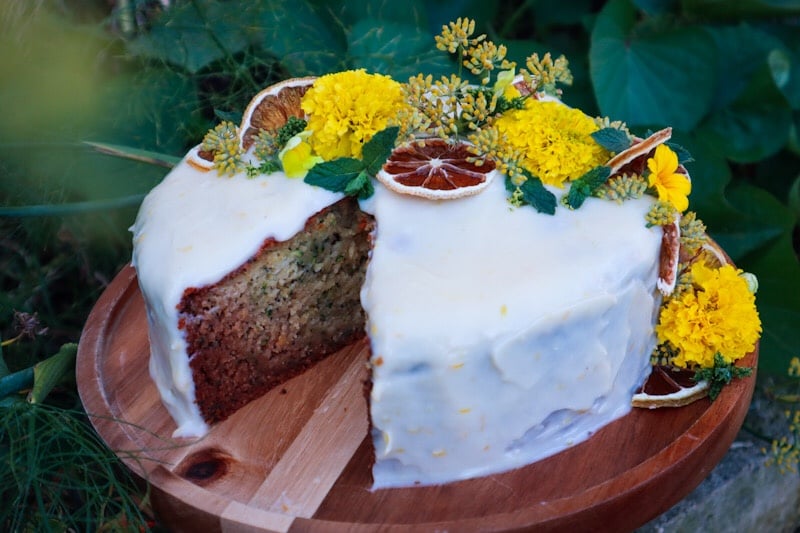
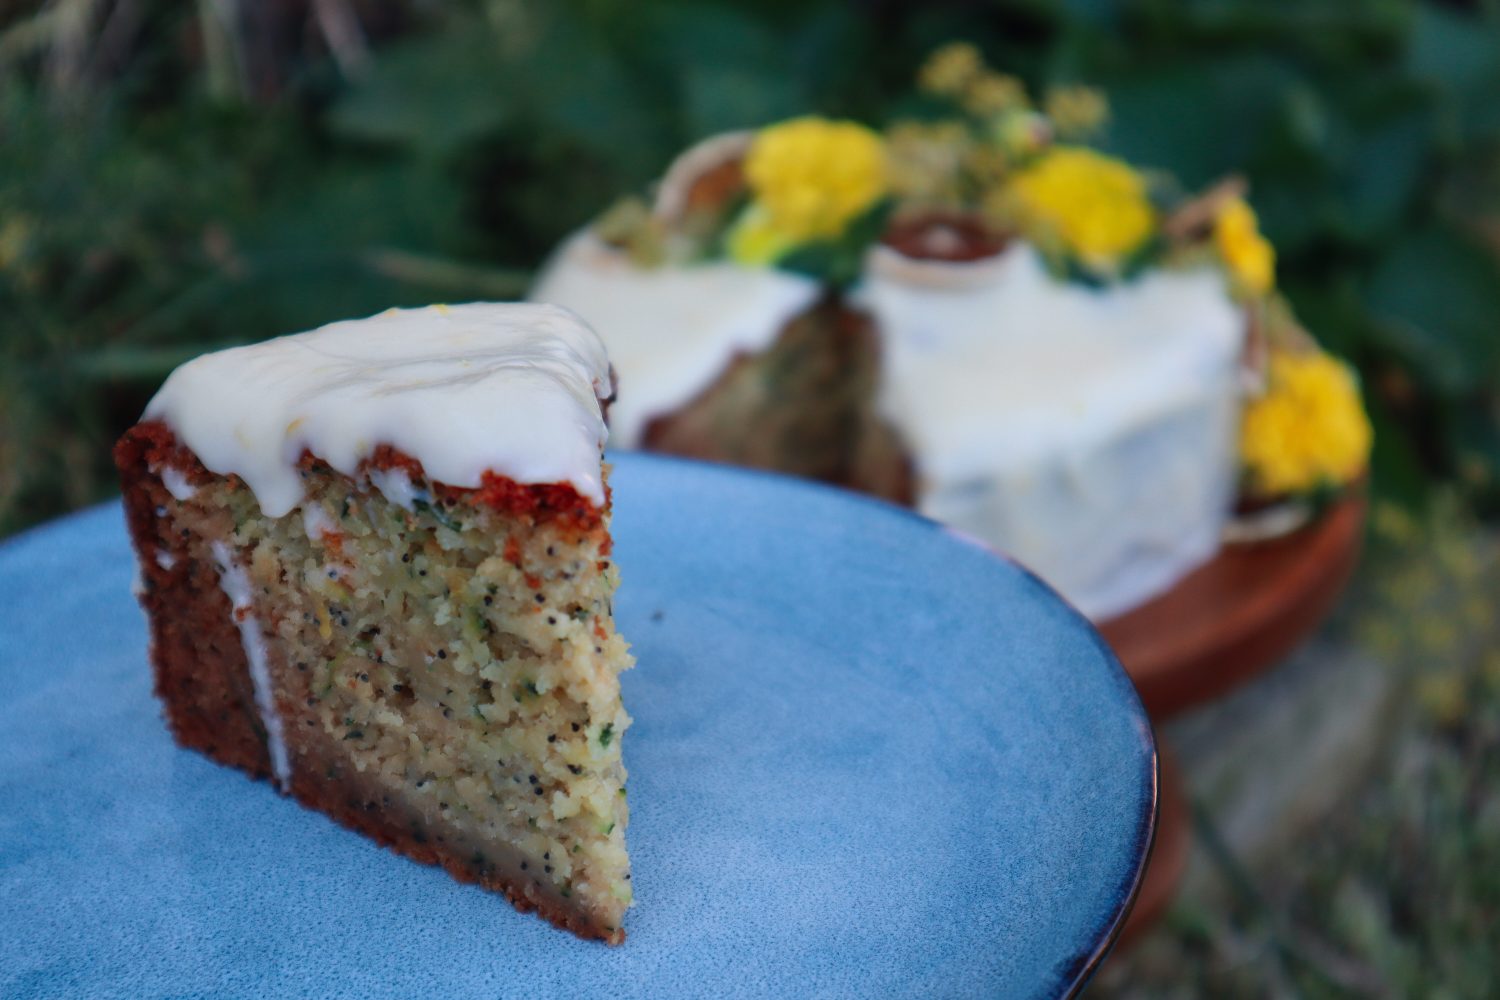
Zucchini are ready and abundant during the warmer months of summer which co-insides with a season of celebrations and events. This Lemon and Poppy Seed Zucchini cake is perfect for any occasion. Light, fresh and easily adaptable to seasonal flavours and fruits.
Lemon and Poppy Seed Zucchini Cake
Prep Time: 10 minutes
Cook Time: 40 minutes
Additional Time: 5 minutes
Total Time: 5 minutes
Ingredients
2 1/2 cups Plain Flour
2 tsp Baking Soda
1/4 tsp Baking Powder
1 Lemon
2-3 Zucchini (3 cups grated with the moisture removed)
3/4 cup Vegetable Oil
1 cup Sugar
1/4 cup Honey
1 tsp Vanilla Essence
3 Eggs
1 TBSP Poppy Seeds
1 tsp salt
extra salt for zucchini (1/4 tsp)
Icing
250g Cream Cheese
1 TBSP Lemon zest
2 TSBP Lemon Juice
1 cup of Icing Sugar
Instructions
Wash and grate the zucchini into a bowl. Sprinkle with roughly 1/4 tsp salt and mix through. Allow to sit while you prepare the other ingredients.
Preheat oven to 175 degrees celsius. In a bowl mix flour, baking soda, baking powder, poppy seeds, and salt and set aside.
In a mixer (or bowl with a whisk) add eggs beat until frothy. Add in the sugar, oil, vanilla, zest, and juice of one lemon. Whist until combined. Gradually add to the flour mix and stir to combine.
Strain and squeeze the extra moisture out of the zucchini using a sieve. Add 3 cups to the mixture and stir to combine.
Grease a cake tin (20cm). Pour in the cake mix and cook for 40 mins to 1hr or until a cake skewer comes out clean.
Remove the cake from the tin and allow to cool.
To make the Icing
Mix Icing ingredients together and ice the cake. Top with Dehydrated citrus and edible flowers.
Notes
To make a special occasion cake, make x2 cakes and add an extra layer of icing between them.
Zucchini are one of my favourite vegetables to grow because of their ease to grow and abundant harvests. They are such generous plants! The best thing about growing an abundance is that you can preserve the excess to use throughout the year. Harvesting and preserving your own Zucchini will allow you to build your self-sufficiency.
This Zucchini recipe is easy to make and you can adjust it to suit your harvest. Zucchini relish is a great addition to sandwiches or add it to a platter with all your delicious homegrown produce and homemade crackers. Zucchini pickle also makes great gifts! Sharing your delicious homegrown produce can help inspire others to grow their own too. Then you can swap and trade and support your friends and family.
Easy Zucchini Relish
Yield: 3 cups
Prep Time: 12 hours
Cook Time: 20 minutes
Total Time: 12 hours20 minutes
Ingredients
1 1/4 cup Apple Cider Vinegar
1 cup Raw Sugar
1/2 tsp ground Tumeric
1/2 tsp dried Chilli flakes ( or more to your taste)
2 tsp dried Mustard Seeds
1 TBS Salt
3-4 medium Zucchini
1 medium- large Onion
3 tsp Cornflour
Instructions
Wash and dice your Zucchini and Onion into small cubes. Place in an airtight container and sprinkle with salt. Mix in well, place on the lid, and add to the refrigerator for 12-24 hours to release the water.
Remove the Zucchini and onion mix from the fridge and strain off the excess liquid.
In a saucepan add the Vinegar, Sugar, Tumeric, Chilli, and Mustard Seeds. Bring to a simmer and stir for 2 minutes. Then add the Zucchini.
Allow to cook down slightly for 15-20 minutes, stirring regularly.
Remove a TBSP or so of the liquid and mix with the cornflour to make a paste. Return this back into the saucepan to thicken the Relish.
Sterilize your jars by either running through a hot dishwasher or in the oven at 110degrees for 15minutes. Sterilize the lids in boiling water.
Pour your zucchini mix into the hot jars and secure the lid. Place the jars upside down to cool. This helps them seal. Once the jars have cooled down, place them in the refrigerator. Enjoy!!
For long-term storage only cook the zucchini mix for 10minutes then add to jars. Process the jars in a boiling water bath for 10minutes.
Notes
For added colour and flavour you can also add Capsicum into the mix.
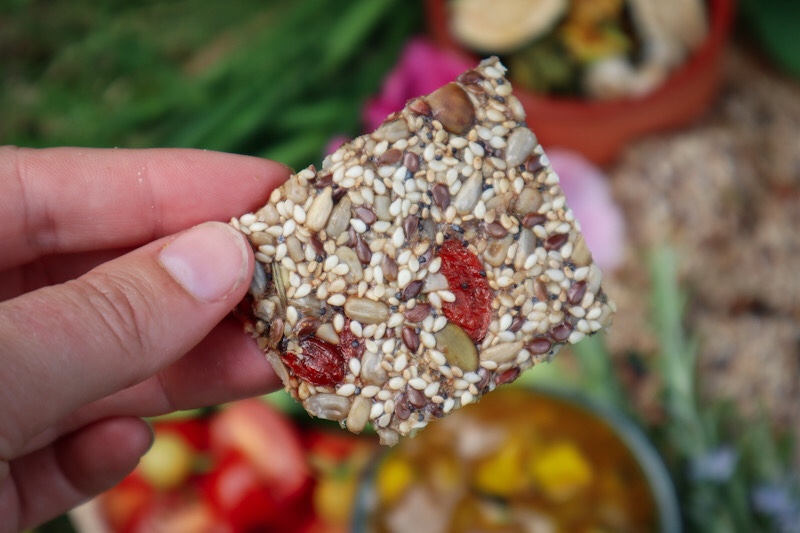
Crackers are such an easy snack to grab and these Super Seed Crackers are also very easy to make. Having easy staple recipes on hand can help you make the most out of your produce. These Crackers also look amazing bundles up and given to friends.
Simply add these crackers to a plate full of fresh fruit and veggies from your garden, along with some delicious relish or garden pesto and you have a winning platter.
Super Seed Crackers
Prep Time: 25 minutes
Cook Time: 1 hour
Total Time: 1 hour25 minutes
Easy and delicious super seed crackers. The ultimate summer platter addition. Serve with relish or pesto straight from the garden to the plate.
Ingredients
1 1/2 cups Sunflower Seeds
1/2 cup Pumpkin Seeds
1/2 cup Linseeds
1 TBSP Poppy Seeds
1/3 cup dried Goji Berries
2 tsp dried Rosemary (1 tsp if store bought)
2 TBSP Chia Seeds
1 Cup Sesame Seeds
2 TBS Psyllium Husks
2 1/4 Cups of Water
Instructions
Add all the ingredients to a bowl and mix to combine.
Allow to sit for 20mins to become a thick mixture.
preheat the oven to 150degrees celsius.
Pour half the mix onto baking paper and place another sheet on top. Roll out to form a thin layer then remove the second sheet of baking paper. Place on an oven tray and repeat with the second half of the mixture.
Bake for 1 hour or until slightly golden.
Remove and cool then slice into your desired cracker size shapes. Store in an air tight container.
Notes
Swap out the Goji berries with your favourite dried fruit. Mix it up!
Cornflour can be used as a substitute for Psyllium husks, you may need to add a little more. Also, mix it with a little water to form a paste before adding it to the mix.