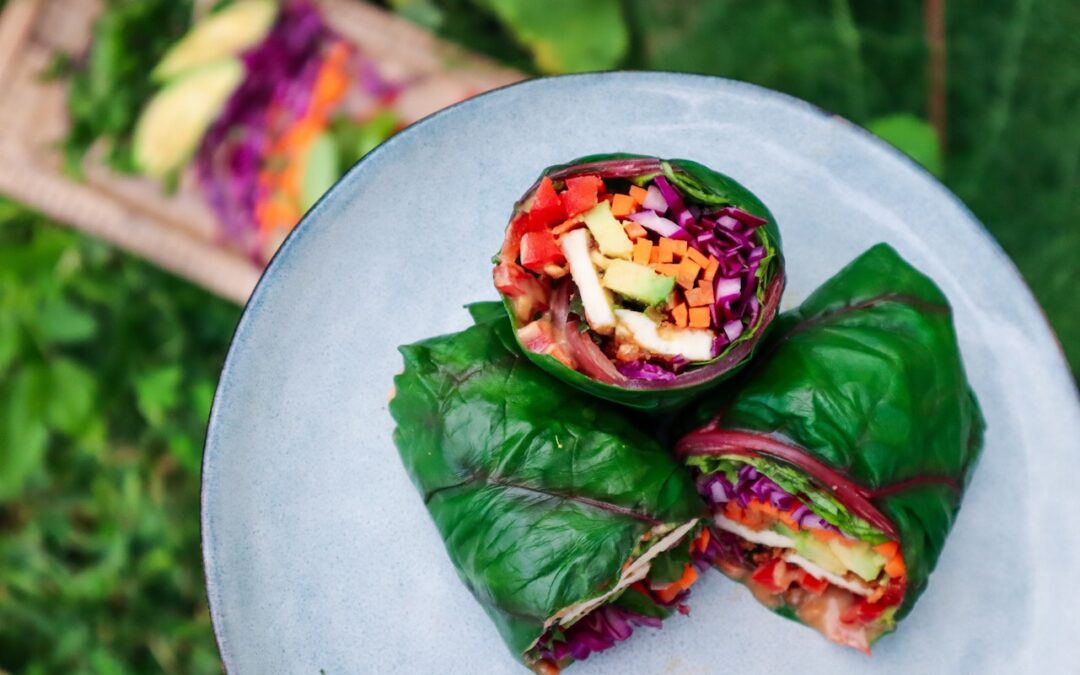
Satay Rainbow Rolls

Satay Rainbow Rolls

Satay Rainbow Rolls are healthy, delicious and so easy to make! Once you master the rolls you can mix and match ingredients with what is fresh and growing in your garden. Plus, feel free to swap the halloumi for your favourite protein. These Rainbow Rolls are made using Rainbow Chard but you could also use large Beetroot leaves, Cauliflower leaves, Broccoli leaves, Spinach or even Cabbage leaves. It is important to have flexible recipes that you can make using what you have available in your garden and these rainbow rolls are definitely a versatile option for your Garden to Plate meals.

satay rainbow roll

Satay Rainbow Rolls

Prep Time: 35 minutes
Cook Time: 2 minutes
Total Time: 37 minutes

Ingredients

  • 3 Large Rainbow Chard leaves
  • 1 Carrot
  • 1 cup finely chopped Red Cabbage
  • 1 /4 of a Red Capsicum
  • 4 Lettuce leaves
  • 1/2 Avocado
  • 6 Strips of Haloumi (swap for Tofu or Chicken)
  • Small lemon wedge
  • 2 TBS Peanut Butter
  • 1 tsp Tamari (or soy sauce)
  • 1 tsp hot water
  • 1 tsp brown sugar

Instructions

  1. Mix peanut butter, tamari, water, and sugar in a small bowl until fully combined.
  2. Rinse Haloumi well in water, dry off and place on a plate to coat in a tsp of the Satay Sauce. Keep the remaining sauce for the rolls.
  3. Finely slice your cabbage. Peel and cut your carrots into fine sticks. Slice capsicum, avocado, lettuce, and any other fillings you want into small strips. Squeeze a little lemon onto the avocado to stop it from going brown.
  4. Rinse your Rainbow chard and remove the stems (keep these in a small jar of water and add to any other meal over the next day). Carefully slice off the back ridge of the stem so that it is thinner (see example image below).
  5. In a small pan lightly fry your halloumi until it is slightly golden. About 1minute on each side. Set aside to cool while you prepare the leaf wraps.
  6. Place a large pan of water to simmer. The pan needs to be big enough to fit your leaves. A wok or a wide frypan works best. Place a dish of water with a few ice cubes beside the stovetop to transfer the leaves to after they have blanched. Add your leaves one at a time to the simmering water for 40secounds and then transfer to the iced water. This will soften the leaves and keep them a vibrant green colour.
  7. Once they have cooled place them on a tea towel and carefully dry off the excess water.
  8. Lay the leaves flat with the top facing down. Add your filling to the widest part near the base of the leaves. Ensure there is about an inch of the empty leaf down the sides. Spoon on some sauce above the filling.
  9. Start rolling the leave from the base and then fold the left side in. Do a half roll again and add the right side. Carefully keep rolling and tucking the sides in as best you can. The bigger the leaf and the more room you have, the easier this will be. At the end, you may need to dab some water on the tip of the leaf to allow it to stick.
  10. Cut in half with a sharp knife and enjoy!

Notes

Additional filling options: Sprouts, Cucumber, Tomato, Egg, Radish, Corn, Chicken, Tofu,

Leaf Roll Alternatives: Broccoli, Cabbage, Spinach, Cauliflower, Beetroot

Preserved Lemons

Preserved Lemons

Preserved lemons is another great way to save and store your beautiful lemon harvests to use later in the year. Preserved lemons are easy to prepare and add a zesty, salty depth of flavour to your dishes. Plus they look beautiful lined up in jars. Preserved lemons can be used in many dishes such as pasta, fish, chicken, salads, salad dressing, dips, platters, salsa and rice dishes.

preserved lemons

Preserved Lemons

Prep Time: 10 minutes
Additional Time: 1 month
Total Time: 1 month 10 minutes

Store your lemon harvests to use throughout the year by making these preserved lemon jars.

Ingredients

  • 5 or more Lemons
  • 1 Cup Salt

Instructions

  1. Sterilize your jars in boiling water.
  2. Rinse your lemons and place them on a plate. Slice 3 or 4 lemons depending on how large your jar is. You will also need a couple of extra lemons at the end for extracting the juice.
  3. Cut the lemons lengthways into 4-6 wedges without cutting the whole way through. Leave a cm at the bottom to keep the wedges attached at the base.
  4. Add 1TBSP of salt to the bottom of the jar.
  5. Add 1TBSP of salt to each lemon and gently squeeze them to absorb the salt.
  6. Add your lemons to the jar and squish them down to try and fill up as much space as you can.
  7. Add the remaining salt on top and any salt and liquid leftover on the plate they were cut on.
  8. The lemons will start to release their liquid but you may need to top up the jar with extra lemon juice and salt. You want to make sure your lemons are covered in liquid. Push down on the lemon and this will help release more liquid.
  9. Secure your lids ensuring the salt mixture doesn't touch any metal part of the lid as you don't want any corrosion. Keep your jars somewhere cool and dark. They will be ready to eat after 1 month but they can be preserved for years to come. Refrigerate after opening.

Notes

Add spices to mix up your flavours such as bay leaves, fennel seeds, chilli, coriander seeds, cloves.

preserved lemons
Vegan Beetroot Choc Chip Cookies

Vegan Beetroot Choc Chip Cookies

Beetroot is one of my favourite veggies to cook with. It is so versatile and can be used for both sweet and savoury dishes. Beetroot has also a vibrant natural pigment that I just can’t get enough of! Plus Beetroot is also a great source of fibre, folate (vitamin B9), manganesepotassiumiron, and vitamin C. Dark chocolate and beetroot go so well together and these choc chip cookies are so delicious. Plus with all the choc chippies the beetroot taste is very mild. The beetroot puree helps bind and keep the cookies moist plus the colour is just something else!

beetroot cookies
Vegan Beetroot Choc Chip Cookies

Vegan Beetroot Choc Chip Cookies

Yield: 15 cookies
Prep Time: 30 minutes
Cook Time: 15 minutes
Additional Time: 10 minutes
Total Time: 55 minutes

Ingredients

  • 2 cups Plain Organic Flour
  • 1 tsp Baking Powder
  • 1/2 tsp salt
  • 1/2 cup sugar
  • 1/2 cup brown sugar (or coconut sugar)
  • 1/2 cup coconut oil
  • 1 medium beetroot
  • 1/2 cup dark vegan choc chip
  • 1/2 cup white vegan choc chip

Instructions

  1. Cut the Beetroot into 4- 6 pieces, place in a saucepan and add enough water to just cover the pieces. Lightly simmer until you can pierce with a folk. Keep the water in and set it aside to cool.
  2. In a mixing bowl add the sugar, salt and oil and mix to combine. Add 1 TBS of the water from the beetroot pot.
  3. Add the beetroot to a blender or Nutribullet. Add a few teaspoons of the water from the saucepan. Enough to help it combine into a puree. Blend and add extra liquid if needed.
  4. Add the beetroot Puree into the sugar and oil and mix to combine. sift and add flour and baking powder. Gently mix with a wooden spoon or spatular to combine. Don't over mix.
  5. Add your choc chips and gently stir through.
  6. Place the mix in the fridge to cool for 10-20mins.
  7. Preheat the oven to 180 degrees Celcius and place baking paper on a tray or grease the tray.
  8. Make tablespoon-sized balls and place them on the tray leaving at least 5cm in between each one. Press down gently with a fork and bake for 12-15mins until slightly golden.
  9. Enjoy!