Quick-pickled asparagus is one of my favourite ways to preserve the fresh, crisp flavour of a spring harvest. If you’re lucky enough to have an abundance of asparagus—either from your own garden or a market haul—this easy refrigerator pickle is a simple, satisfying way to make the most of it. These pickles are crunchy, tangy, and packed with flavour, making them perfect for snacking, adding to grazing boards, or tossing into salads and wraps.
Refrigerator Pickles are Great for Beginners
Refrigerator pickles are one of the easiest ways to experiment with preserving at home—no canning or complicated steps needed. This recipe uses a basic hot brine made with apple cider vinegar, water, a little sugar or honey, and salt. Mustard seeds add a subtle zing, while red onion (or shallot), dill, and optional chilli give the spears depth and a burst of visual appeal.
Preparing the asparagus is simple: just snap the ends at their natural breaking point and trim them to fit your jar. You can even add the leftover ends into the jar—they soak up the flavour just as well and help minimise waste.
Once packed into a sterilised jar and covered with the hot brine, the pickled asparagus just needs time to chill in the fridge. After 24 hours, the flavours will develop beautifully, and they’ll be ready to enjoy. These will keep for up to a month in the fridge, though they rarely last that long in my house!
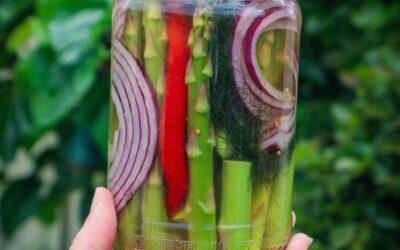
Easy Refrigerator Pickled Asparagus Spears
Prep Time: 10 minutes
Additional Time: 1 day
Total Time: 1 day10 minutes
Quick and easy way to extend your Asparagus harvest. Add other in-season veggies or herbs to the mix. Enjoy as a snack or added to wraps and sandwiches.
Ingredients
1 cup water
1 cup ACV
1 bunch asparagus
2 TBSP sugar (or honey)
1/2 TSP salt
2 tsp mustard seeds
2 sprigs dill or fennel frond
2 red chilli (optional for spice)
1/4 red onion sliced or 1 shallot
Instructions
Clean and sterilize a Jar (approx 700gram).
Rinse Asparagus and hold the bottom to snap the spear at the freshest part. Cut fresh spears to fit in the height of your jar.
Stack spears the jar. The excess cuts can also be added. Push dill, onion and chilli in the jar and add mustard seeds.
In a saucepan add water, vinegar, sugar (or honey), and salt. Bring to a simmer or until sugar is dissolved.
Add the hot liquid to the jar. The liquid should completely cover the spears. Secure the lid and flip it upside down to help seal. Leave on the bench until cool (room temperature). Place in the refrigerator for at least 24/hours before eating. Eat within 1 month.
Final Tip
Try swapping out the dill for fennel fronds or tarragon for a twist, or add garlic cloves for extra bite. It’s a quick, easy way to enjoy asparagus long after the season is over.
Links included in this post might be affiliate links. If you purchase a product or service with the links that I provide I may receive a small commission. There is no additional charge to you! Thank you for supporting my blog so that I can continue to provide you with free content.
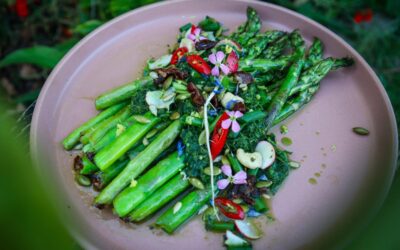
Fresh seared Asparagus topped with a delicious flavour-packed Radish top chimichurri and topped with crispy seeds. This Asparagus dish is quick and easy and makes a great Spring side dish to accompany your meals. Add fresh in-season herbs and greens to adapt to suit. This Chimichurri green sauce is one of my favourites and is packed with flavour! Asparagus is ready in Spring and is the perfect balance between a light yet hearty side dish. Top with radish flowers for a pop of spring colour!
Why You’ll Love This Recipe
Spring is all about fresh greens and easy meals, and this recipe ticks all the boxes. Asparagus is one of the first vegetables to pop up after winter and is always a sign that the garden is waking up. Cooking it simply—seared, grilled, or pan-fried—lets its natural flavour shine.
Pairing it with a chimichurri made from radish tops makes this dish both flavourful and low-waste. Radish greens are often overlooked, but they’re peppery, nutrient-rich, and perfect for green sauces like this.
Low-Waste, High-Flavour
This chimichurri can be adapted with whatever fresh herbs or leafy greens you have on hand—think parsley, coriander, lemon balm, or even carrot tops. A handful of toasted seeds (like sunflower or pepitas) adds texture, while soft, chewy dates bring a lovely balance of sweetness.
For a final flourish, top with delicate radish flowers or other edible blooms from your garden to highlight the beauty of spring produce.
Asparagus with Radish Top Chimichurri, toasted Seeds and Dates
Prep Time: 10 minutes
Cook Time: 5 minutes
Total Time: 10 minutes
Light, fresh, and packed full of flavour, this grilled Asparagus is the ultimate Spring side dish. Topped with crispy seeds, chilli, and dates for a sweet and spicy punch.
Ingredients
1 large bunch of Asparagus
1 red chilli
2 TSP seeds (sunflower and/or pumpkin)
1 tsp lemon zest
1 tsp Olive Oil
2 Pitted Dates
Radish top Chimichurri
1 cup greens (Medium - young leaves Radish leaves and Parsley)*
1 1/2 TBSP lemon juice
1 TBSP Red Wine Vinegar
1/4 cup Olive Oil
1 tsp Sugar
2-3 Garlic Cloves
Sea salt flakes to season
Fresh Red Chilli or 1/4 tsp chilli flakes
Instructions
Rinse Asparagus, hold the bottom, and bend to snap. The spears will snap at the freshest part. Add oil to a grill or fry pan and cook Asparagus until lightly charred, bright green, and still a little crunchy.
Add Greens (Radish tops and Parsley), Lemon juice, Vinegar, Sugar, and Garlic to a mixer or mortar and pestle. I prefer a mortar and pestle as I like it chunky and not to blended. Blitz or crush to combine and make a green sauce.
Then gradually add oil to combine. Add Chilli flakes and a pinch of Sea Salt Flakes. Taste and balance with more salt or sugar if needed.
Remove Asparagus from the pan when cooked and add in the seeds and sliced dates (optional for those that like a bit of sweetness). Lightly toast until slightly golden.
Add Asparagus to a plate and drizzle over the green sauce. Garnish with toasted seeds, sliced red chilli, lemon zest, and edible flowers (I used Radish and cornflowers)
Notes
Swap Parsley or Radish tops for Fennel fronds, Carrot tops, Corriander, or a mix.
A Celebration of Spring on a Plate
This dish is proof that you don’t need fancy ingredients to create something beautiful and delicious. It’s quick to throw together, makes use of food scraps that might otherwise be tossed, and looks stunning on the plate. Perfect for a shared meal, a garden lunch, or a seasonal celebration.
Links included in this post might be affiliate links. If you purchase a product or service with the links that I provide I may receive a small commission. There is no additional charge to you! Thank you for supporting my blog so that I can continue to provide you with free content.
Learn how to grow Asparagus and what to make with your abundant harvests. Asparagus (Asparagus officinalis) is a perennial vegetable and is a great long-term investment in your food production. Asparagus grows back each year and can produce for up to 30 years ( or longer). The great thing about Asparagus is it produces edible spears at the start of spring, which is often an “in-between” time in the garden when winter crops have finished and summer crops are not yet ready.
Asparagus does require its own spot in the garden, but it can also be grown successfully in a container garden.
Plant seeds in spring or dormant crowns late winter.
SOIL
Free-draining compost-rich soil.Slightly acidic.
LOCATION
Full sun – part. 6-8 hours.
CARE
Keep weed-free and well mulched.
FERTILISE
Feed with compost and composted manure late winter after fronts die off.
PESTS
Aphids, snails, slaters.
HARVEST
Harvest spears in spring choose spears thicker than a pencil.
REPRODUCE
Can be grown by seed but produce quickerby dividing crowns (roots)
Why Grow Asparagus at Home?
Here are some of the many reasons to grow Asparagus.
Hardy, low-maintenance vegetable
Perennial
Ornamental and edible
Prolific producer
Early Spring Harvest
Produces up to 30 years
High in Potassium
Great raw or cooked
Popular Asparagus Varieties to Grow
Mary Washington – Popular open-pollinated variety. Long, tender green spears. White spears can be produced if blocked from light.
Sweet Purple – Dark purple spears with 20% more sugar than the green variety. It is also less fibrous.
TOP TIPS ON HOW TO GROW ASPARAGUS
Choose a sunny locationthat can be a permanent home
Prepare soil with plenty of compost and well-composted manure.
Free-draining, slightly acidic soil
Grow from crowns for faster production
Feed with high nitrogen or compost at the end of winter before spring growth
Allow spears to grow into ferns for the first 2 years
Harvest the fattest spears and leave thin ones to go to ferns
Keep weed-free and well-mulched
When to PlantAsparagus?
If you are planting Asparagus from seed, sow seeds in Spring. Soak seeds in water for 2+ hours before planting for quicker germination. Seedlings can also be planted in spring. Established crowns should be planted while still dormant in late winter.
How to GrowAsparagus?
Choose a sunny location with 6-8 hours of sunlight.
Choose a location that can be a permanent home for the next 20+ years.
Be aware of surrounding trees that may grow to overshadow the asparagus patch.
Asparagus-like loose soil that is easy to burst through. Create mounts if you have hard or clay soils.
Prepare beds with plenty of compost and composted manure.
Plant 40cm apart
Give them a deep water.
Care/ Maintenance
Asparagus comes in both male and female plants. They both produce spears, but the males are said to be of higher quality. The female plants can be identified as they produce berries at the end of the ferns. These berries can be saved and will have seeds inside that can be planted.
Feeding
Feed with compost or composted manure at the end of winter. Remulch with lupin, pea straw or sugarcane.
Watering
Deep water, especially in summer.
Harvesting
Asparagus holds its energy in the crowns, so it is important to allow the patch to establish before harvesting. From seed, Asparagus should be left for the first 2-3 years. If growing from crowns, Asparagus can be picked sparingly over the first 1-2 years. Choose the fattest spears at least pencil-width thick. Let the thin spears turn to ferns to conserve energy in the crowns for winter.
Pruning
If left, the spears will turn into tall ferns. This is how the plant conserves energy and repopulates. It’s important to allow this for the first few years. The green ferns will turn yellow and die off during mid-late winter. They can then be pruned and used as mulch or added to the compost. Once pruned, add a fresh layer of compost around the bed and re-mulch. This will keep them warm over winter and add nutrients back to the bed ahead of spring.
Pests / Disease
Aphids, slugs, snails, and slaters may like your young spears. Check plants in early spring. Natural pest management. Spears can also be affected with rust. Allow good airflow.
How/ When to Harvest
Asparagus is ready in early spring. Choose the fattest spears, bigger than pencil width and 20 – 25cm tall. Use a sharp knife and cut just below the soil line. Allow thinner spears to grow into ferns.
Reproducing
Female plants will produce berries at the end of their ferns, which contain seeds. These can be planted to expand your Asparagus patch. Crowns can be split when dormant in winter to create new patches.
Cooking and Using
Asparagus can be eaten raw, cooked or preserved, pickled, and bottled.
Asparagus pairs well with:Mint, peas, rocket, dill, chives, cheese, eggs, cured meats, seafood, strawberry, raspberry, nuts, lemon, and potato