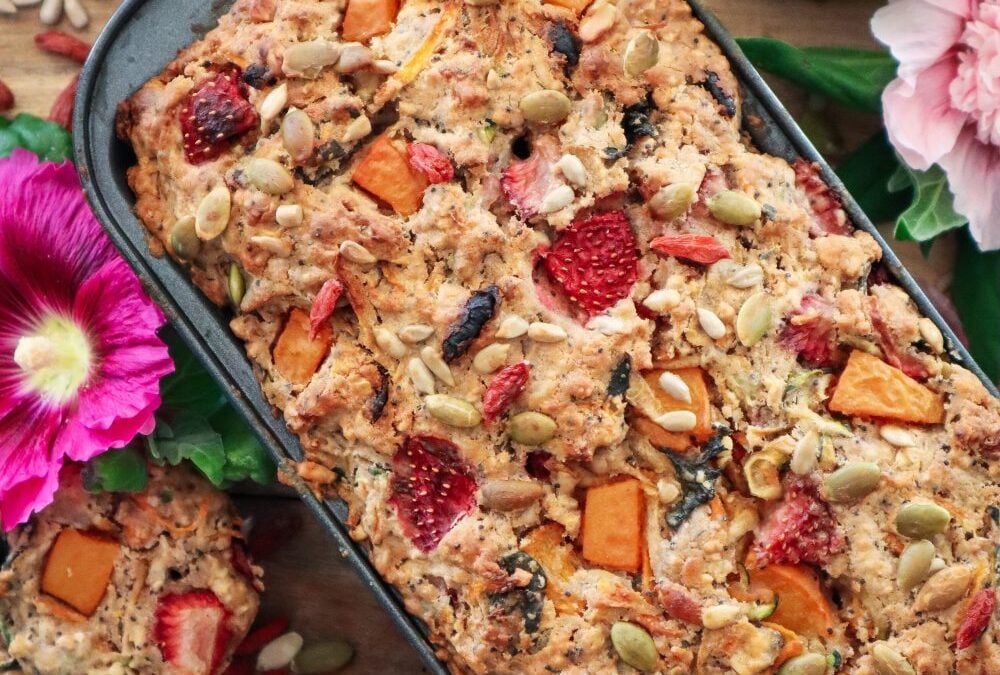
Have odd fruit and veggies to use up? This leftover breakfast loaf is a great way to reduce waste and make a delicious and healthy breakfast (or anytime) alternative. This recipe is flexible to allow a range of fruits, nuts, and seeds you have available.
Leftover Breakfast Loaf
Prep Time: 15 minutes
Cook Time: 45 minutes
Additional Time: 20 minutes
Total Time: 1 hour20 minutes
Have random odd fruit and veggies that need to be used up? This leftover breakfast loaf is a delicious way to make sure they don't go to waste.
Ingredients
Dry ingredients
2 cups flour
1 cup oats
1 tsp cinnamon
1 tsp mixed spice
1 TBSP Baking Powder
1/2 cup seeds (i used 50:50 pumpkin and sunflower)
1/2 cup walnuts (choose your favourite nuts)
1 TBSP Poppy Seeds
1/2 cup chopped mixed dried fruit (Goji berries, apricot, raisons)
Wet ingredients
1/2 cup coconut oil (liquid)
1/2 cup quality maple syrup
3/4 cup oat milk (or preferred milk)
Fruit & Veggies
1 cup grated zucchini
1 cup grated carrot
1 cup chopped greens/ spinach
1 cup grated pear (or apple)
1 cup diced Apricot & strawberry (swap for berries or cherries)
Instructions
Preheat oven to 180 degrees.
Mix dry ingredients in a bowl.
Grate and add chopped fruit and veggies to a bowl along with all the wet ingredients. Stir to combine.
Fold in the dry to the wet mix and combine with minimal mixing (don't over-mix).
Grease a loaf or bread tin and add in the mix. Bake for 45 minutes or until the skewer comes out clean.
If there is a little too much for the tin ( in my case) add to muffin trays (but these will only take 20 minutes).
Allow the tin to cool for 10 minutes then remove the loaf and cool for a further 10-15mins on a wire rack (do not slice straight out of the oven or it will fall apart and turn dry).
Notes
To freeze the extra loaf cut it into slices first and pop it in the compostable ziplock bags.
Mix and match fruit, veggies, nuts, and seeds to make your own delicious blends.
Frozen berries can be used add them in frozen don't thaw them out first.
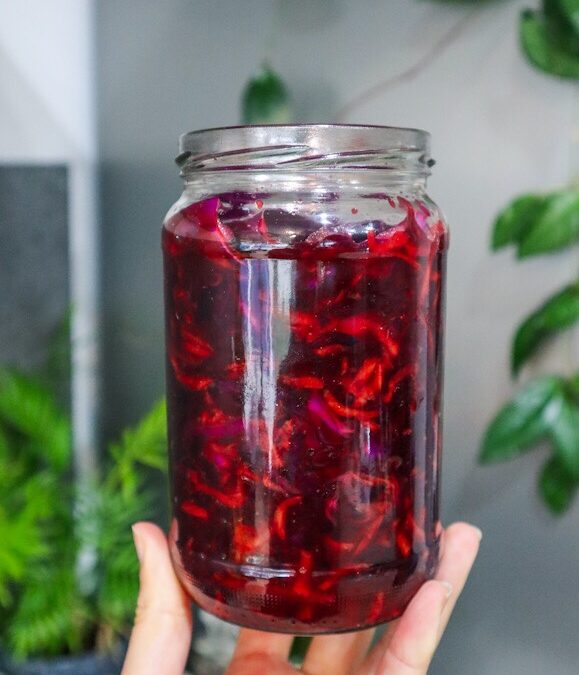
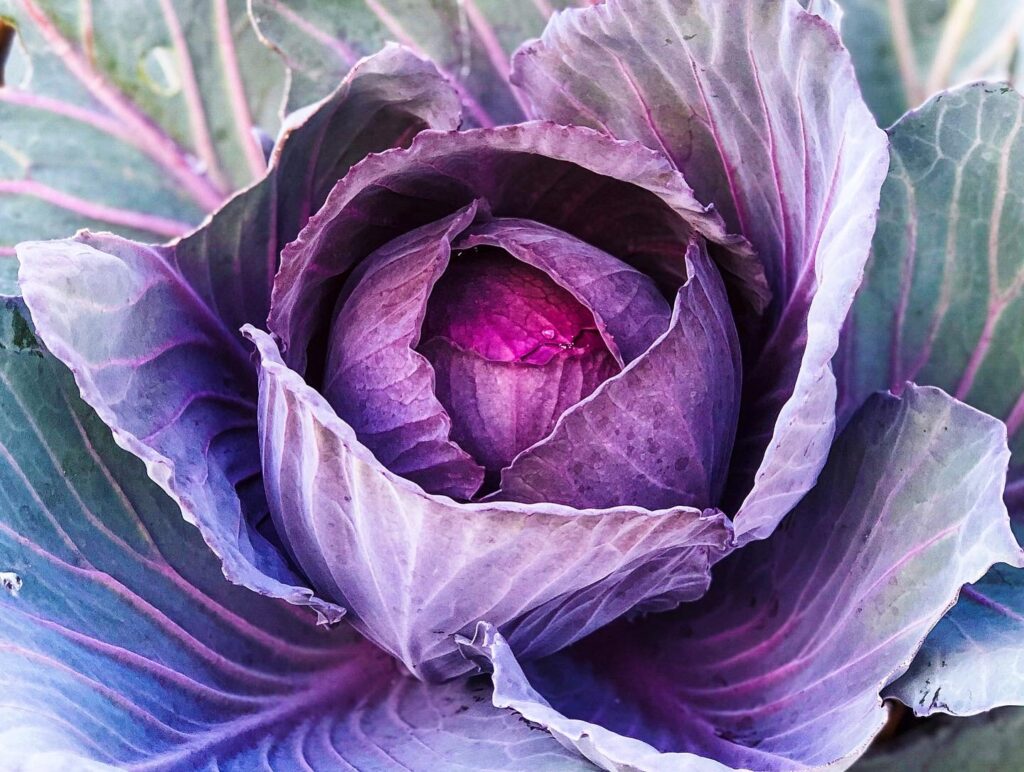
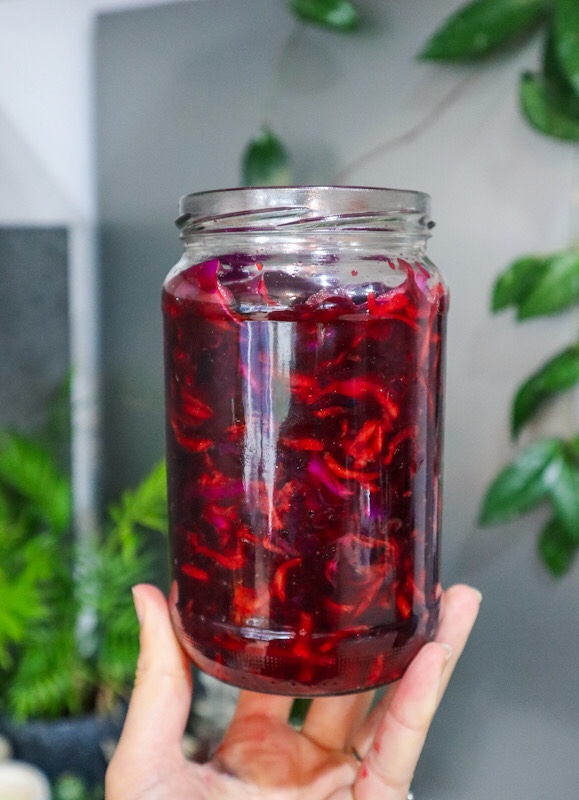
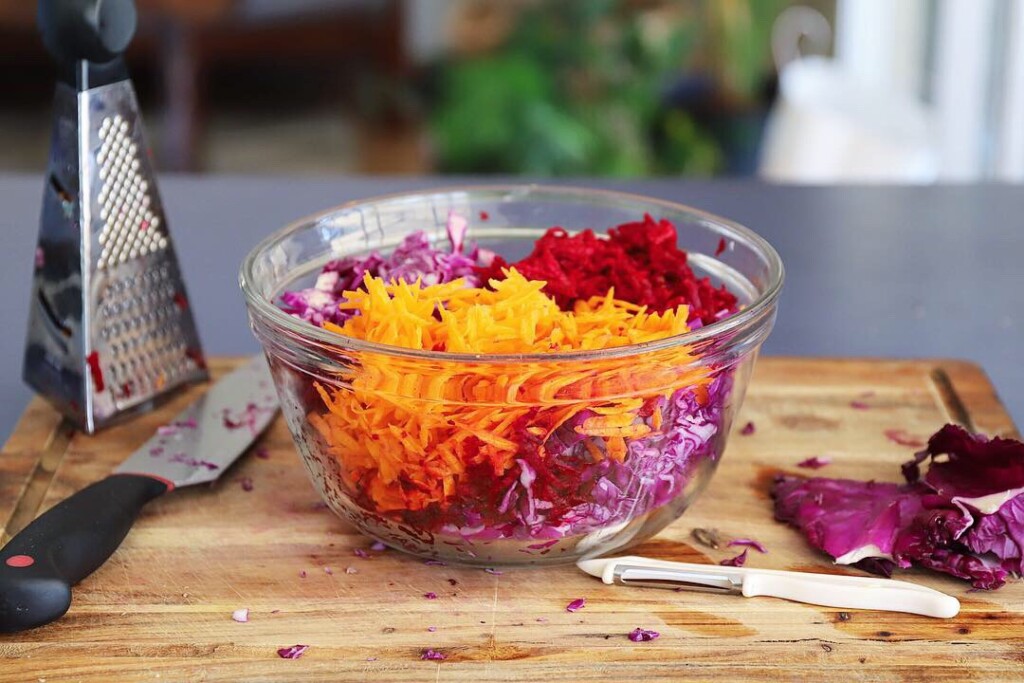
Sauerkraut is a great way to preserve extra cabbage and make a delicious probiotic accompaniment. Red Cabbage, Carrot, and Beet make this a vibrant colourful Sauerkraut but you could use regular cabbage.
Cabbage, Beet and Carrot Sauerkraut
Prep Time: 10 minutes
Total Time: 10 minutes
Vibrant kraut full of gut-loving probiotics. This is a quick and easy way to see up extra Cabbage harvests.
Ingredients
3 cups shredded cabbage (1/4 of a whole cabbage)
1 medium Beetroot
2 Medium Carrots
1 1/2 tsp Salt
Instructions
Finely slice or grate cabbage using a mandoline or grater. Reserve a whole piece to cover the contents at the end. Add to a large mixing bowl and sprinkle over the salt. at the
Squeeze the salted cabbage to extract the moisture. Do this for 5-7 minutes.
Grate carrot and Beetroot and add to the cabbage bowl. Peeled or unpeeled is optional - see notes.
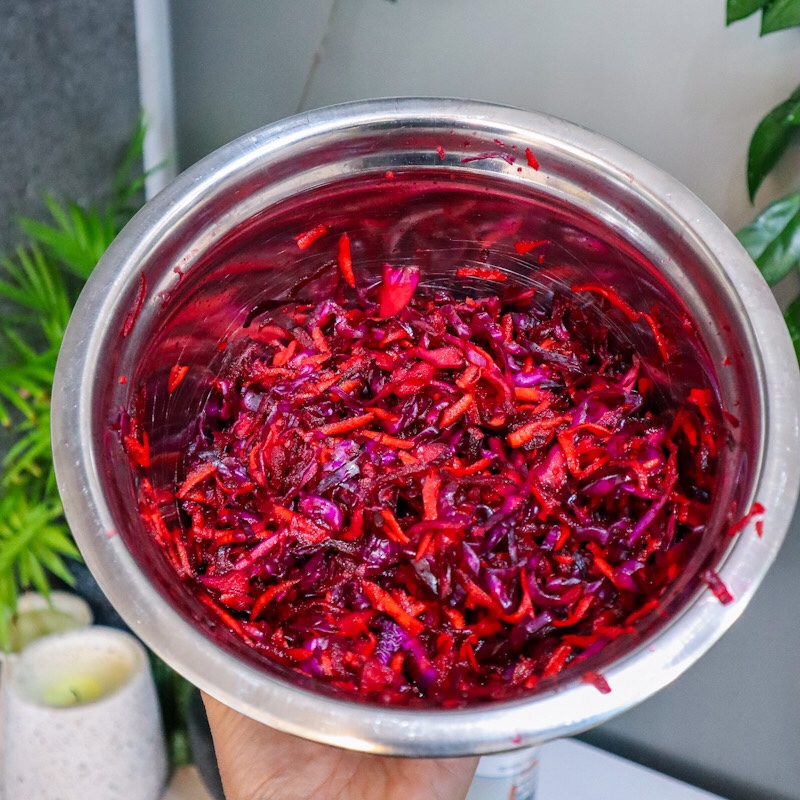
MIx to combine. Cover and let it sit for 5 minutes.
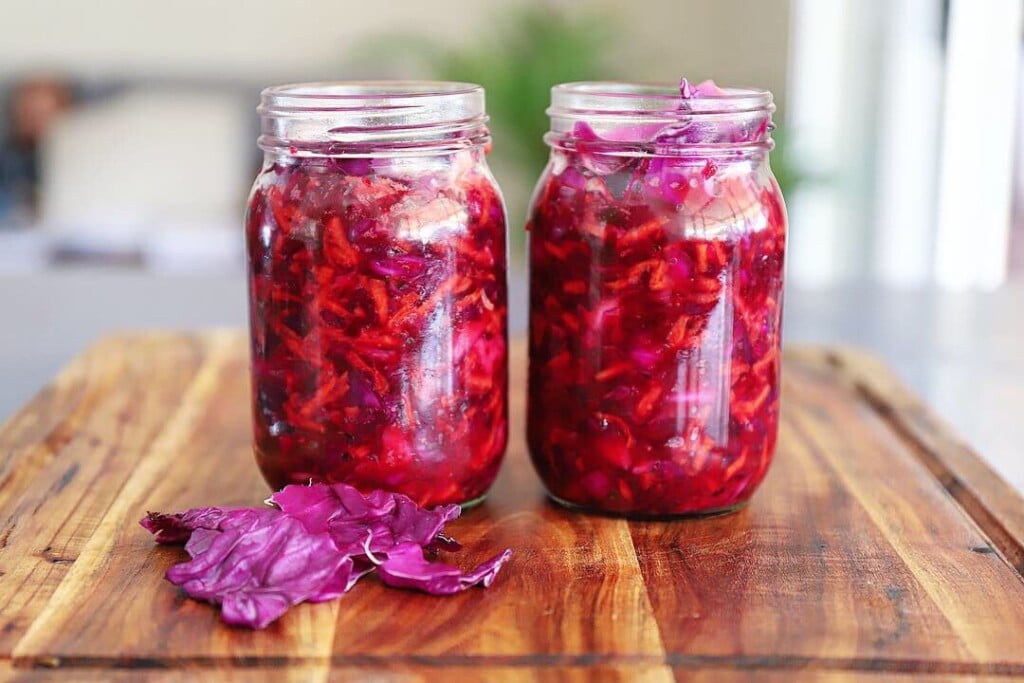
Give the mixture a final squeeze and mix. Then add to a sterilised jar. This mix will fit a 700gram jar so you could also use two smaller jars. Allow 2cm of empty space at the top of the jar. Press the mixture down to remove air bubbles and pour over any remaining liquid from the bowl. The liquid should cover the cabbage. Add a little bit of filtered water if you need it. Place a piece of cabbage leaf over the top to keep the mix submerged in liquid.
Store in a cool dark place for 3-5 days or until you like the flavour. It will get increasingly sour the longer you ferment it. Once you are happy secure the lid and place it in the refrigerator. This will mellow out the smell and slow the fermentation down.
Notes
- Peel the beets and carrots if the skin is particularly dirty and hard to remove or if you have purchased the beets from the store.
- Don't use pre-shredded store-bought cabbage as it will not have the active bacteria.
- Check the mix daily to ensure it is fully submerged in liquid. You may need to add a small weight to keep it down.
Delicious Roast Radish and Carrot Salad with Radish Top Chimichurri dressing for a low waste recipe to get the most your of your harvest. Roast Radish is just something else! They are sweet, juicy, and delicious additions to a roast veggie salad. Radish are a quick crop to grow and can fill up gaps in your garden beds to get maximum production out of each space. There are so many delicious ways to use Radish and this salad is a wholesome and easy way to eat Garden to Plate.
Roast Radish and Carrot Salad
Prep Time: 15 minutes
Cook Time: 40 minutes
Total Time: 55 minutes
Wholesome and delicious roast veggie salad using root to tip.
Ingredients
8-10 Radish
6-8 Fresh Baby Carrots
3 cups chopped Greens (combination of what is available) Spinach, Kale, Sweet Potato Leaves, Chard
Olive oil to drizzle
Salt Flakes or Seas Salt
Chilli Flakes or fresh Red Chilli
Chimichurri Dressing - See Recipe card below
Instructions
Wash the radish and carrots and remove the tops. Set aside for the Chimichurri Sauce.
Cut the larger carrots in half-length ways. The small or thinner ones can remain whole. So that all the carrots are of a similar thickness.
Cut the larger Radish in half and leave any small ones whole so that they are all roughly the same thickness. Optional - add scores with a knife 1/3 the way through the radish. This allows for the dressing to soak in later.
Add the Carrots and Radish to a roasting dish, drizzle in olive oil, sprinkle with salt, and cook for 35mins or until slightly brown. I like my roast veggies a little crisp still. Cook for 45 minutes if you want softer roast veggies.
Whilst the veggies are roasting prepare the Chimichurri Green Sauce - Recipe card below. Use the Radish and carrot tops in place of parsley.
Remove the roast veggies from the oven whilst you prepare the rest of the salad.
In a large saucepan add 1/4 cup water and 3 cups of chopped greens. You can also use any leftover radish and carrot tops not needed in the dressing as part of your greens. Toss and allow to wilt then remove from the heat. Drain and add to a serving bowl. Drizzle over 2-3 TBSP of the green sauce liquid and toss to mix through the greens.
Add the Radish and carrots on top of the greens. Spoon and drizzle over the remainder of the green sauce.
Add fresh red chilli or chilli flakes, salt and edible flowers to garnish and serve.
Notes
Edible flowers I used - Sweet violets, fennel flowers, dried purple and blue cornflowers.
Chimichurri Dressing using Radish Tops
This recipe below can be adapted to make using the leftover radish and carrot tops. Swap out the parsley and fennel fronds or use a mix of both.
Chimichurri Dressing
Prep Time: 10 minutes
Total Time: 10 minutes
This vibrant green dressing is packed full of flavour and is a delicious way to add a fresh zing to your meals.
Ingredients
1 cup Parsley*
1 1/2 TBSP lemon juice
1 TBSP Red Wine Vinegar
1/4 cup Olive Oil
1/2 cup Fennel Fronds*
1 tsp Sugar
2-3 Garlic Cloves
Sea salt flakes to season
Fresh Red Chilli or 1/4 tsp chilli flakes
Instructions
Add Parsley, Lemon juice, Vinegar, Sugar, Fennel Fronts, and Garlic to a mixer or mortar and pestle. I prefer a mortar and pestle as I like it chunky and not to blended. Blitz or crush to combine and make a green sauce.
Then gradually add oil to combine. Add Chilli flakes and a pinch of Sea Salt Flakes. Taste and balance with more salt if needed.
Drizzle over the green sauce. Garnish with sliced red chilli, fennel fronts, and edible flowers.
Notes
* Swap Parsley or Fennel fronds for Radish tops, Carrot tops, Corriander, or a mix.
There may be a little extra sauce than needed so you can keep it in the refrigerator to use within a few days or freeze it in ice cubes to use in cooking.
Rainbow slaw not only looks amazing but it’s also packed full of nutrients. Just like planting diversity creates a healthy garden, eating diversely also has many health benefits. Each vegetable has different levels of vitamins, minerals, phytochemicals, dietary fibre, and antioxidants. This slaw can be adjusted to suit your seasonal produce – see the notes for other vegetables to try out. Rainbow slaw is very quick and easy to make and can be a delicious and wholesome accompaniment to any meal.
Rainbow Slaw
Vibrant and full of nutrients, this Rainbow Slaw is the ultimate Spring side salad.
Ingredients
1 cup shredded Red Cabbage
2-3 Carrots
1 cup chopped Lettuce
1 medium Red Beetroot
3-4 Radishes
5cm cube Butternut Pumpkin
2 TBS Sunflower Seeds
Dressing
3 TBS Coconut (or greek) Yoghurt
1 tsp Lemon Juice
1 Clove Garlic
2 tsp finely chopped fresh Fennel Frond or Parsley
1 TBS Water
1 Tbs Olive Oil
1/2 tsp Chilli Flakes
Salt and Pepper to season
Instructions
Rinse your veggies and clean off any grit or soil.
Finely slice the Cabbage using the thin-medium section of the mandolin. If you don't have a mandoline, you can either grate or finely slice using a knife.
Peel the Carrot, Butternut, and Beetroot (The skins dressed in olive oil and seasoned make delicious chips - see notes below).
Using the Julienne teeth on the mandoline, finely slice the Carrot, Radish, Butternut, and Beetroot into thin strips. Use a grater if you do not have a mandoline.
Roughly chop your lettuce into small pieces.
Add a little of each vegetable to a bowl so they are all mixed without having to stir through (otherwise the beetroot will turn everything red and you will lose some of your colours).
Drizzle with olive oil and a squeeze of lemon juice. Lightly toss.
To make the dressing, add yogurt to a small bowl. Then add crushed garlic, finely chopped fennel frond, lemon juice, water, chilli flakes, and salt and pepper to season. Stir well and taste. Add extra salt or lemon juice if needed.
When ready to serve, drizzle the dressing over the salad and top with sunflower seeds and edible flowers - I used nasturtium petals.
Notes
- Use vegetable skins from Carrot, Beetroot, and Butternut to make vegetable chips
Coat your skins in a light drizzle of oil.
Place your vegetable skins on a baking tray and sprinkle with a little salt.
Cook at 190 degrees celsius for about 5 minutes turning once halfway through. Keep an eye on them as they are so thin they will overcook easily.
Remove when they are golden and slightly crispy. They will also crisp up as they cool.
- Other vegetables that would be great in this slaw are: coloured Capsicums, Fennel, Nasturtium leaves, other Beetroot Varieties.
Pumpkin soup is like a warm, comforting hug during winter. This recipe uses the whole Butternut Pumpkin including the skin and seeds to add a toasty, crispy topping. The best addition to a soup! Turmeric has great natural anti-inflammatory properties and carrots have vitamin K and potassium for bone health. Freeze your extra soup in portions to pull out for a quick and easy winter meal.
Don’t throw out your Butternut skins and seeds, toast them to make delicious soup toppings or just a healthy snack.
Pumpkin, Tumeric, and Carrot Soup with Crispy Skins
Yield: 4-6 serves
Prep Time: 10 minutes
Cook Time: 50 minutes
Additional Time: 10 minutes
Total Time: 1 hour10 minutes
This warming winter soup with crispy skins and seeds is full of flavour and so satisfying. Using the whole vegetable to add texture and a beautiful nutty flavour.
Ingredients
1 medium butternut Pumpkin/squash
2 small-medium Carrots
1 brown Onion
1 red Onion
1 TBSP Oil
1 TBSP Tamari (or soy sauce)
1/2 tsp Ground Tumeric
2 tsp Sea Salt Flakes
1/2 tsp Chilli Flakes
1 can Coconut Milk
2 cups Water
Instructions
Dice and saute onions and place in a large pot or saucepan with oil until cooked through - approx 5minutes. Then add the Turmeric and mix to combine.
While your onion is cooking peel the Butternut as close to the skin as possible so there is very little flesh left on the skin. Place the skin and seeds in a bowl and set them aside.
Dice the rest of the Butternut into chucks - approx 3-4cm. Add to the pot with the onions.
Chop the carrot including the skin into 1cm slices and add to the pot.
Add in water, Tamari, salt, chilli, and coconut milk. Stir to combine.
Place a lid on top and reduce the temperature to a light simmer - 40minutes.
Once the pumpkin and carrot are cooked through and soft, remove from the heat and allow to cool slightly.
Turn your oven on high to 200degrees celsius.
Blend soup using a stick mixer or blender (ensure the soup is not too hot if you are using a blender or it may burst through the lid). Blend to a smooth soup consistency.
Place the soup back in your pot to reheat.
Coat the Butternut skin and seeds in oil and sprinkle with extra salt flakes and chilli flakes. Place on an oven tray and cook until golden and crispy. Watch them carefully as this will only take about 5 minutes. They will crisp up even more as they cool.
Serve your soup in a bowl and top with crispy skins and seeds. Garnish with edible flowers (i used rosemary flowers) and fresh herbs (thyme or parsley).