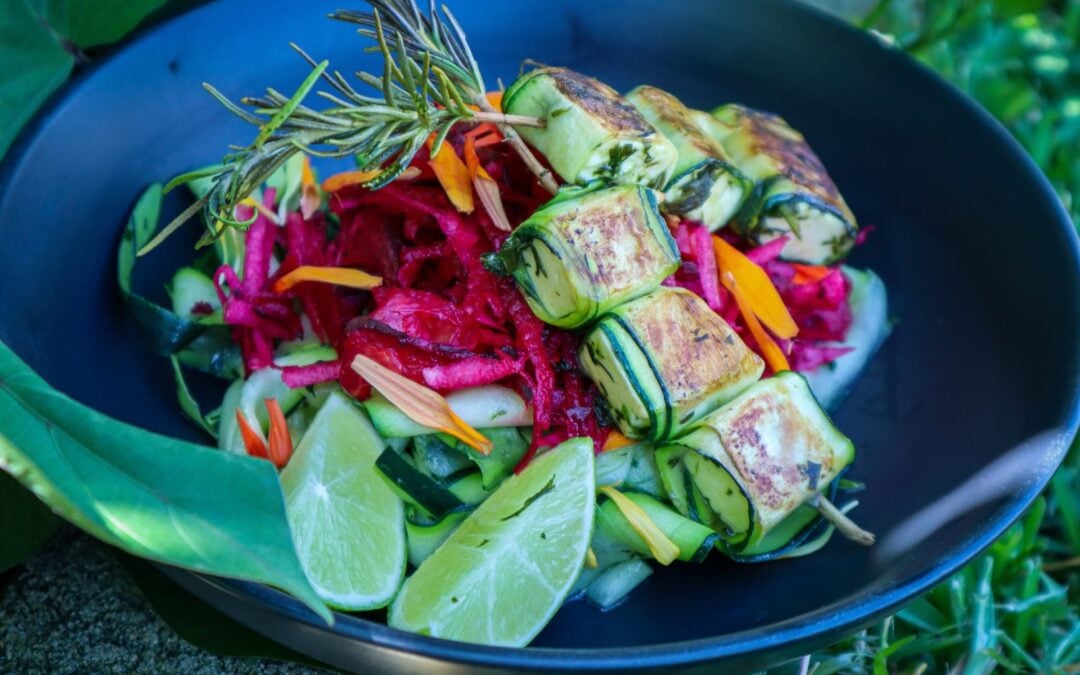
These Zucchini wrapped haloumi skewers are so delicious and easy to make! Marinated in my favourite green sauce plus the Rosemary flavour also infuses during cooking. I made this during one of my YouTube live streams and had to share the recipe! Serve on a fresh salad or with a charcuterie board. These would also be great for summer BBQs.
Rosemary (Rosmarinus officinalis) is a fragrant perennial herb. Rosemary is a hardy, drought-tolerant shrub and can also be used as an ornamental due to its evergreen foliage and purple or white edible flowers. Rosemary is a great herb to plant on your journey to sustainability, as it has a large list of beneficial uses for the garden, home, kitchen, plus many medicinal qualities. When Rosemary flowers it will attract an abundance of beneficial pollinators to increase your garden’s production.
Zucchini wrapped Haloumi on Rosemary Skewers
Yield: 9
Prep Time: 25 minutes
Cook Time: 8 minutes
Total Time: 8 minutes
Easy and delicious these Rosemary Skewers make a quick lunch or entertaining dish.
Ingredients
1 medium Zuchinni
1 packet Haloumi
Olive oil
9 Rosemary sprigs
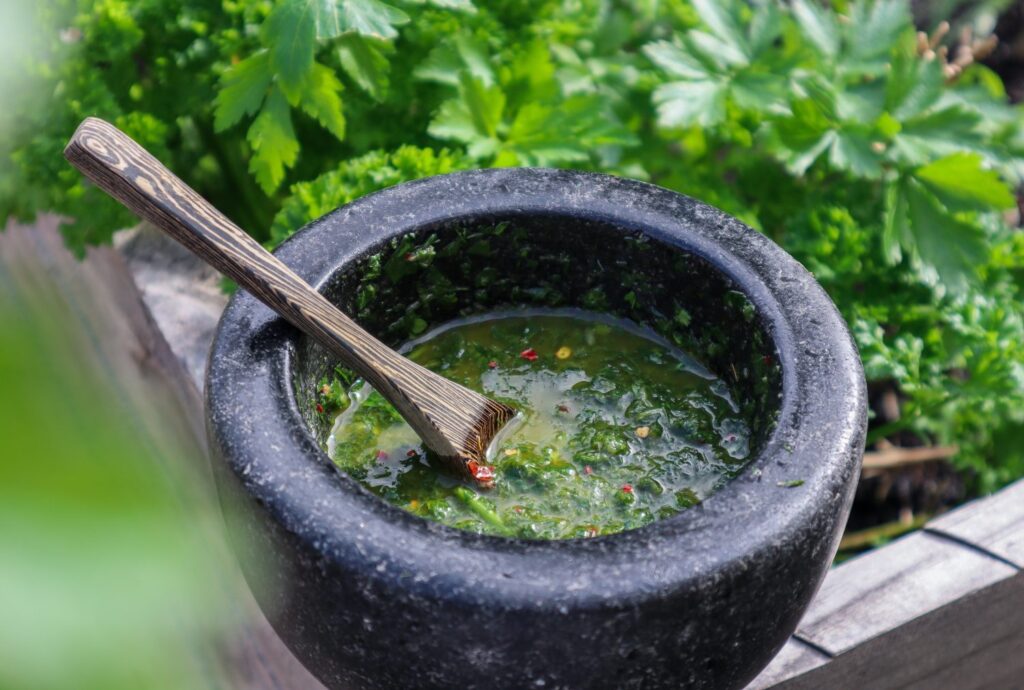
Green Dressing (available below for logged in members or see notes)
Instructions
Soak the Haloumi in a bowl of water for 5-10 mins while prepping the rest of the dish (optional but reduces the salt and makes the halloumi softer).
Cut the Zucchini into thin ribbons using a wide vegetable peeler.
Prepare the green sauce or marinade (available below for logged-in members or see notes)
Pour half the marinade over the zucchini Ribbons.
Remove the haloumi from the water, cut it into squares roughly 1-2cm, and place in the bowl with the remainder of the marinade.
Place the ribbons and halloumi in the fridge to marinate further for 10-20min.
Heat a pan with olive oil on medium heat.
Lay a zucchini strip out flat and place a haloumi cube at the beginning then roll to wrap the square.
Strip 3/4 of the leaves from the rosemary skewers (see notes if you are using the leaves for the marinade you will need to do this at the beginning).
Place 3 wrapped cubes on a skewer and place in the pan. Cook until golden on each side - roughly 3 minutes each side.
Serve on a fresh salad with lemon or lime wedges and extra green sauce or a creamy yogurt dressing.
Notes
Non-member's alternative to the green dressing - Strip 3/4 of the leaves from the Rosemary sprigs. Roughly chop and add 1/4 cup of Olive Oil and use that as the marinade.
Swap Haloumi for Feta or Vegan Cheese
P.S - I make the members green dressing in the YouTube live.
Green Sauce Chimichurri
This vibrant green dressing is packed full of flavour and is a delicious way to add a fresh zing to your meals.
Content is protected for Garden to Plate members only. Sign up for full access https://sustainableholly.com/join-the-club/
Watch the Live Video 👇
Want more Recipes?
Join the Garden to Plate club to learn more about growing thriving gardens and wholesome Garden to Plate meals.
This easy Homemade Sweet Chilli Sauce is a fantastic way to use up a bunch of homegrown chillies. Growing Chillies is a great place to start for Beginner Gardeners or those with limited space, as they are easy to grow and can produce an abundance of chilli on one plant. Chilli plants like warm weather, but they can be grown throughout winter in a greenhouse or warm spot. I will cut back my chilli plants soon, place them in a warm area and let them go semi-dormant for the winter, which is called “overwintering”. That way come spring and summer, the plants are well established and will provide me with a decent crop.
This recipe can be adjusted to be as mild or hot as you like. You can use different chilli varieties, but obviously, the hotter the variety, the more your sweet chilli sauce will pack a punch! If you are concerned, I would remove and save the seeds from 3/4 of the chilli, and once it has cooked down a bit, taste and add more of the seeds to get the desired heat. I just went all-in with the seeds and used a hot Thai Chilli variety, so mine turned out quite hot, but I like that.
Easy Homemade Sweet Chilli Sauce
Yield: 500g
Prep Time: 10 minutes
Cook Time: 1 hour
Additional Time: 5 minutes
Total Time: 1 hour15 minutes
This easy Homemade Sweet Chilli Sauce is a fantastic way to use up a bunch of homegrown chillies. Growing Chillies is a great place to start for Beginner Gardeners or those with limited space as they are easy to grow and can produce an abundance of chilli on one plant.
This recipe can be adjusted to be as mild or hot as you like. You can use different chilli varieties but obviously, the hotter the variety the more your sweet chilli sauce will pack a punch! If you are concerned I would remove and save the seeds from 3/4 of the chilli and once it has cooked down a bit, taste and add more of the seeds to get the desired heat. I just went all-in with the seeds and used a hot Thai Chilli variety so mine turned out quite hot but I like that.
Ingredients
250 - 350g Chilli
8 Cloves Garlic
5 cm piece of Ginger
2 cups Sugar
2 cups White Vinegar
3 teaspoons Salt
Instructions
Wash chilli and cut off the green stems.
Roughly chop the Chilli, Garlic and Ginger and add to a mixing bowl or food processer.
Blitz the mixture into a rough paste using either a food processor or stick mixer. If using a stick mixer make sure you cover the bowl with a cloth to stop bits of chilli flying everywhere!
Add the blitzed chilli mixture to a pot and add Sugar, Vinegar and Salt.
Bring to the boil and then let it simmer on a low - medium heat until the mixture thickens (45min - 1hr).
The mixture will continue to thicken as it cools. Add a dash of water or extra vinegar if need be.
Heat oven to 130 degrees celsius and add your clean jars or bottles to sterilize for 15mins. Put the lids in a bowl of boiling water for 5 minutes.
Carefully pour the warm sauce mixture into your jars while they are still warm and secure the lids on.
Store in the fridge and use within 3-4 weeks*
* For long term storage place in smaller containers or jars and freeze or use canning methods for long term preservation.
Notes
If you want a mild sweet chilli sauce, remove 3/4 of the chilli seeds and set aside. Once the mixture has started to reduce, taste and add extra seeds as desired.
Serve with Sweet Potato Fries, as a Stirfry sauce, burger sauce or even add to noodles and vegetables for a deliciously tasty meal packed full of flavour.
If you have chilli plants that ripen at different times or a smaller amount to harvest, try freezing them whole until you have enough saved up to make the recipe. Other ways to preserve your chillies are to dry them out and keep them whole or try blitzing the dried chillies to make a chilli powder or flakes.
I hope you enjoy this easy homemade sweet chilli sauce!
Watch My Chilli Harvest and How to Make Sweet Chilli Sauce
DISCLAIMER: Links included in this description might be affiliate links. If you purchase a product or service with the links that I provide I may receive a small commission. There is no additional charge to you! Thank you for supporting my page so I can continue to provide you with free content!