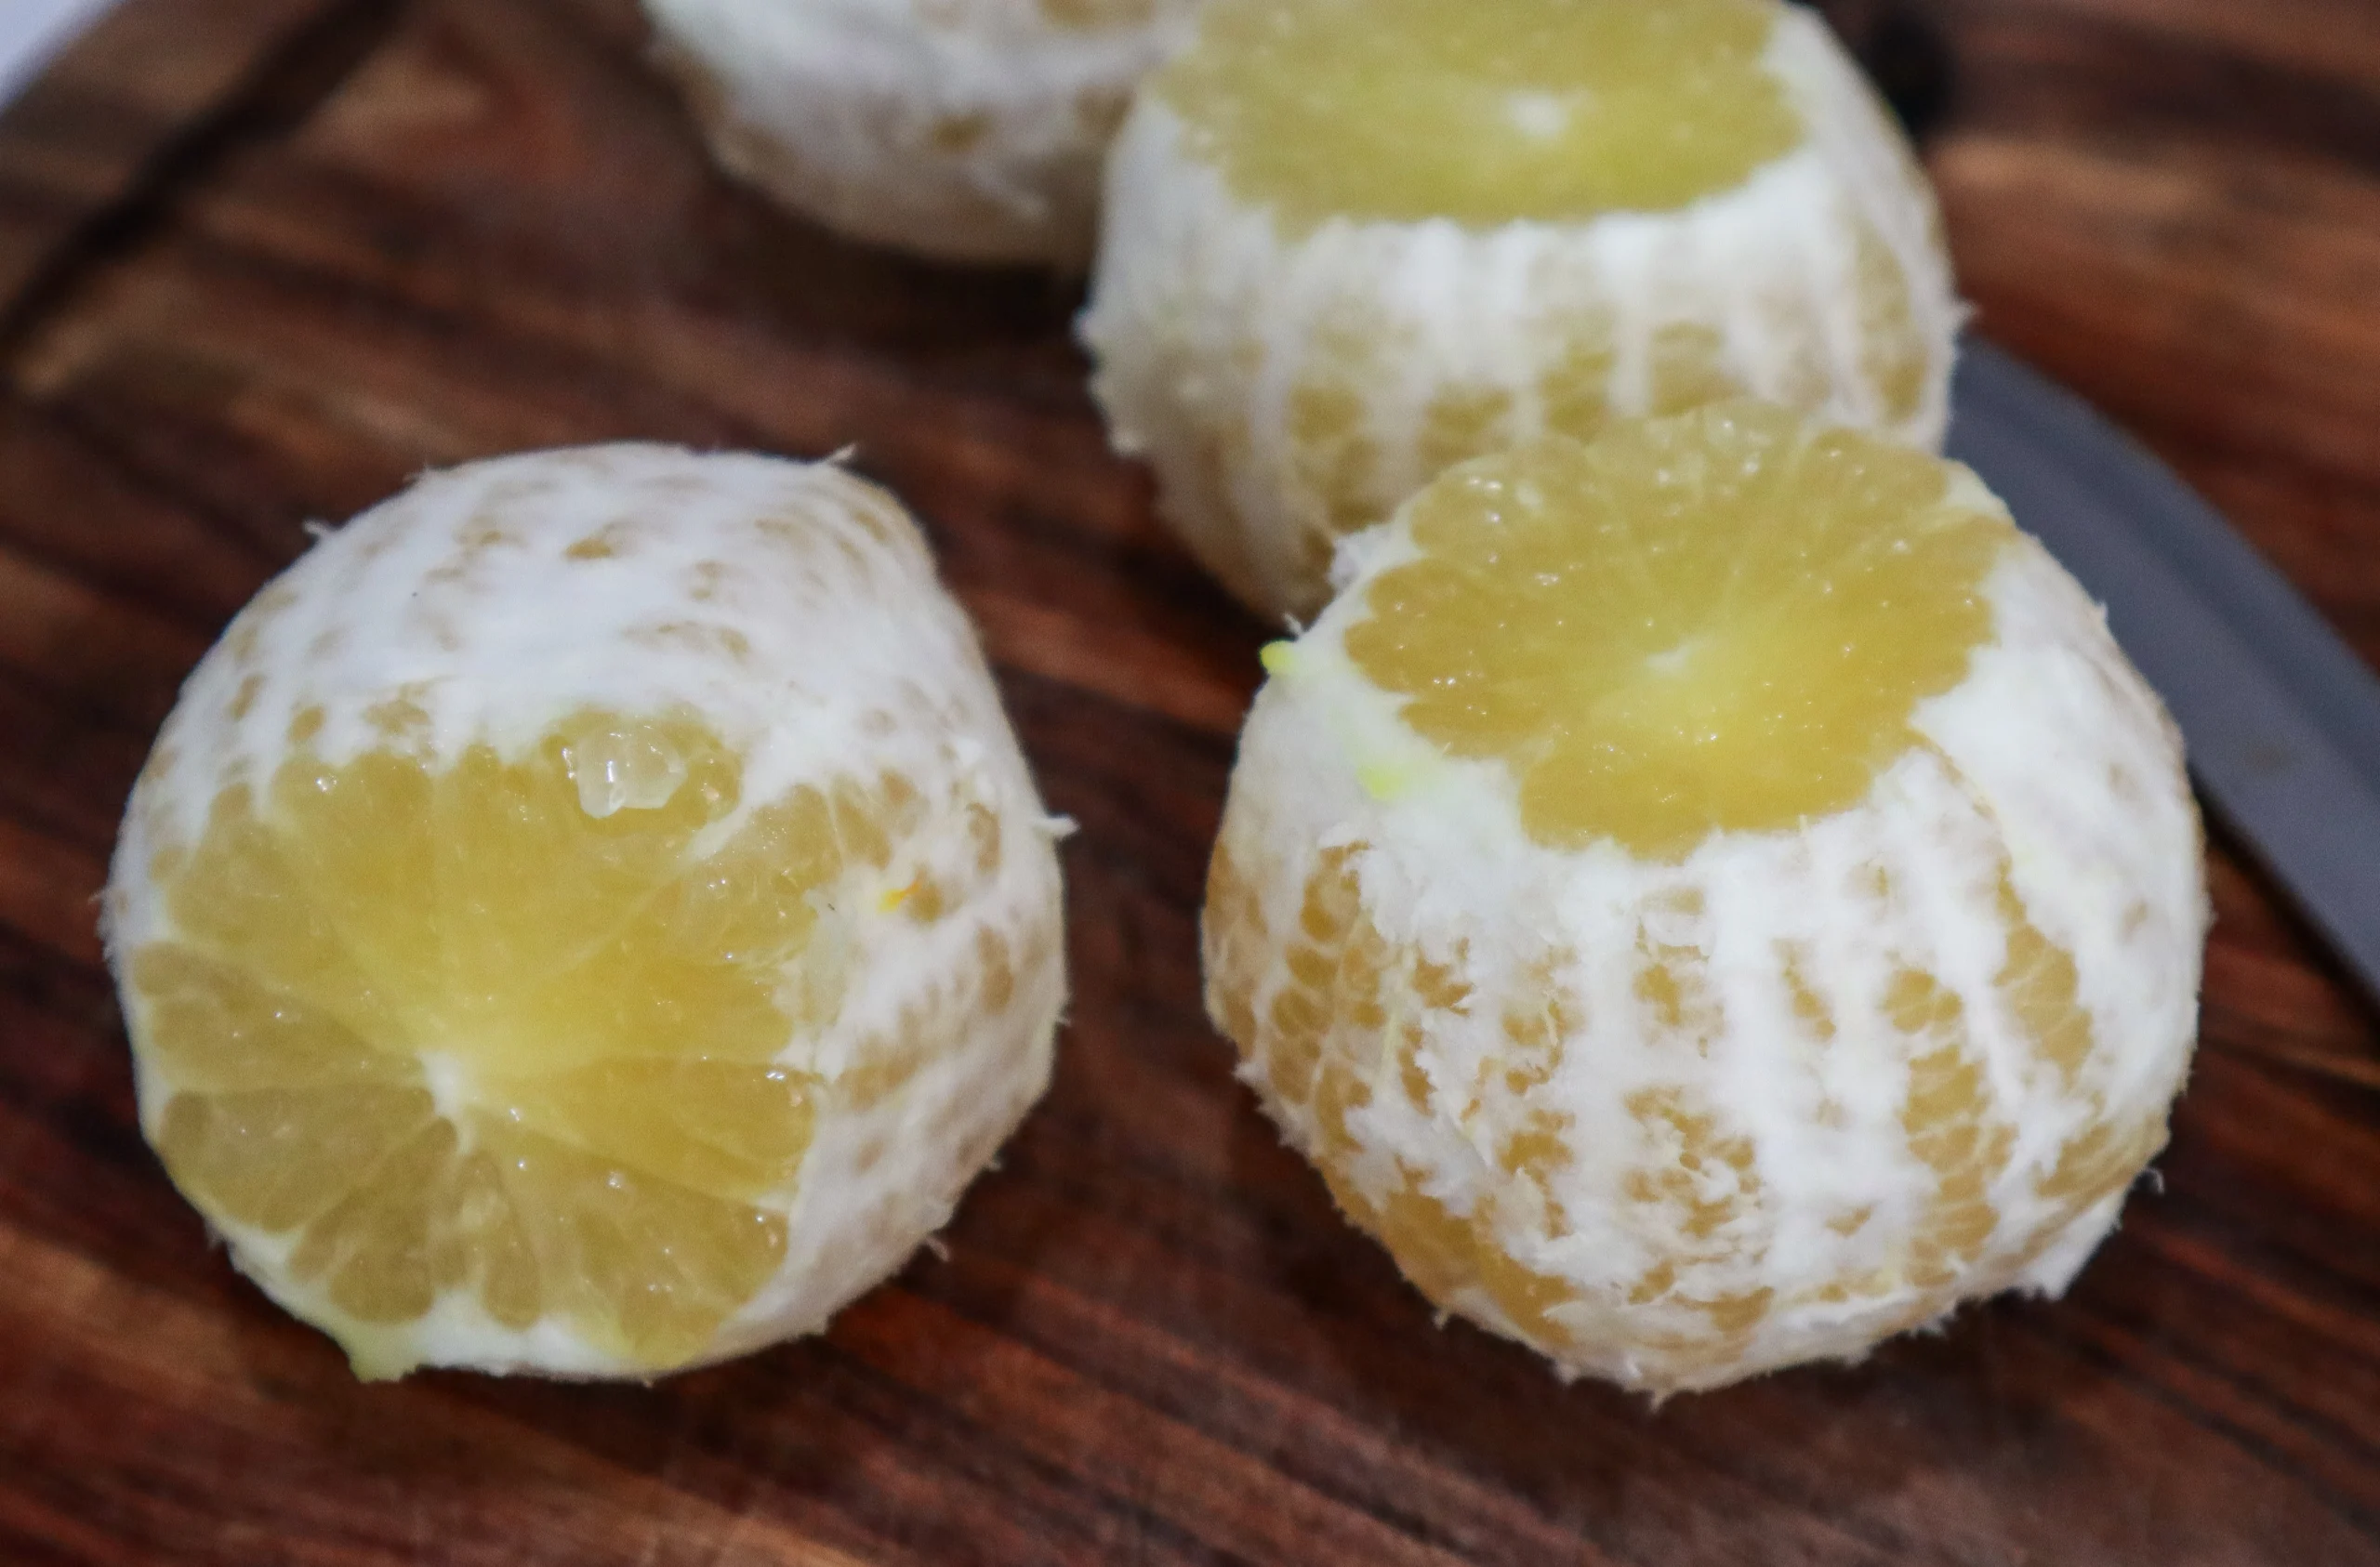
Learn how to grow a Lemonade Tree (Citrus limon x reticulata) at home, from planting to harvest, and how to use its delicious fruit in drinks, desserts, and garden-fresh recipes. The Lemonade Tree is one of my favourite citrus trees, especially because it’s so productive! You can eat the fruit fresh off the tree, just like an orange, but with lemon flavour!
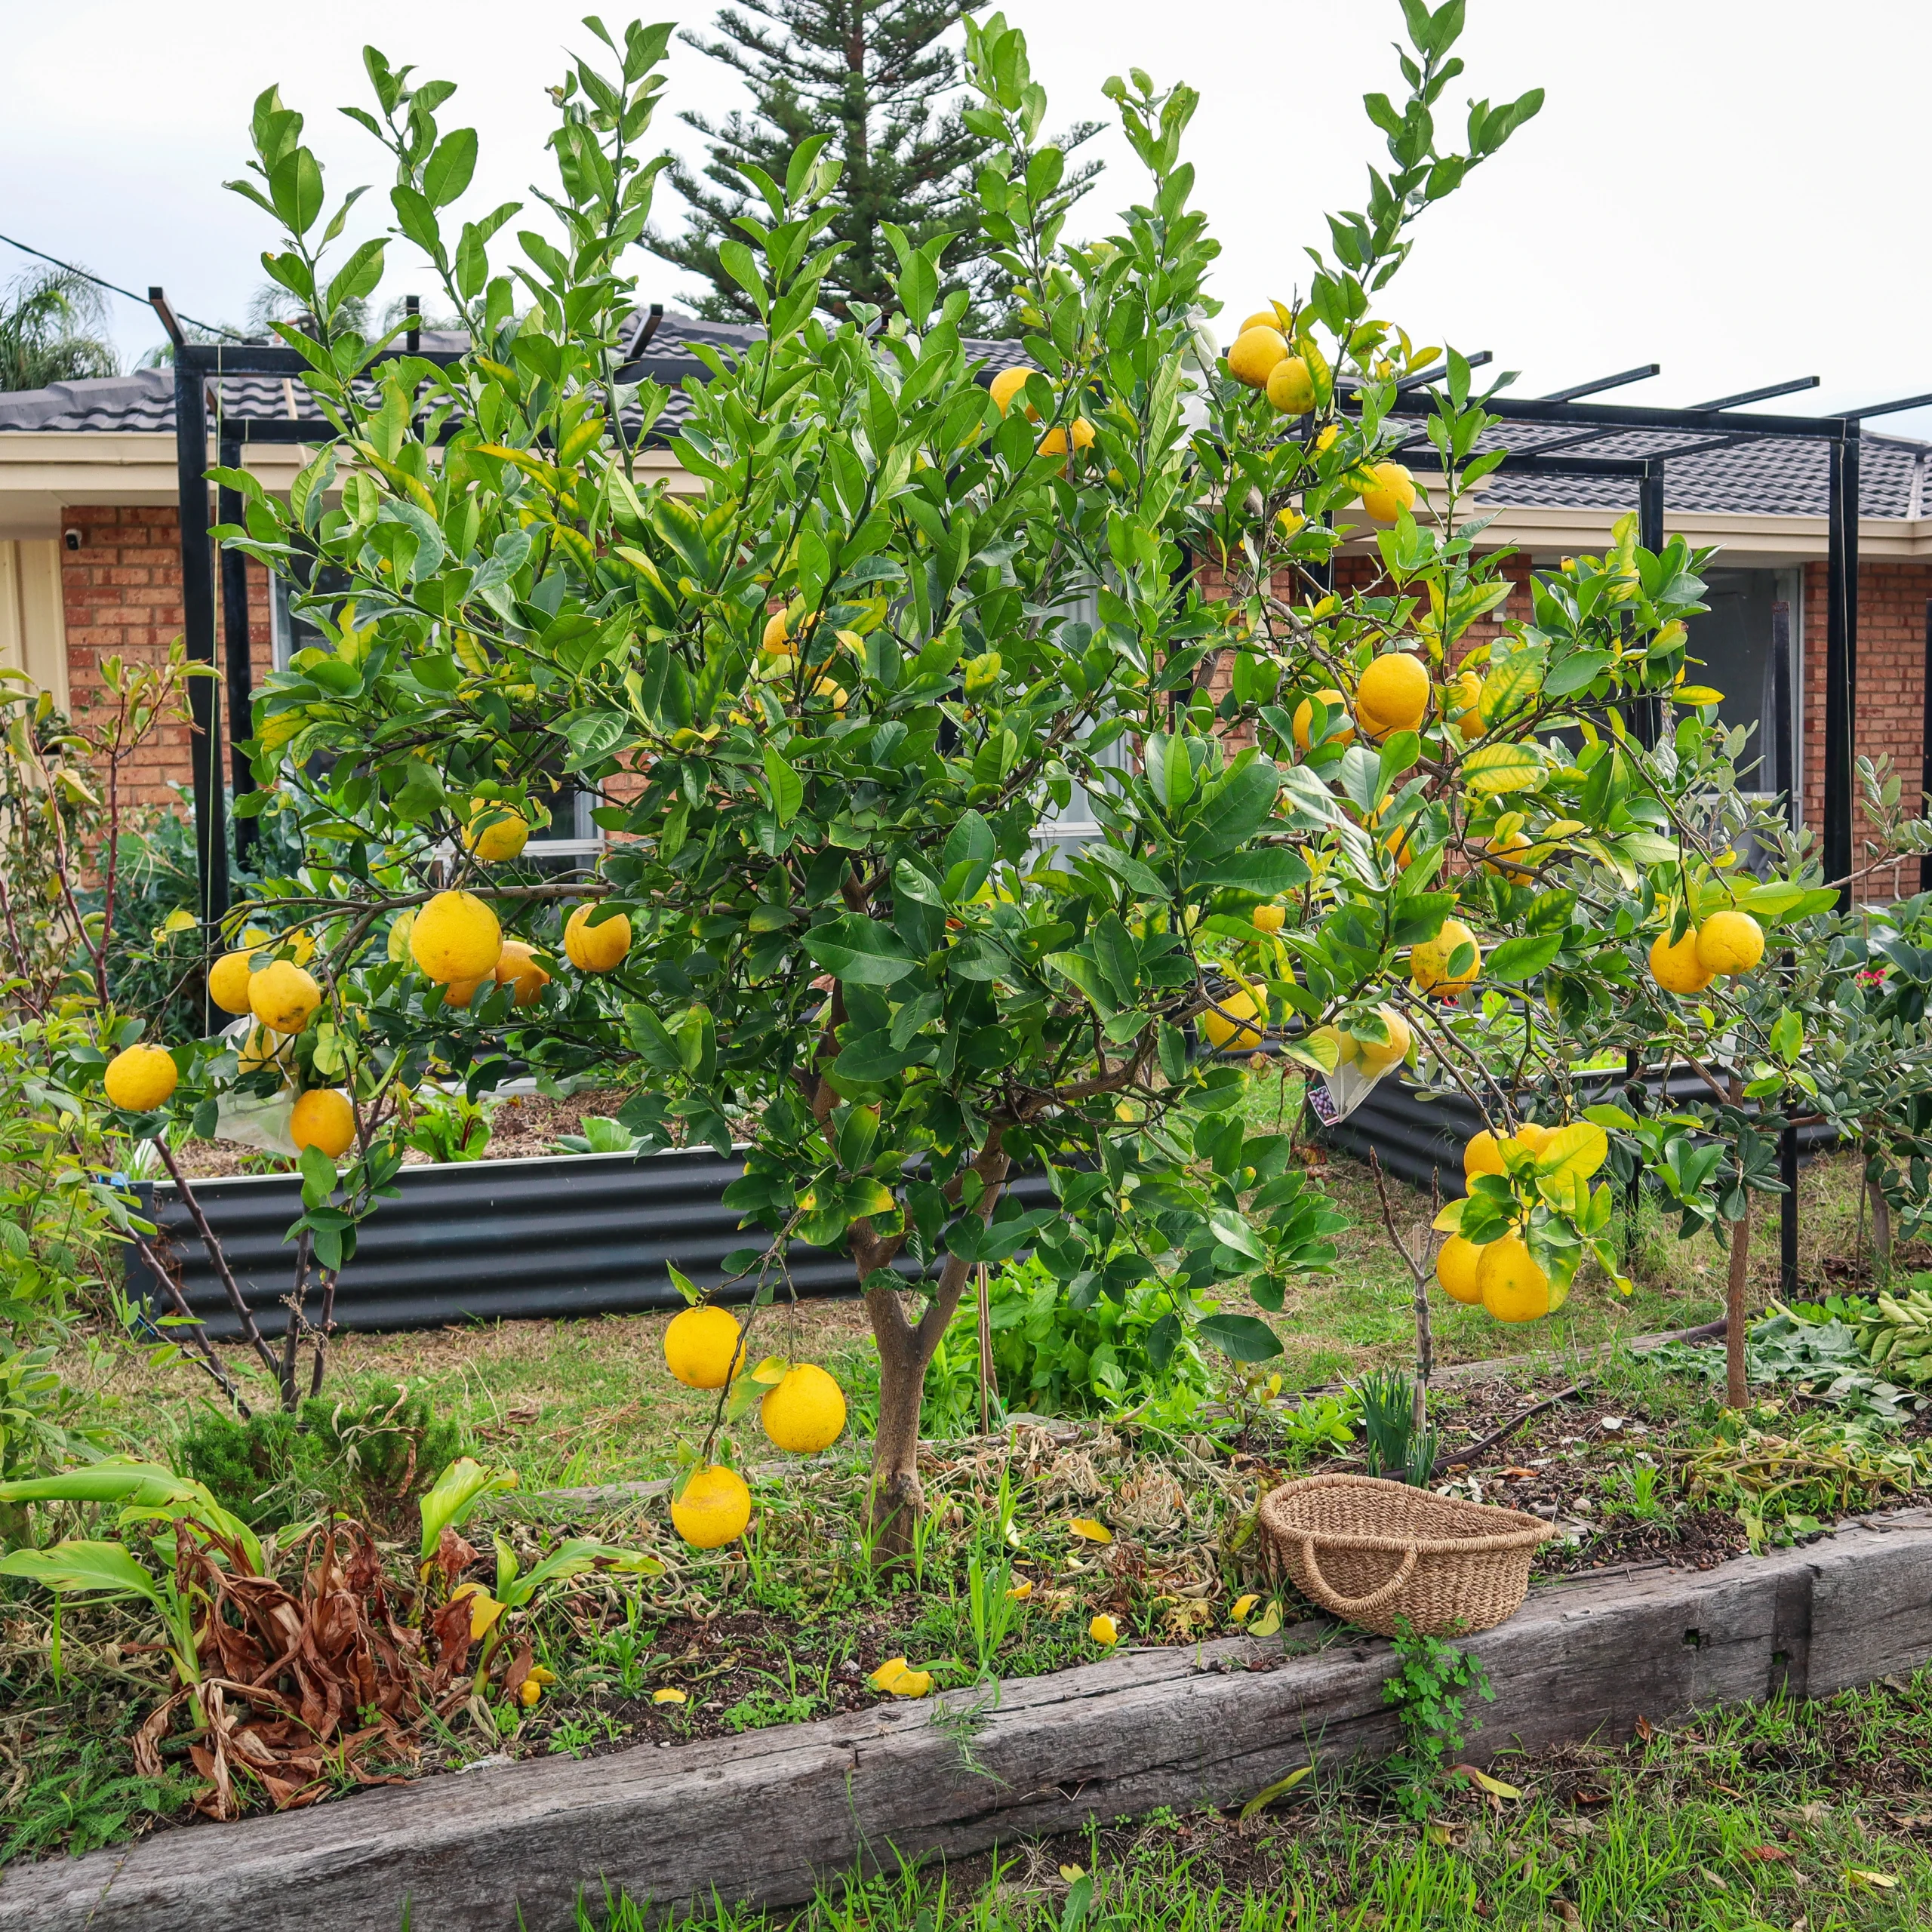
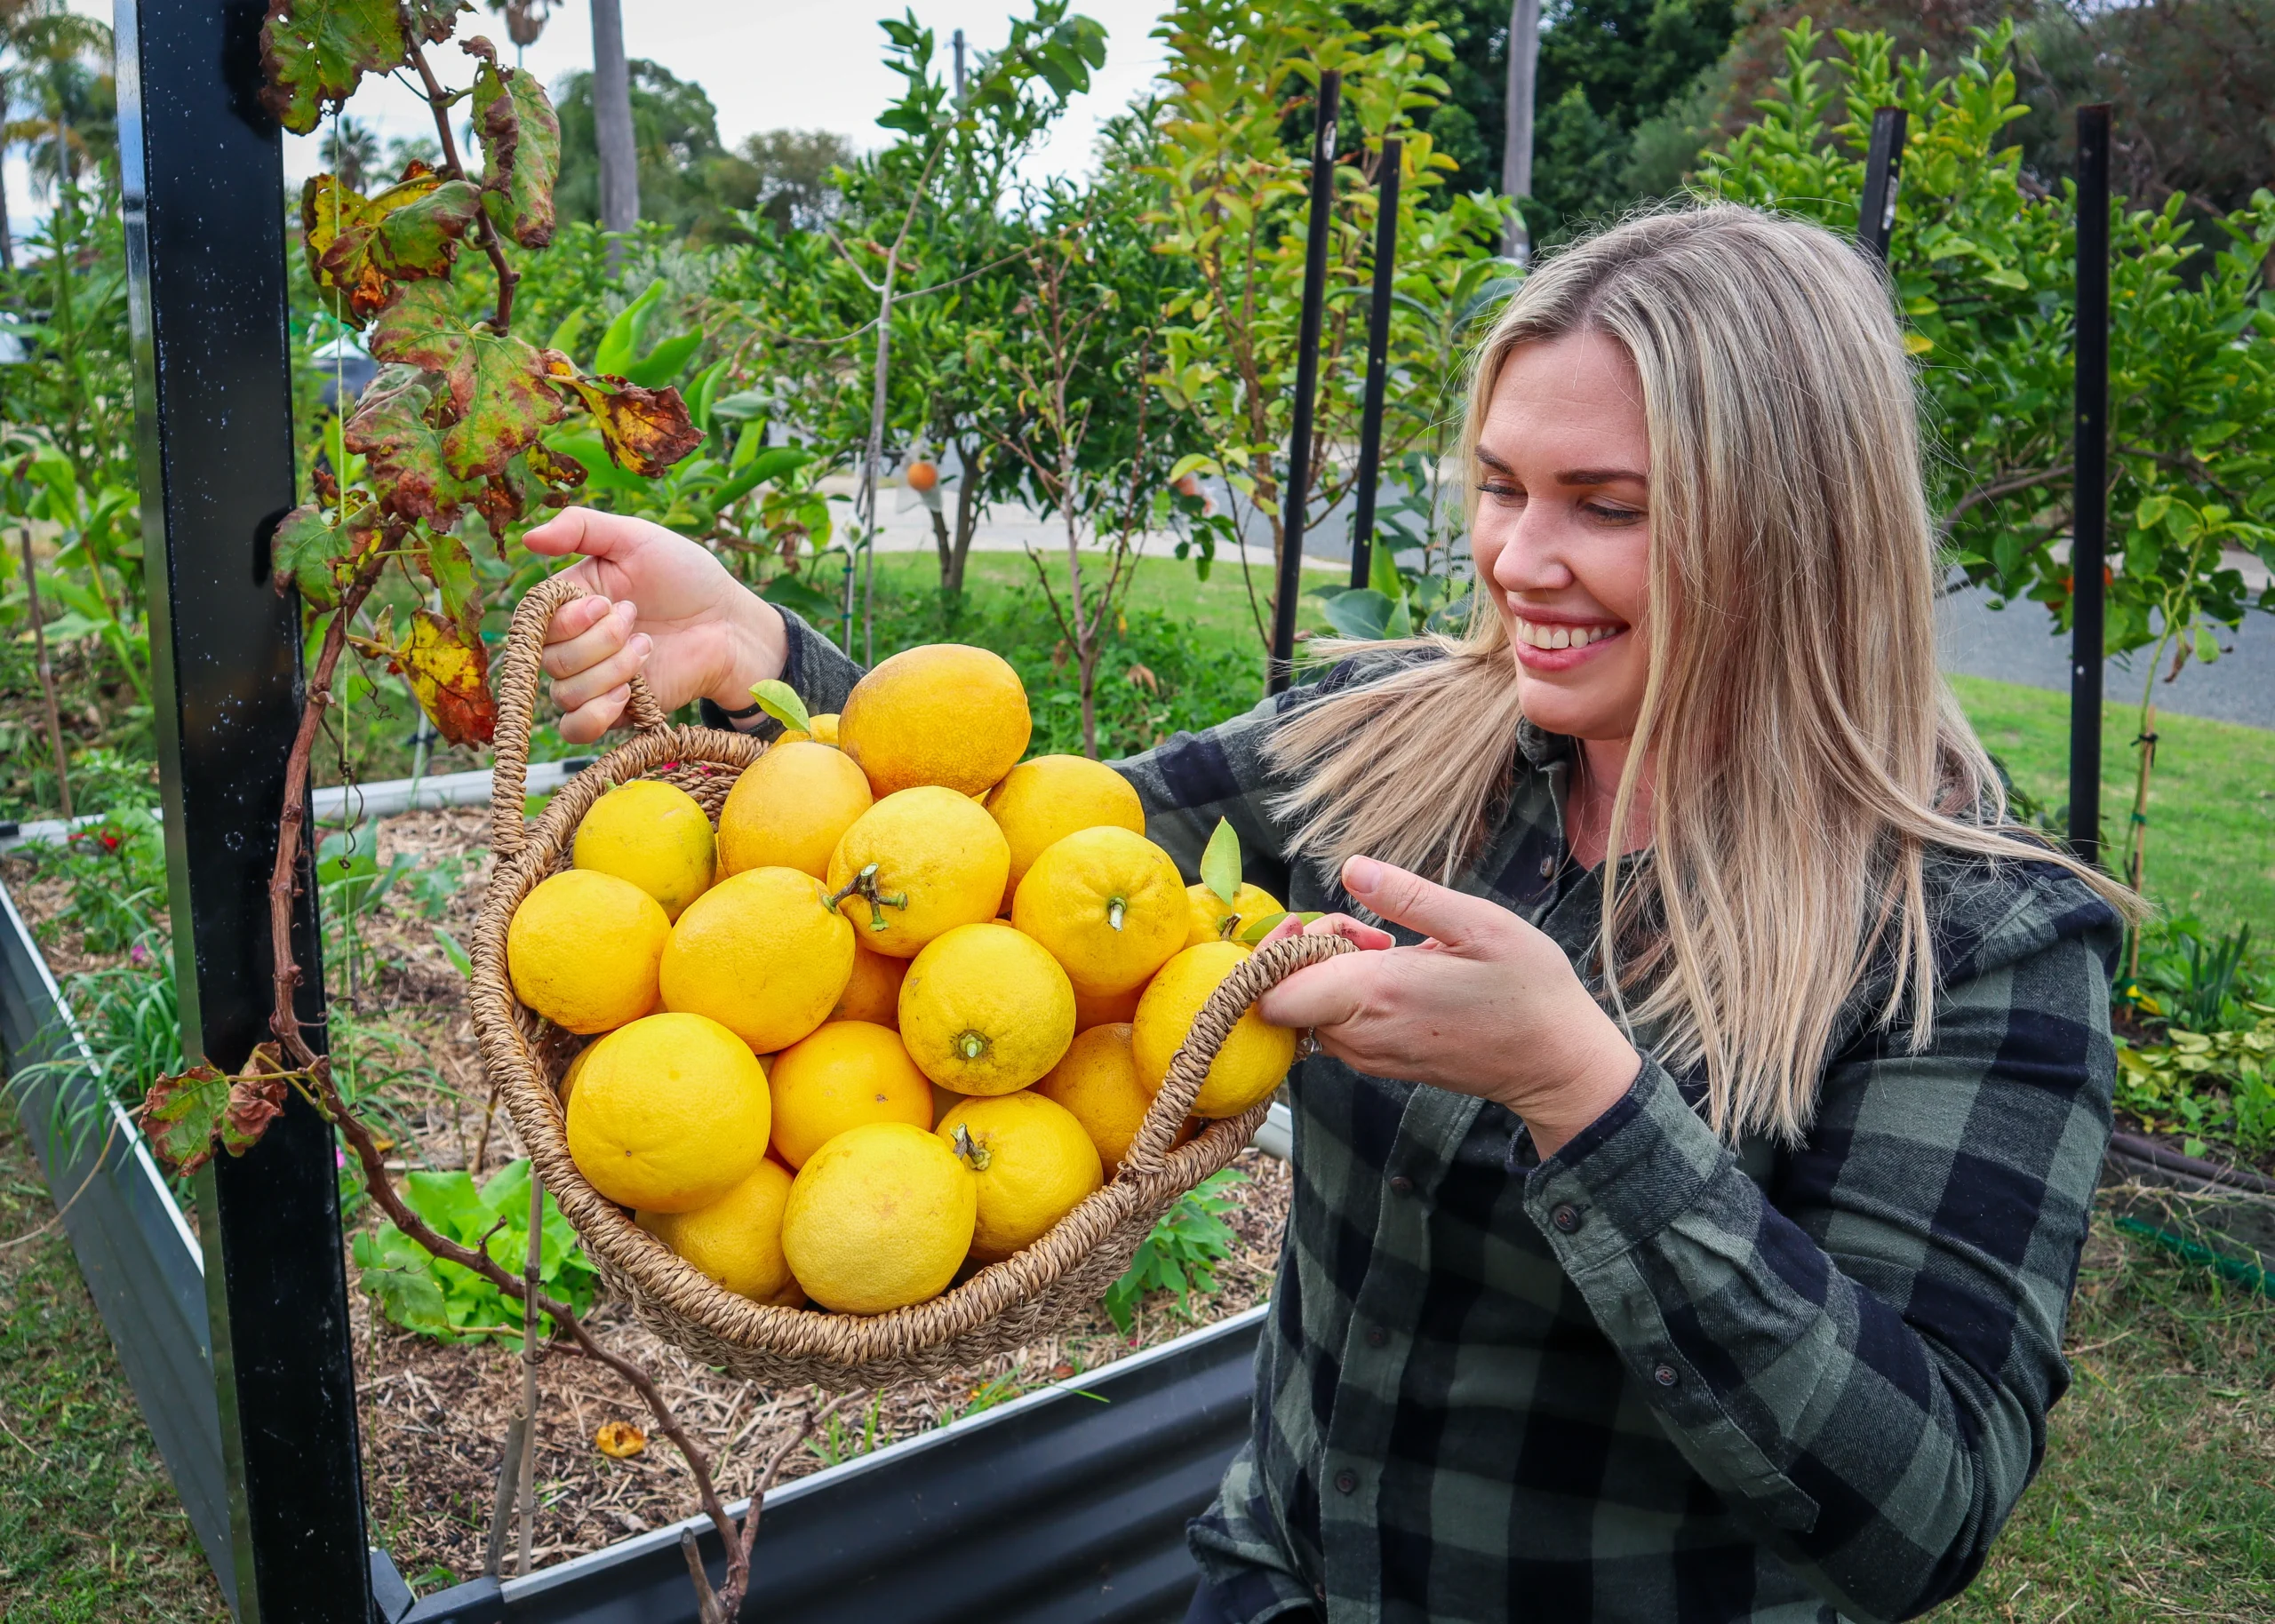
The lemonade tree was discovered in New Zealand from a chance seedling. Many backyards have Lemonade Trees growing, and it was a staple fruit in my lunch growing up in NZ. I now have a Lemonade Tree in my Perth gardens, and it is loaded with fruit each year. It’s honestly one of the most refreshing, productive citrus trees you can grow. The fruit is naturally sweet and low in acid, like lemonade straight from the tree! It’s perfect for eating fresh, juicing, or turning into easy garden-to-table treats.
What parts of Lemonade are edible?
Flesh – Edible
Mild, sweet-tart flavour with low acidity—can be eaten fresh, just like a mandarin or orange. Great for juicing, making cordial, using in desserts, or adding to savoury dishes. Unlike regular lemons, you often don’t need to add sugar!
Juice – Edible
Naturally sweet juice makes a refreshing lemonade-style drink with no sugar needed.
Zest (Outer Peel) – Edible
The peel (zest) is full of citrus oils and adds bright flavour to:
Cakes and cookies
Dressings and sauces
Herbal teas or syrups
Rind (Including Pith) – Edible when Cooked
Can be used to make candied citrus peel, marmalade, or citrus-infused vinegar. Thicker rinds can also be oven-roasted with herbs or added to preserved lemon recipes.
What is a Lemonade Tree?
The Lemonade Tree is a hybrid between a lemon and a mandarin, resulting in a fruit that looks like a lemon but is mild, sweet, and low-acid. It can be eaten fresh like an orange, juiced into a zingy lemonade-style drink, or used in desserts without that sharp citrus bite.
Quick Tips on How to Grow Lemonade at Home
PLANT
Autumn or spring in frost-free areas.
SOIL
Well-draining, compost-rich soil. Avoid heavy clay unless mounded or in raised beds.
LOCATION
Full sun (at least 6 hours daily). Protect from strong winds and frost.
CARE
Mulch thickly, water consistently (especially during flowering and fruiting), and prune to shape after harvest.
FERTILISE
Feed in early spring, summer, and late summer with organic citrus fertiliser or worm juice + compost.
PESTS
Watch for citrus gall wasp, aphids, scale, leaf miners, and fruit fly. Encourage beneficial insects and prune affected areas.
HARVEST
Pick when fully yellow for peak sweetness. Or slightly green for more tartness and flavour.
REPRODUCE
Usually grown from grafted trees.
Why Grow Your Own Lemonade?
Here are some of the many reasons to grow Lemonade.
Naturally sweet fruit – no sugar needed!
One ingredient Lemonade!
Great fresh eating
Low-acid – gentle on the stomach and kid-approved
Perfect for small spaces or large pots
Highly productive from an early age
Great pollinator and companion tree for citrus guilds
Versatile in the kitchen – from juice to marmalade, even baking
Temperature & Climate Conditions
Lemonade Trees grow best in subtropical to warm temperate zones, but they’re more cold-hardy than many tropical fruits. With the right care, they can thrive in most areas of Australia:
Ideal temperatures: 15–30°C
Can tolerate down to: -2°C (brief frost OK with protection)
Best zones: 2–4 (Subtropical to Warm Temperate)
Plant in a sunny, sheltered location, preferably near thermal mass (like a wall or paved area) to keep roots warm in winter.
In colder regions: grow in large pots and move to a sunny porch or greenhouse in winter.
TOP TIPS TO GROW LEMONADE
Choose a warm sunny location
Prepare the soil with plenty of compost
Free draining is key!
Choose a sunny spot with great drainage
Protect from frost in the first 1–2 years
Mulch thickly but keep away from the trunk
Feed regularly and deep water in dry months
Remove gall wasp galls before spring
Net for fruit fly
Keep weed-free and well-mulched
Growing Lemonades in Pots or Small Spaces
Great for renters, balconies, or frost-prone areas (can be moved to shelter). Plant in their final position early to minimise root disturbance. Use a large pot (at least 50L) with premium potting mix + added compost. Ensure good drainage. Feed more often, as potted citrus use up nutrients faster.
How to Care for Lemonade Trees
Care/ Maintenance
Lemonade trees are heavy feeders due to the amount of fruit they produce! Add plenty of compost and mulch often to keep them well fed. Always ensure the mulch is pulled away from the trunk. Keep an eye on suckers and remove any growth from below the graft line. Add frost cloth during sudden cold snaps. Place young trees near north-facing walls or thermal mass.
When to Feed Lemonade Trees
Citrus trees are hungry feeders, especially during their active growing and fruiting seasons. Feed them three times a year, timed with key growth phases:
1. Early Spring (August–September)
Just as new growth starts and flowering begins
Encourages healthy leaves, blossoms, and strong fruit set
2. Early Summer (November–December)
Helps fuel fruit development and maintain strong leaf growth
Important for trees already holding fruit
3. Late Summer / Early Autumn (February–March)
Boosts energy before fruit harvest and supports next season’s buds
Prepares the tree to handle cooler months with stronger roots and reserves
Bonus Feeding Tips:
Avoid feeding in winter when growth slows, especially in cooler areas.
Use organic citrus fertiliser, compost, worm juice, or seaweed tonic.
Apply after watering, then water again to avoid burning roots.
Mulch well, but keep it away from the trunk
Watering
Citrus trees like the Lemonade Tree need consistent watering, but they don’t like soggy feet! The key is to keep the soil evenly moist, not wet, not bone dry. Excess watering or inconsistent watering near ripening can cause fruit to split.
How Often to Water:
Young trees: Water 2–3 times per week, depending on weather
Established trees (in-ground): Deep water once a week in mild weather, 2–3 times a week in summer or heatwaves
Potted trees: Water more frequently—every 1–2 days in summer, but always check the soil first
Best Watering Tips:
Water early morning or late afternoon to reduce evaporation
Mulch thickly (with compost, straw, or bark) to keep moisture in, but keep mulch clear of the trunk
Signs of Over or Underwatering:
Yellow, curling leaves: Could be either! Check if the soil is too wet or too dry.
Dry, crispy leaves or fruit drop: Not enough water
Drooping, dark green leaves or root rot: Too much water or poor drainage
Pro Tip: Use your finger! Stick it about 5 cm into the soil—if it feels dry, it’s time to water.
When to Harvest Lemonades
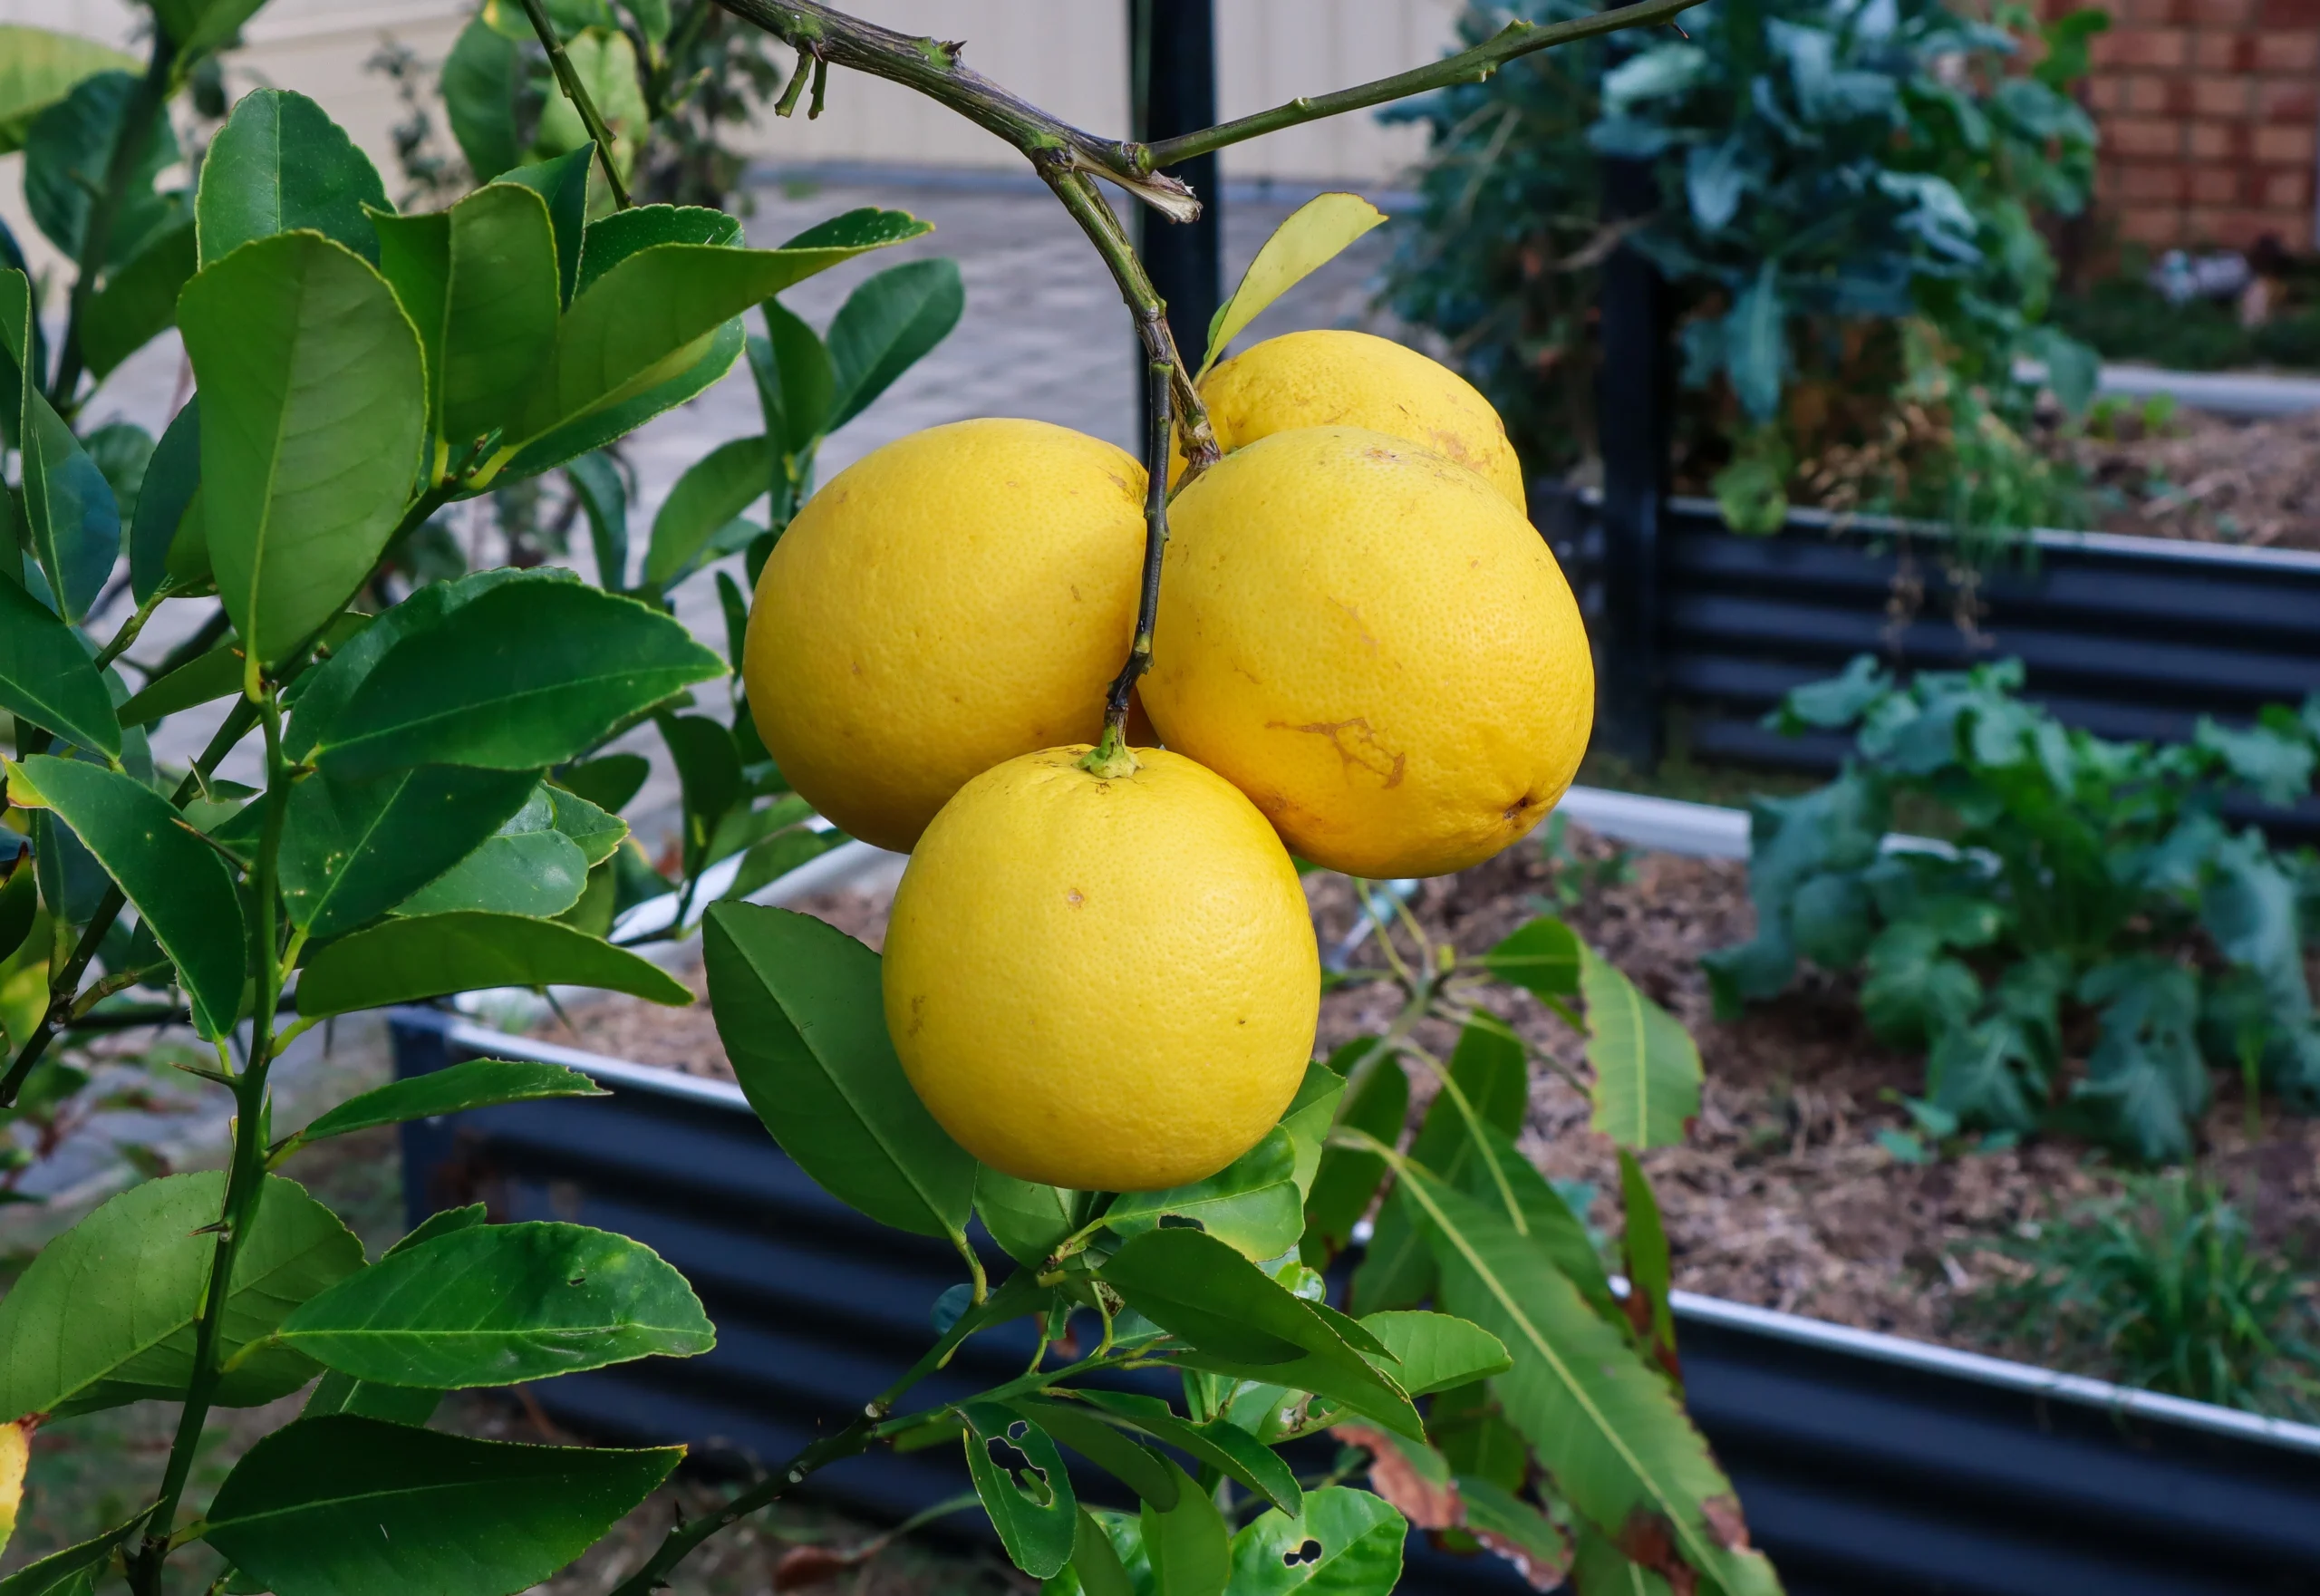
Lemonade trees are early-season producers. They can start to ripen in late Autumn to early winter. Pick when fully yellow. Fruit doesn’t ripen much off the tree, so taste test before harvesting large batches. Or slightly green for more tartness and flavour. Lemonades can lose some flavour when over-ripe.
Pruning & Care Tips
Prune after fruiting to maintain shape and airflow.
Remove any inward-facing or crossing branches
Cut off any suckers or growth below the graft
Keep well-mulched and weed-free at the base
Pests / Disease
Slugs, slaters, and snails can also be damaging to young plants. Watch for fruit fly, root rot (in soggy soil), and mealybugs. Net fruit if needed. Birds, rats and fruit bats will also enjoy your fruit.
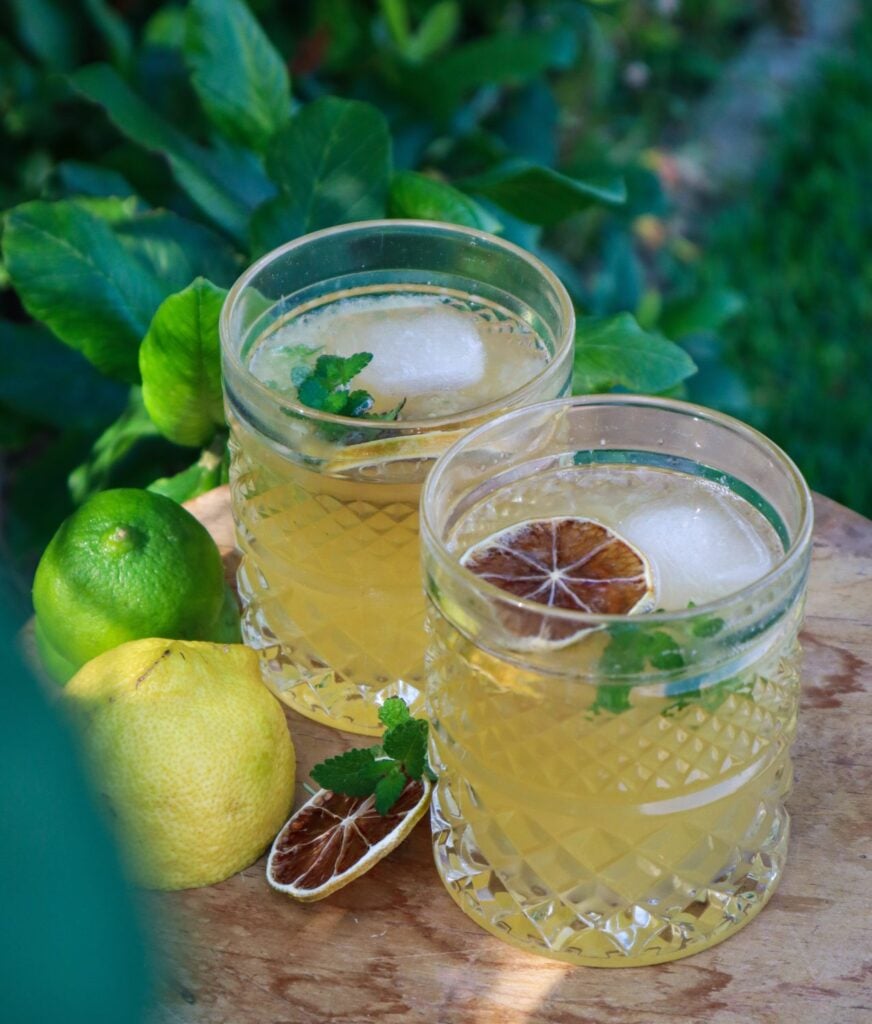
Cooking and Using Lemonades
Lemonades are great because you can enjoy them straight off the tree! However, once your tree gets bigger, you will have an abundance! It can be too much to eat fresh, even after giving some away. Below are some ideas to use and preserve your Lemonade harvests.
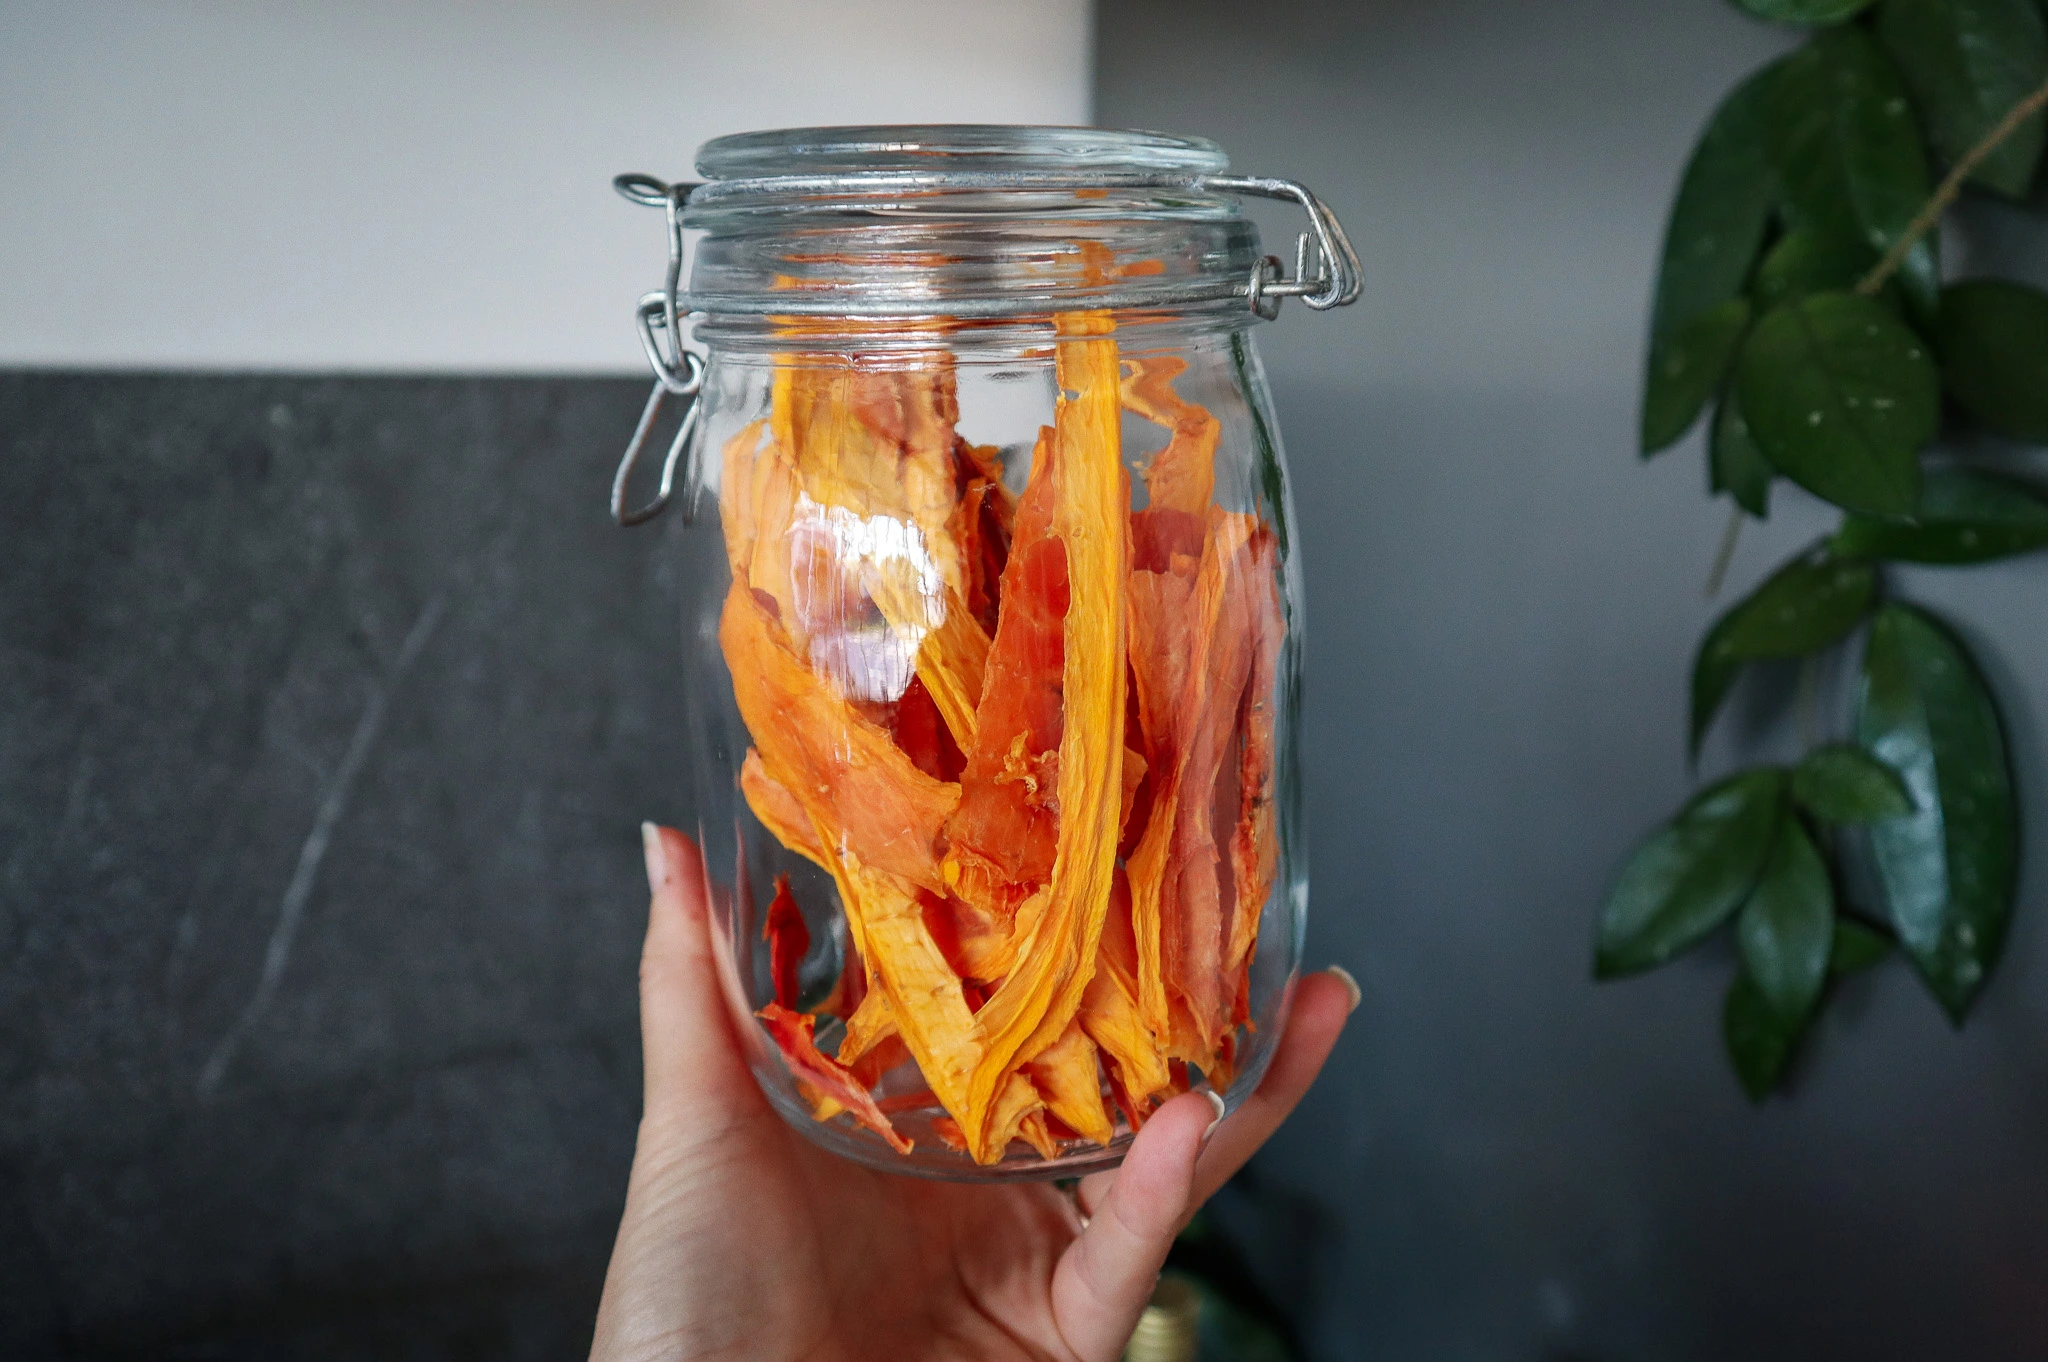
Dehydrate slices for teas, cocktails, or cake decoration
Freeze juice
Preserve in Jams, Marmalade or Chutney
Watch for more tips on growing a lemonade tree
Lemonade FAQs
Do lemonade trees have thorns? Yes, most do have thorns.
Are Lemonades a hybrid fruit? Yes, they are a cross between a lemon and a Mandarin
Are Lemonades sweeter than Meyer lemons? Yes, and even less acidic
Do they grow true from seed? Very Unlikely. This is a hybrid cross, and can be cross-pollinated again, so seedlings will be surprising results.
How long until they fruit? Grafted fruit trees will likely try to fruit in year 1. Due to the size of the tree it can be better to remove the fruit until year 2-3.
Where did Lemonade trees come from? Thought to have originated from New Zealand in the early 1980s from a chance hybrid seedling.
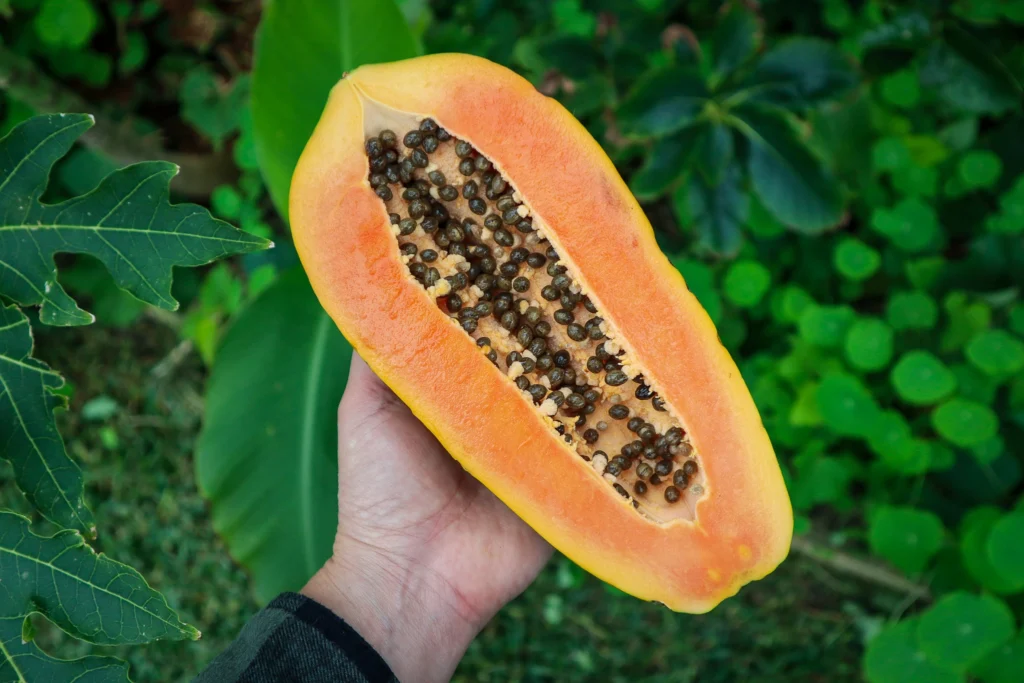
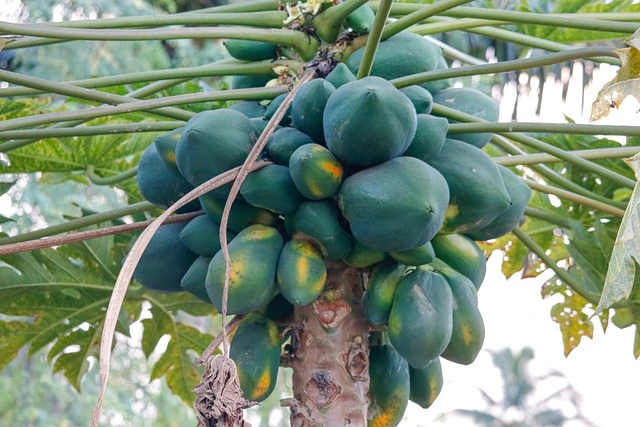
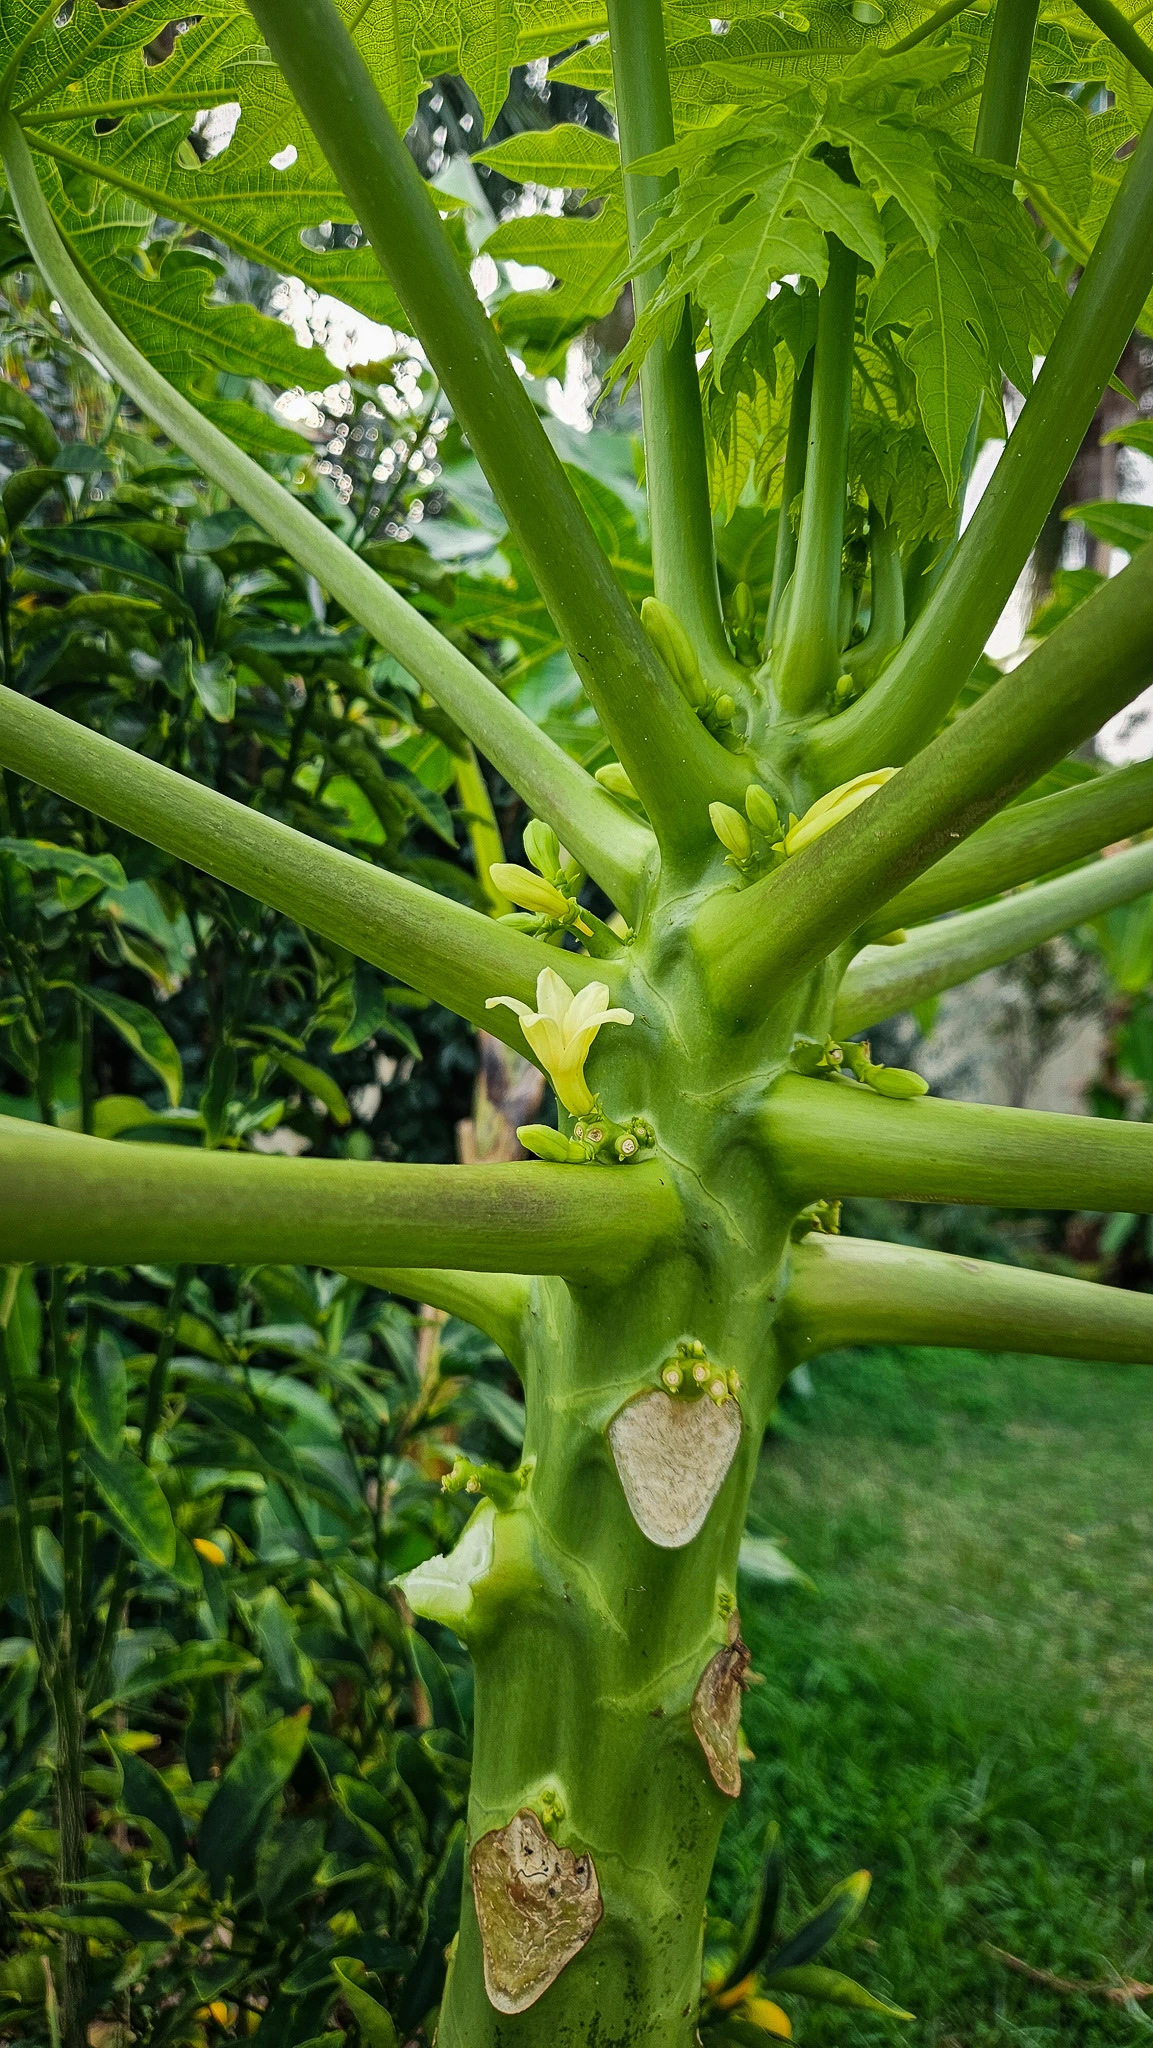
Learn how to grow Papaya (Carica papaya) at home from seed and what to make with your abundant Papaya crops! Papayas are a must-grow plant if you live in a warm climate and want abundant, quick harvests, vertical shade, and tropical vibes in your food forest or backyard. They grow fast, produce generous fruit, and are surprisingly easy to start from seed, making them perfect for urban permaculture gardens!
I have 6 Papaya plants that I’ve grown from seed and love how they act as an umbrella for my hot gardens, plus offer so much fruit! The amazing thing about Papaya is that you can harvest it green and use it like a vegetable, or wait for it to tree ripen and develop a sweet tropical flavour. They have quickly become one of my top picks for a low-maintenance, productive fruit tree that fits beautifully into even small gardens.
What parts of Papaya are edible?
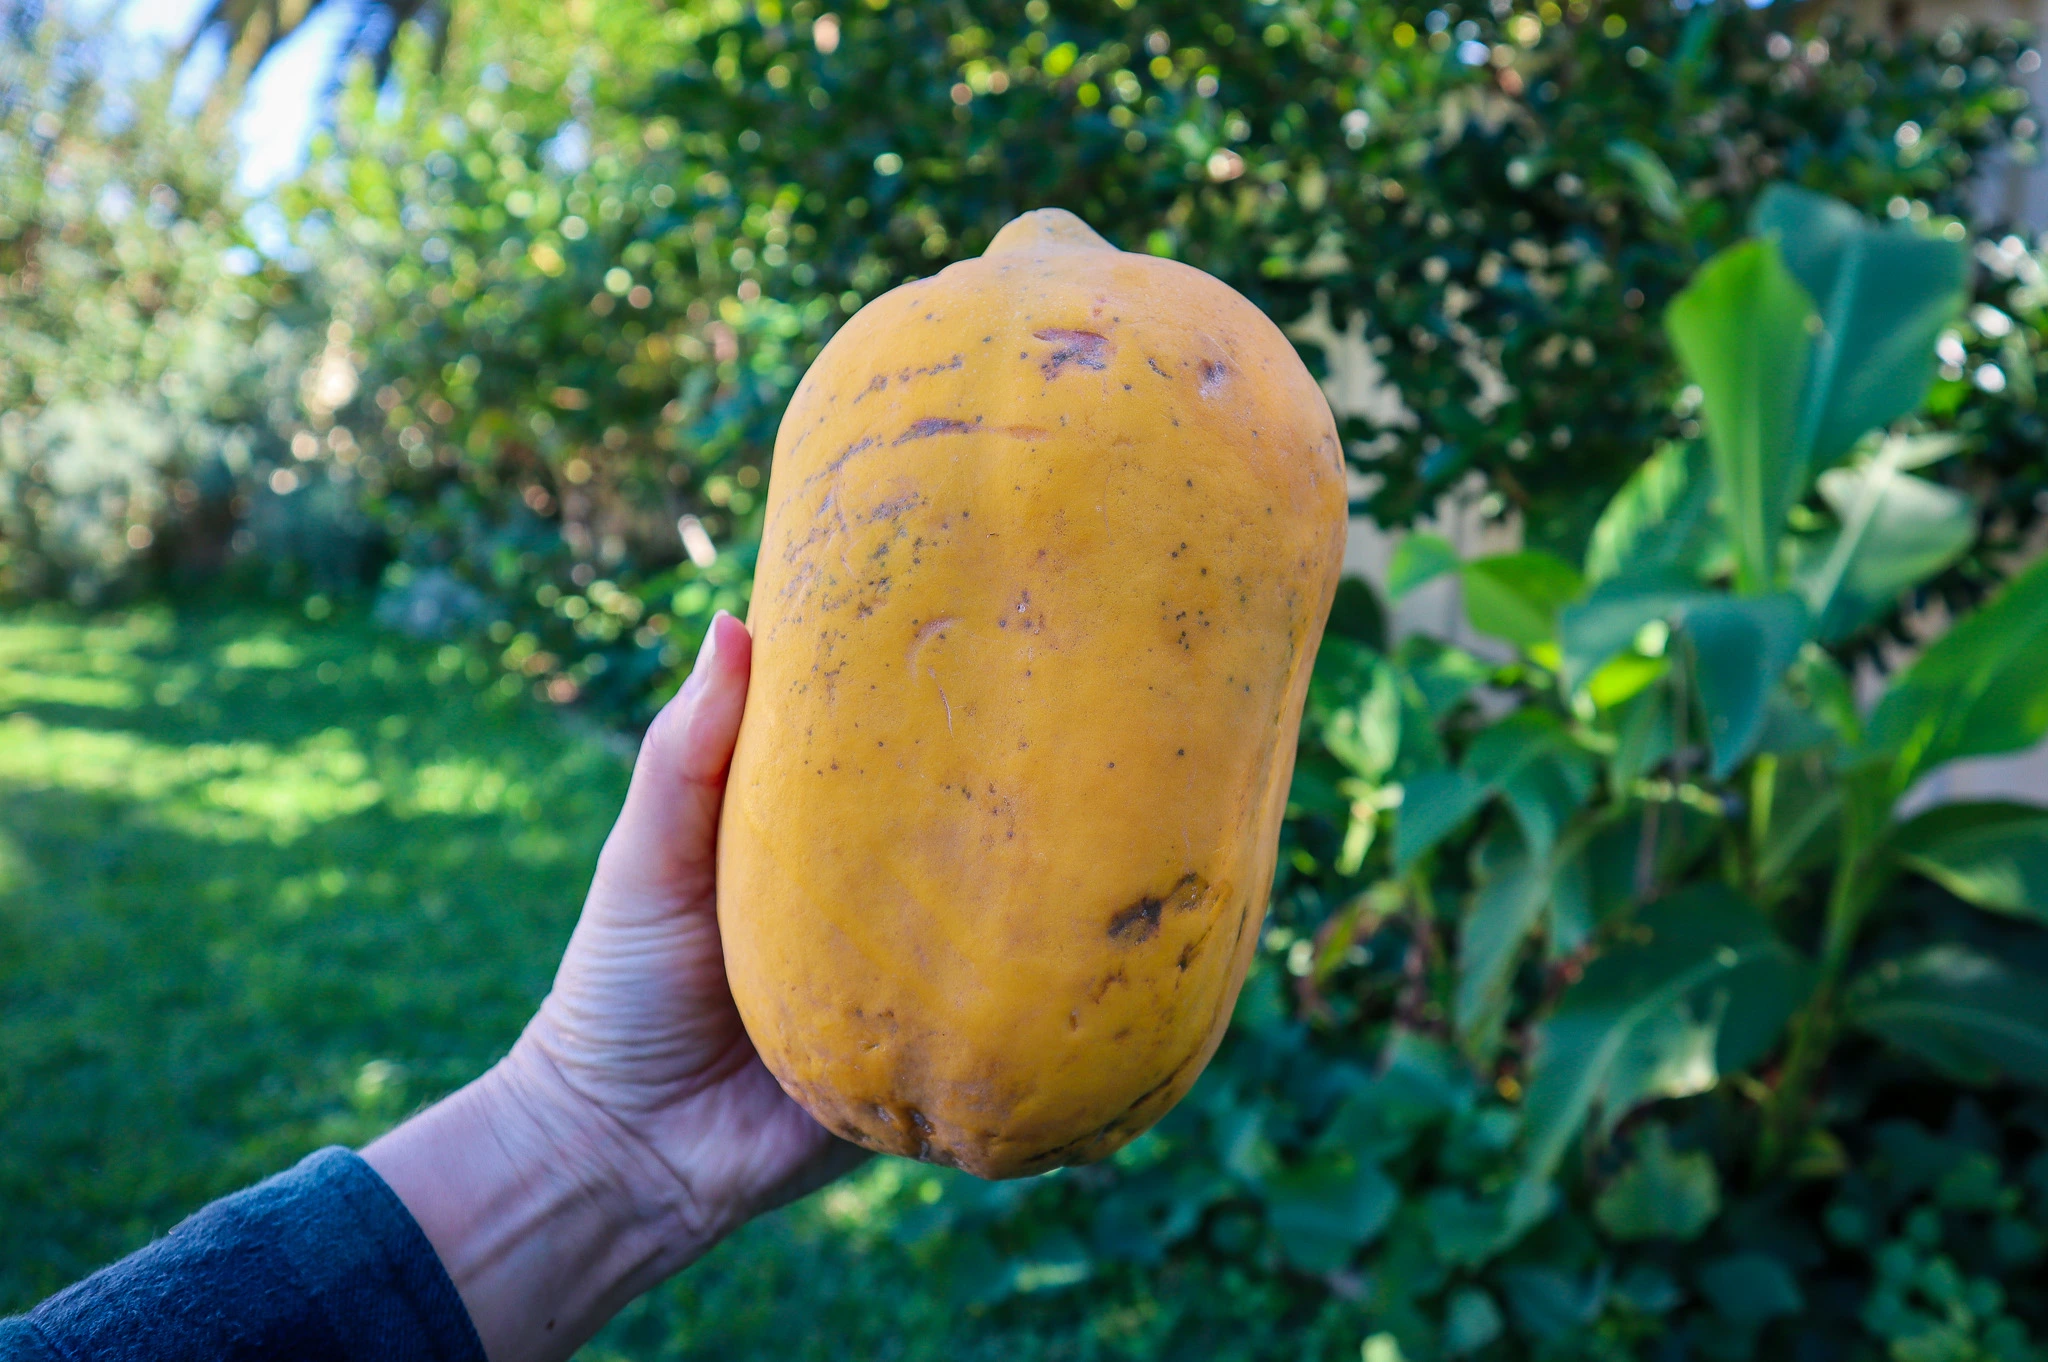
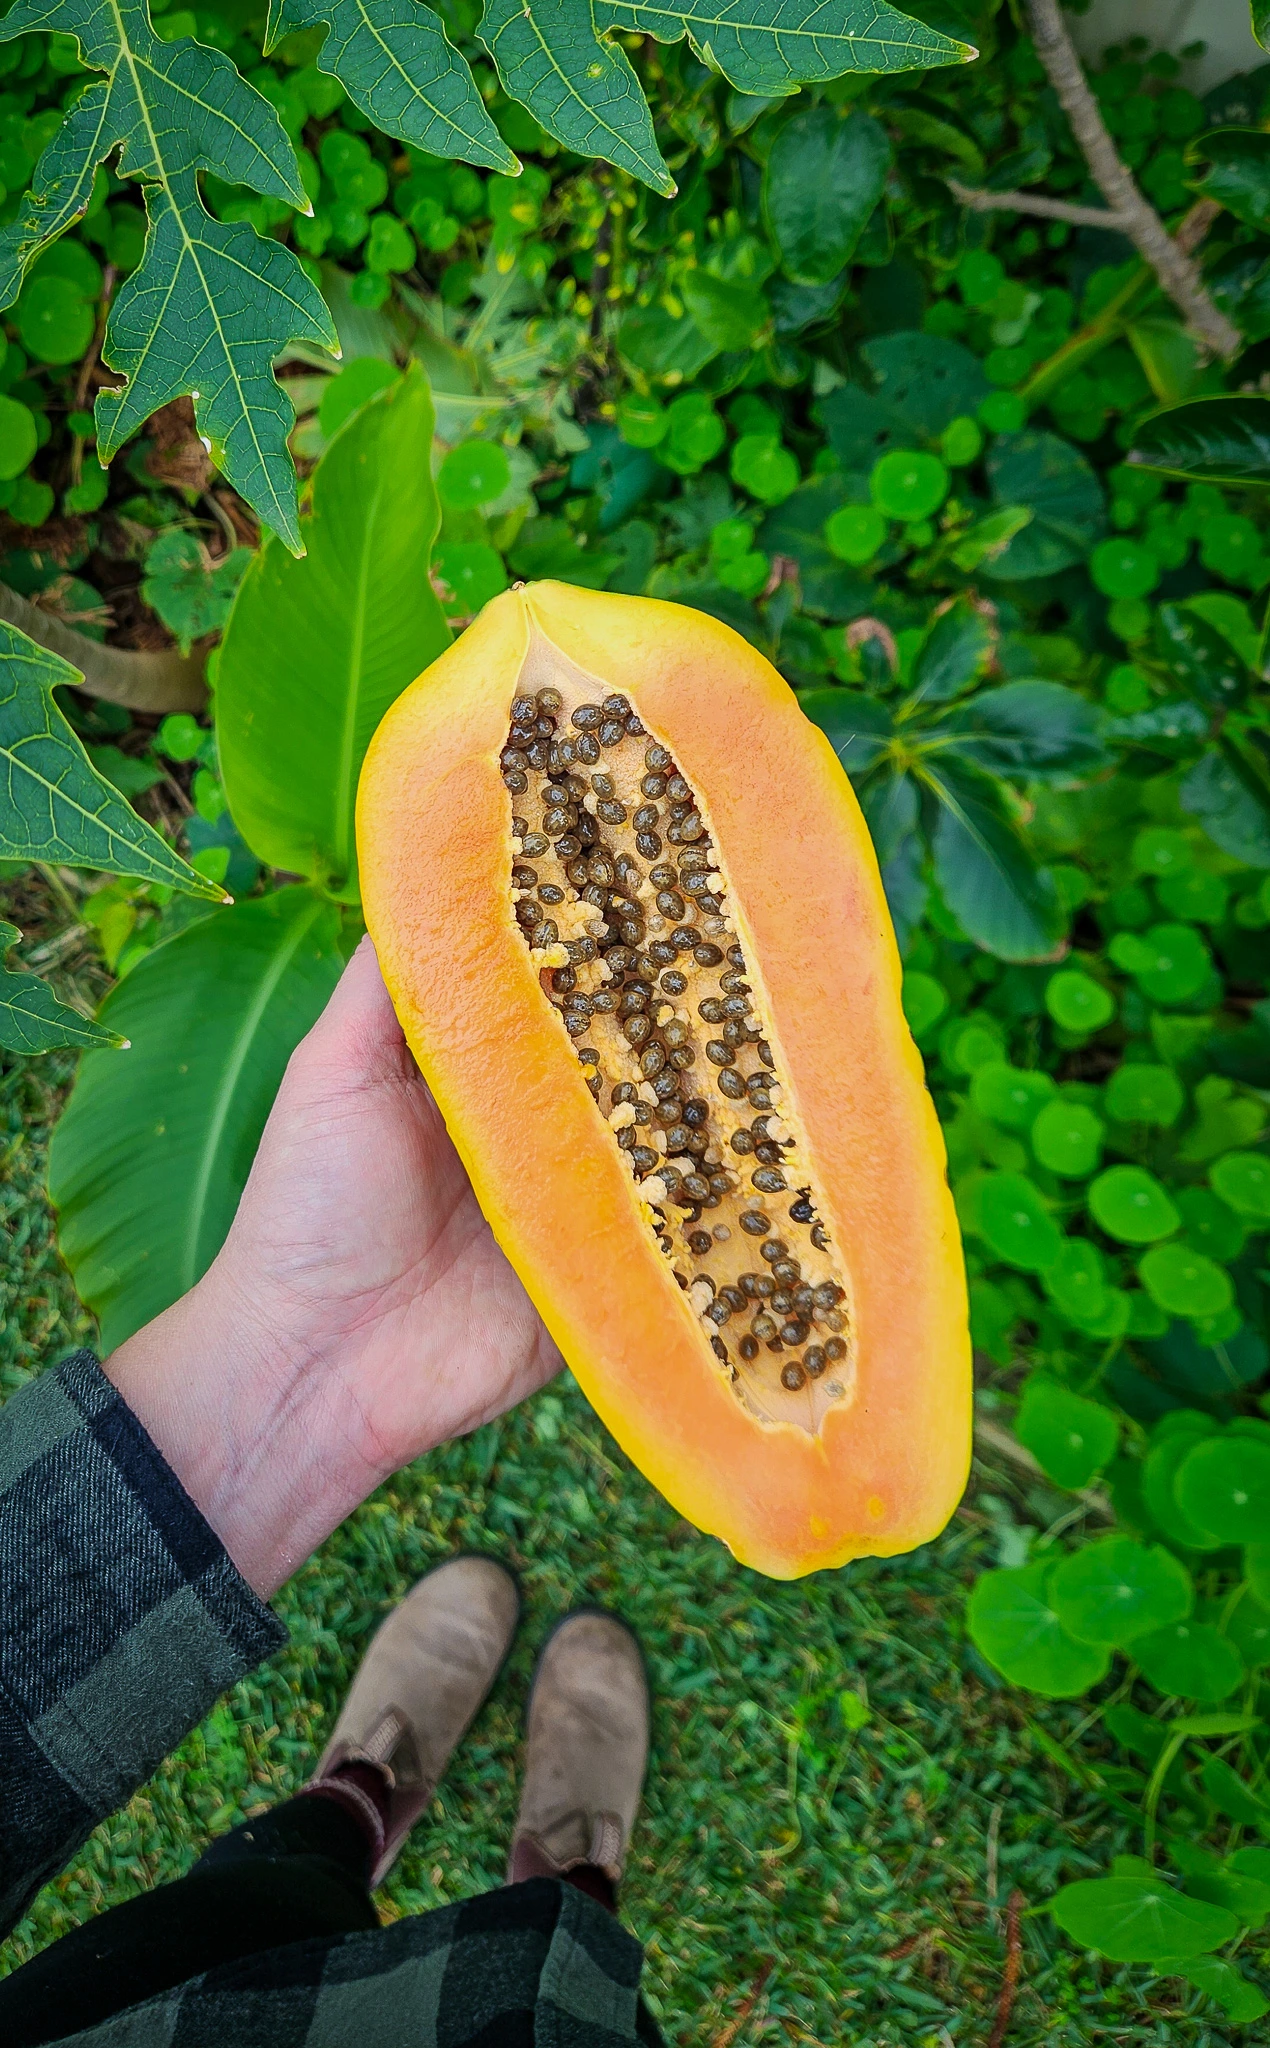
Fruit (Ripe Papaya) – Edible
The orange to reddish flesh of ripe papaya is sweet, soft, and full of enzymes.
Commonly eaten fresh, in smoothies, salads, salsas, or desserts.
High in vitamin C, A, and papain (a digestive enzyme).
Seeds – Edible (in moderation)
Have a peppery, slightly bitter flavour—can be eaten fresh or dried and ground as a pepper substitute.
Rich in enzymes and antimicrobial properties, but best in small amounts (they can be too potent or slightly toxic in excess).
Green (Unripe) Fruit – Edible when cooked
Used as a vegetable in curries, stir-fries, or grated into salads (like Thai green papaya salad).
Contains more papain, which breaks down proteins—great for tenderising meat.
Must be cooked or prepared properly, especially for those sensitive to latex.
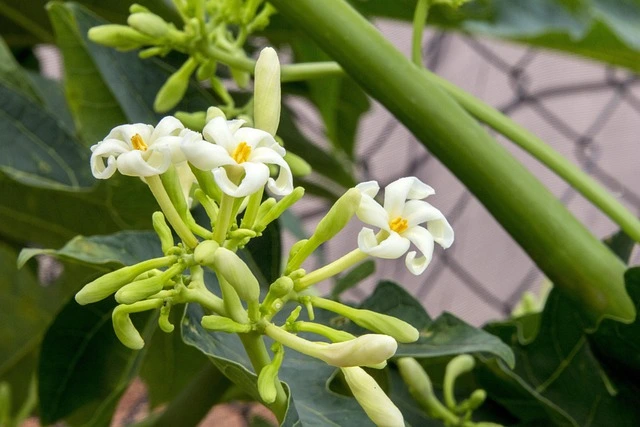
Flowers – Edible (especially male flowers)
Sometimes used in traditional dishes in Asia and the Pacific Islands.
Have a mild bitter flavor; usually sautéed or boiled before eating.
⚠️ Parts NOT Recommended to Eat Raw:
Stem, latex, and roots: Contain milky sap (latex), which may cause irritation or be mildly toxic.
Unripe parts (fruit or leaves) should be cooked if consumed, especially for people with latex sensitivity.
Quick Tips on How to Grow Papaya at Home
PLANT
Sow seeds in spring to early summer for best results.
SOIL
Free-draining compost-rich soil.Mounded above ground in clay soil.
LOCATION
Full sun. Choose a warm, sheltered spot protected from wind and frost.
CARE
Water deeply but allow the soil to dry slightly between watering. Mulch thickly. Prune lower leaves as they yellow.
FERTILISE
Feed monthly with compost tea, worm juice, or organic fertiliser high in potassium.
PESTS
Watch for fruit fly, root rot (in soggy soil), and mealybugs. Net fruit if needed.
HARVEST
Pick when the fruit starts to yellow and softens slightly. Let it ripen further indoors.
REPRODUCE
Grow from seed, but know your plant’s sex! See below for more info on male, female, and bisexual types.
Why Grow Your Own Papaya?
Here are some of the many reasons to grow Papaya.
Super fast-growing fruit tree
Suitable for pots or small spaces
Vertical growth = space saver
Produces fruit in under a year
Can grow tall to act as a shade umbrella
Perfect for syntropic and food forest layering
It can be used as a fruit or a vegetable
Versatile uses in the kitchen
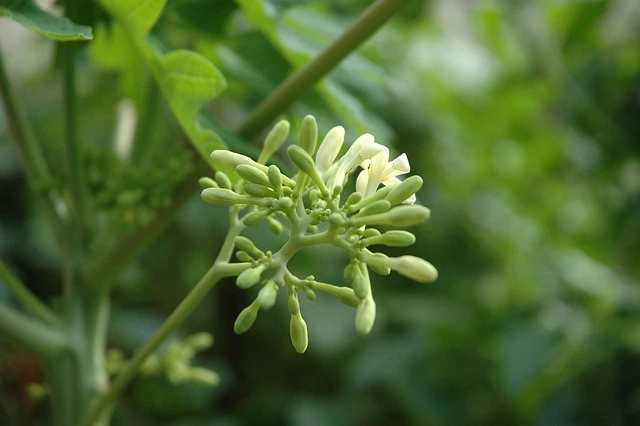
How to tell Papaya Plant Sex: Male, Female & Bisexual
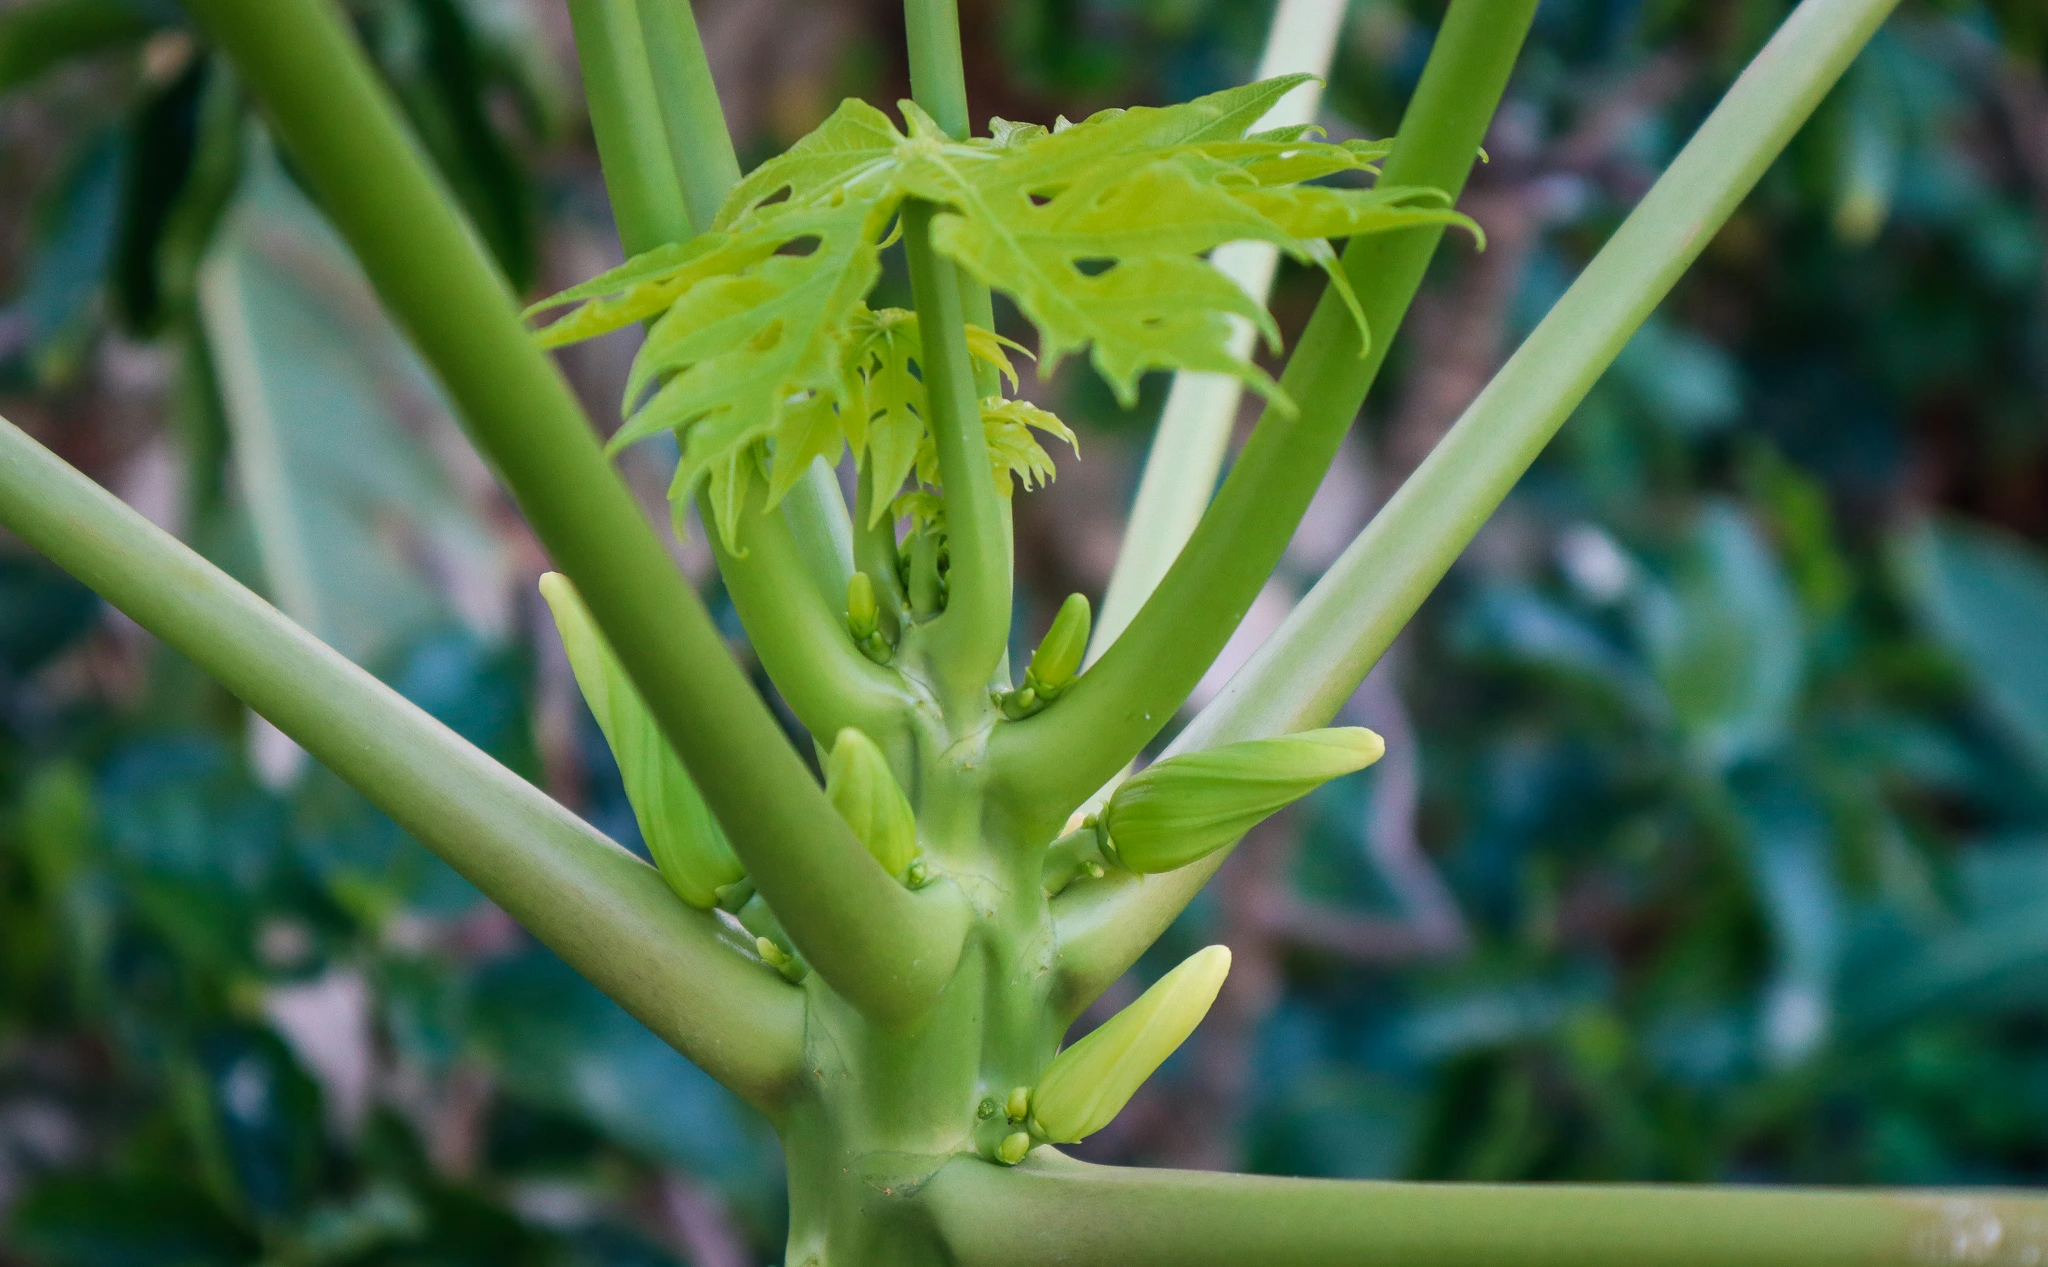
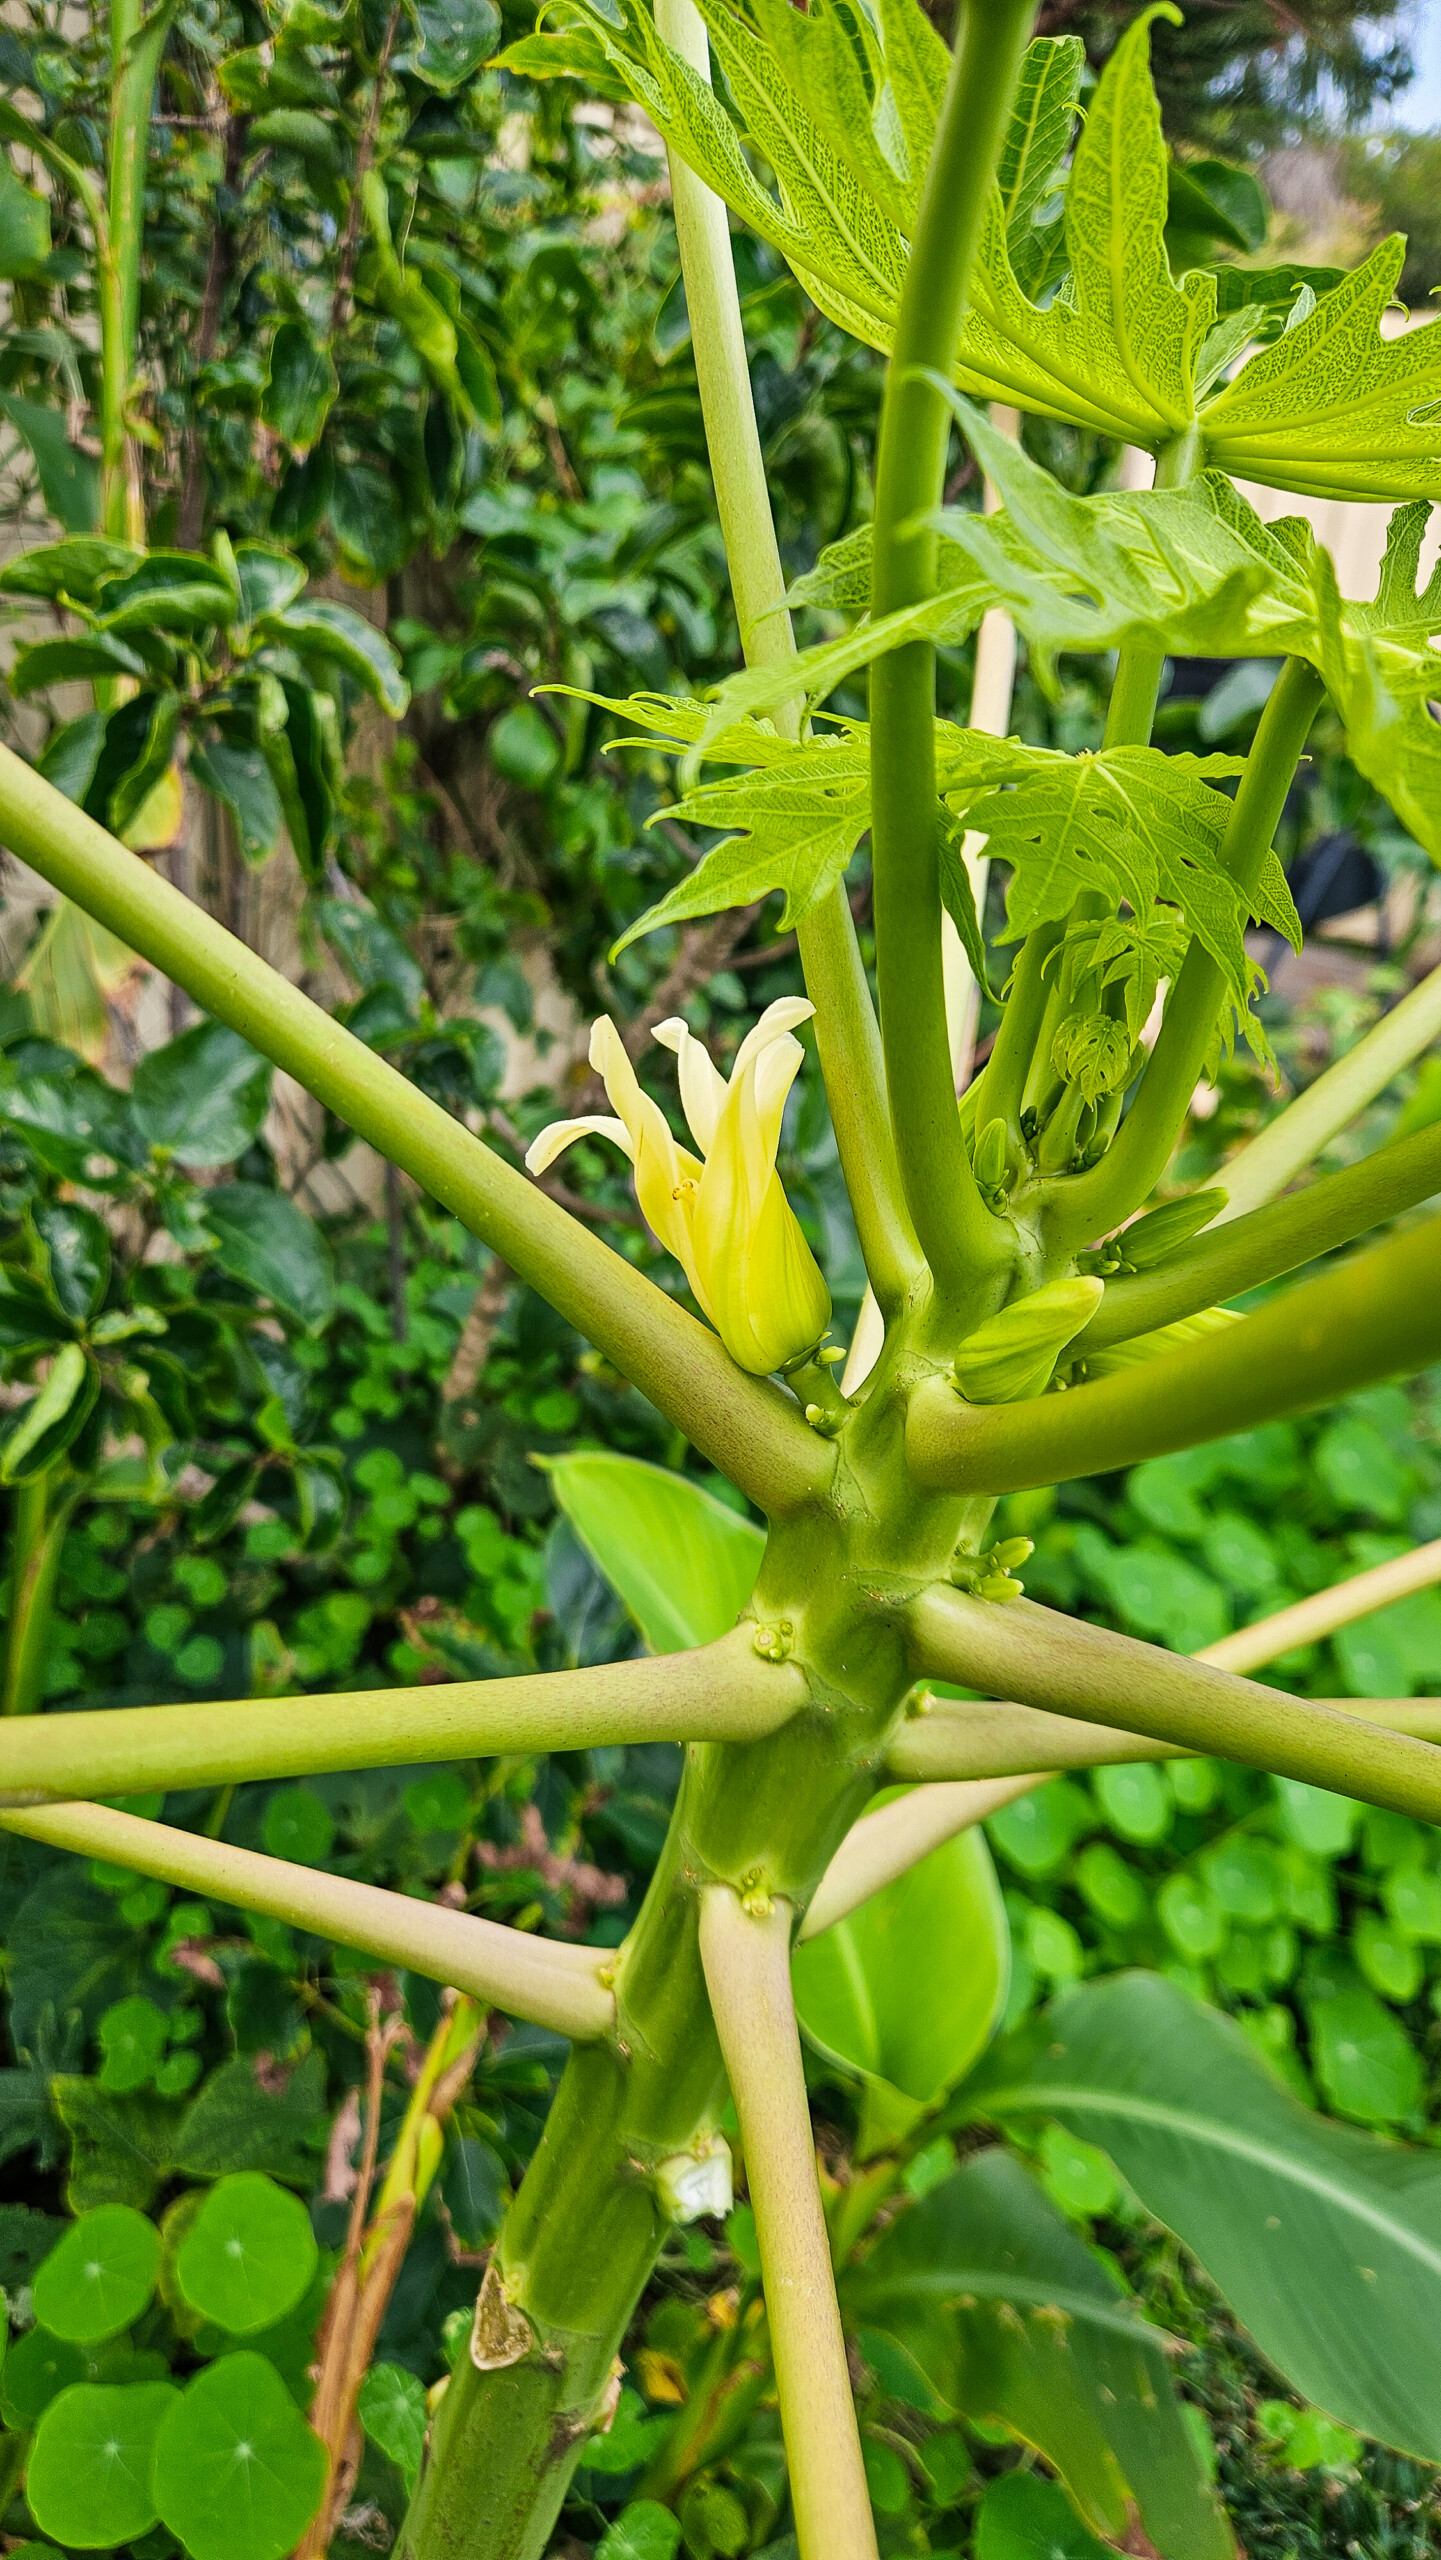
Male
Mainly just produces flowers with many on long shoots. Sometimes they will produce fruit also at the end of the long stem. Males are often the quickest to start flowering. Keep one if you want to pollinate females, but usually not needed if you grow bisexual types.
Female
Produces the largest flowers with mini Papayas tucked under their unfurling white petals. They fruit better if pollinated by a male or bisexual plant. Fruit is rounder and often larger than bisexual fruits. Female fruits sometimes have fewer seeds inside and even none when they haven’t been pollinated.
Bisexual (Hermaphrodite)
Produces small flowers in clusters close to the main stem (unlike the male, which clusters on long stems). Self-pollinating and highly productive. The fruit is usually more elongated with plenty of seeds inside. Ideal for small gardens as you only need one plant.
When can you tell what sex a Papaya is?
You won’t know the sex until flowers appear, usually a few months in, when the plants are about 0.5 – 1m tall. This is why it is a good idea to grow your own from seed and plant multiple seedlings (5–6) and remove males later, unless needed for pollination. Some nurseries will falsely sell Papaya plants as Bisexual, but because they are all grown from seed, there is still a chance of getting a male or female plant.
Popular Papaya Varieties
Red Army- Large, firm red-fleshed fruit with excellent flavour and good shelf life.Bred for disease resistance and improved productivity in Australian conditions.
Pink Lady – Deep pink flesh, sweet flavour, smooth texture. Performs well in warm, humid climates and responds well to regular feeding.
Southern Red – Sweet, deep red-orange flesh, medium-sized fruit. Australia’s most commonly grown red papaya variety. Productive and widely available.
Solo Sunrise – Small, sweet, pear-shaped fruit with orange-red flesh. Compact plant, good for pots or smaller gardens.
TOP TIPS TO GROW PAPAYA
Choose a warm sunny location
Prepare the soil with plenty of compost
Free draining is key!
Papayas hate wet feet and can rot easily. In clay soils – mound up above the ground rather than planting down in a hole
Do not disturb roots when removing from the pot.
Protect from frosts and high winds
Keep the trunk clean and clear with good airflow.
Remove older yellowing leaves
Keep weed-free and well-mulched
How to Grow Papaya from Seed
You can grow papayas from shop-bought or homegrown fruit. Ideally, source locally grown fruit as supermarket-imported fruit is often treated and has fewer viable seeds. Here’s how:
Step-by-Step:
Scoop out fresh papaya seeds and rinse off pulp.
Gently squeeze the seed to pop the casing off and reveal the bumpy seed.
Plant 2–3 seeds per hole in a sunny seed-raising tray or directly into a garden bed.
Thin out to the strongest seedling once sprouted.
Keep at least 5-6 plants, either in pots or the ground and wait until they start to flower to determine sex.
💡 Tip: Papayas don’t like transplanting or having their roots disturbed. Plant in their final position early to minimise root disturbance.
Temperature & Climate Conditions for Growing Papaya
Papayas (Carica papaya) love the heat and grow best in tropical to warm subtropical climates. They’re fast-growing but sensitive to cold, so choosing the right spot and protecting young plants is key.
Frost-sensitive: Frost can damage or kill papaya trees, especially young ones.
If you’re in a warm coastal or inland area with mild winters (like parts of WA, QLD, NT, or northern NSW), papayas will thrive year-round. In cooler zones, they’ll need protection from cold, wind, and frost—especially during their first 1–2 years.
Tips for Growing Papaya in Cooler Zones:
Plant in full sun, ideally with a north-facing wall, fence or thermal mass to reflect warmth
Use a frost cloth or a mini greenhouse in winter if needed
Grow in large pots and move under cover during cold snaps
Apply thick mulch and avoid planting in frost-prone low spots
Want to Grow Papaya in Cooler Climates? Try These Alternatives:
If your garden gets frost or struggles to stay warm through winter, papaya might not be the easiest option. But there are a few cold-tolerant cousins and lookalikes worth trying!
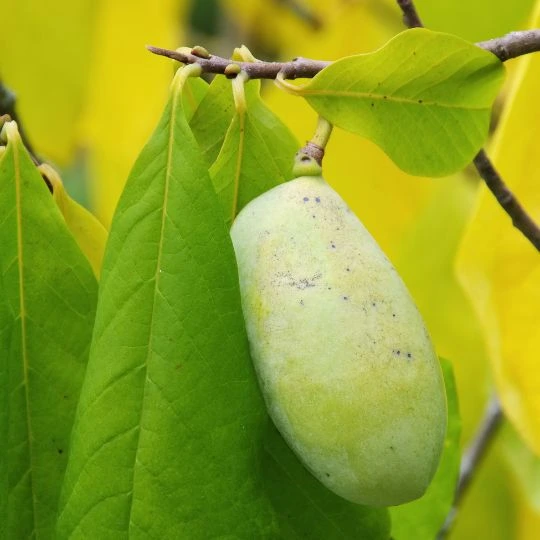
Mountain Papaya (Vasconcellea pubescens)
Native to the Andes, this papaya relative handles much cooler temps—even light frosts! This one is popular back home in New Zealand. I haven’t been able to find a plant here in Western Australia…yet.
Grows well in temperate zones with protection.
Fruit is smaller, ripens to yellow and is pear-shaped
Champagne-like flavour and you can eat the seeds as well.
Bonus: It’s often grown for its enzyme-rich latex, like papain.
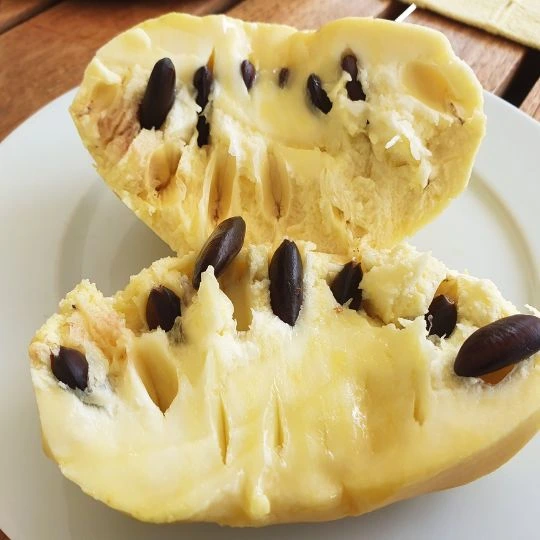
Babaco (Vasconcellea × heilbornii)
A natural hybrid related to mountain papaya.
Alaos called the Champagne fruit due to the flavour.
Grows in cool subtropical to mild temperate zones—tolerates down to around -2°C with protection.
Produces seedless, tangy-sweet fruit that tastes like a mix of pineapple, pawpaw, and lemon.
Compact, attractive tree perfect for pots or small backyards.
Needs pruning to keep productive, and doesn’t tolerate root disturbance.
North American Pawpaw (Asimina triloba)
Not related to papaya, but often confused due to the name.
Native to eastern North America and thrives in cold temperate zones.
Deciduous tree with custard-like fruit that tastes like banana, mango, and vanilla.
Needs chill hours and two trees for pollination, but a great option for truly cold climates.
Best grown in full sun with rich, moist soil.
North American PawpawNorth American Pawpaw
How to Care for Papaya Plants
Care/ Maintenance
Papayas are heavy feeders, so compost and mulch often to keep them well fed. Always ensure the mulch is pulled away from the trunk, as papaya stems are susceptible to rot.
Feeding
Feed monthly with compost tea, chop and drop mulch, worm juice, or organic fertiliser high in potassium.
Watering
Water deeply but allow the soil to dry slightly between waterings.
Harvesting
Fruit takes 5–8 months to mature from a flower.
Harvest when the skin starts to turn yellow.
Clip off with secateurs. Ripen further indoors.
Use green if preferred for savoury dishes (salads, curries, stir-fries).
Can you Prune Papaya Plants?
Yes! Some Papaya plants can get very tall, which is great for shade, and as the canopy is overhead, they take up less room in the garden. However, this can make it very hard to pick ripe fruit. Pinching the top of the Papaya plant can force it to stop growing taller and branch out. If your papaya does get too tall, you can cut the main stem, which will also force it to branch out. Stems can be hollow, so you may need to cover the cut to stop rain from getting down in the stem and causing rot. An upside-down container can work well. Prune off the older yellowing leaves by gently pulling down on the stem. This will help to divert energy back to the plant.
Pests / Disease
Slugs, slaters, and snails can also be damaging to young plants. Watch for fruit fly, root rot (in soggy soil), and mealybugs. Net fruit if needed. Birds, rats and fruit bats will also enjoy your fruit. It is best to pick fruit at the first sign of yellow and allow it to ripen inside to avoid attracting more pests.
ReproducingPapaya
Scoop seeds from ripe fruit.
Rinse and dry thoroughly.
Store in a paper envelope in a cool, dry spot.
For better odds of getting bisexual plants, save seeds from bisexual fruits only.
Cooking and Using Papaya
Papaya is delicious raw or cooked as well as ripe or unripe. Making it a great staple food to grow in the garden.
Learn how to grow Avocado (Persea americana) at home and what to make with your abundant avocado crops! Avocado is a popular fruit that can be a little tricky to grow. Choosing the right variety for your climate and getting some key care points right should have you picking homegrown avocados for years to come!
Avocados can be used as evergreen shade trees or grown in pots for urban areas. Avocado trees can reach heights of 12+ meters if they are not pruned. Smaller dwarf trees will reach maximum heights of around 4 meters, but can also be pruned to keep them smaller.
Avocados are best grown from grafted trees. Growing an Avocado from seed can take anywhere from 4 to 13 years or longer to get fruit. Even then, you have no idea what the fruit will be like, as it will not be identical to the plant the seed came from. Grafted trees have mature fruiting stems grafted onto allow the tree to bear fruit within a year or two.
Free-draining compost-rich soil.Mounded above ground in clay soil.
LOCATION
Full sun – part. 6-8 hours.Can benefit from afternoon shade.
CARE
Keep weed-free and well-mulched.Protect from wind and hot afternoon sun when young.
FERTILISE
Feed with compost and mulch.
PESTS
Excess water and fungal diseases are the most common cause. Rats may eat the fruit.
HARVEST
Fruit takes about 1 year on the tree to ripen. Skin goes dull and some may drop from the tree.
REPRODUCE
Can be grown by seed but may take 10+ years to fruit. Mature wood grafted from fruiting-age trees is best.
Why Grow Your Own Avocado?
Here are some of the many reasons to grow Avocados.
Evergreen shade-giving tree
Perennial crops
It can be expensive to buy!
Can be used in sweet and savoury dishes
Prolific producer
Long harvests
High in vitamin E and folate
High in fibre
Substitute for butter
Popular Avocado Varieties to Grow
Avocados come in A and B varieties. Each type flowers has male and female at different times of the day. Having both an A and a B-type Avocado will mean you will get more avocados due to an increase in pollination. Most avocados will be self-fertile, but having a second will increase the amount you get. Dwarf or semi-dwarf avocados will grow to be smaller trees, but unlike other dwarf fruit trees, they will still be up to 4m high. Keeping them pruned can maintain their size.
Type (A) Varieties
Hass – Popular small dark-skinned avocado. Most commonly found in stores due to its tough skin for transport. Small fruit, a great producer.
Reed – Large green round fruit 200-800 grams. Mild and buttery flavour. The tree tends to grow upright rather than outwards.
Choquette – Large green round fruit weighing over 1kg! Creamy, rich flesh. A cross between a Guatemalan and a West Indian type.
Semi Dwarf
Lamb Hass – Large dark-skinned avocado. Semi-dwarf tree growing 3-4 metres. Late-season fruits.
Pinkerton – Medium-sized green-skinned fruit. Semi-dwarf tree growing 3-4 metres. High oil content.
Wurtz – Medium-sized green pear-shaped fruit. Semi-dwarf tree growing 3-4 metres. Weeping branches that hang downward.
Type (B) Varieties
Shepard – Popular commercial variety. Green skin and yellow firm flesh. Smaller tree size 6-8 metres.
Bacon – Most cold-tolerant variety (may survive -5 degrees). Large pear-shaped fruit with green skin.
Fuerte – Small – medium-sized green fruit. Thin skin and buttery flesh. Produces both normal-sized and mini seedless avocados called “cukes”. Crops more biannually (every second season). Vigorous spreading tree.
Zutano – Pear-shaped fruit with green glossy skin. Low oil content and can be quite watery.
Sharwill – Medium-sized oval fruit with green skin. Rich flavour and small seeds. Frost sensitive.
Linda – Large fruit with dark purple skin. Fruits from 400-1100g each. Thick skin that is easy to peel.
TOP TIPS TO GROW AVOCADO
Choose a sunny location
Shelter from the wind or able to create shelter
Prepare the soil with plenty of compost
Free draining is key!
Avocados hate clay soils – mound up above the ground rather than planting down in a hole
Do not disturb roots when removing from the pot!
Protect from the hot afternoon sun
Keep grass and weeds away from the base
Keep weed-free and well-mulched
When to PlantAvocados
Avocados don’t like the cold or the extreme heat, so avoid planting them in winter or summer. Choose a day when the weather will be mild for a few consecutive days.
How to Grow an Avocado
Choose a sunny location with 6-8 hours of sunlight.
Choose a location that can be protected from winds (shade cloth can help)
Dig a hole and prepare the soil with compost. Mix compost and sandy soil together. For clay soils, backfill with compost and sandy soil, and create a mound above the ground.
Carefully remove the Avocado carefully by cutting the bag or gently easing it from the pot. Try not to disturb roots when possible.
Gently push soil against the root ball and push down with your hands to remove air pockets.
Add a stake to help secure the tree, but do not push it through the root ball.
Add mulch as wide as you can approx 1m but pull back from the trunk so it does not touch (this can cause collar rot)
Add a shelter of shade cloth to the side that gets wind and afternoon hot sun.
Paint any exposed stems with water-based white paint (nontoxic) at a ratio of about 50% paint and 50% water. This acts as sunscreen, which is important for Perth summers!
Care/ Maintenance
Avocados like plenty of food, regular top-ups with compost and mulch are important. The biggest issue with Avocados is too much water, sun or wind.
Feeding
Feed with compost or composted manure at the end of winter, before spring, and end of summer.
Watering
Deep water, especially in summer. Push your finger into the soil to the second knuckle; if it comes out dry, water well. If the soil on your finger sticks and is mois,t leave it be.
Harvesting
Avocados, like many fruit trees, should be prevented from fruiting for the first 1-3 years. Wait until the flowers sprout on long stems, then remove them. Once you start letting your Avocado fruit, it will take 1 year from when the fruit sets until it is ready to harvest. Some Avocados stay green when they are ready and ripen off the tree, so here are a few ways to tell if they are ready to pick.
Skin turns from glossy to dull
Stem lightens
It’s within the varieties’ “mature fruit months” (research for your variety and area)
Pick one and let it ripen on the bench for a week or two. If it is delicious and buttery, you can harvest more. If it shrivels and goes black, it is not ready and try again in 2-3 weeks.
Fruit starts falling on the ground.
Pruning
The Avocado tree can grow to be a huge 10 m+ tree if left unpruned. Once your tree reaches 2m or your desired height, you can start pruning it. Be selective and try to remove branches whilst still allowing shade to the other parts of the tree. Try not to remove the bottom “skirt branches” as these protect the stem from being burnt. If once you prune the tree, there are areas of stem exposed, paint with white water-based paint (50:50 water mixed) to add protection.
Pests / Disease
Avocados mainly succumb to bacterial diseases due to excess water. Don’t water the leaves when possible and allow good drainage for the roots.
Reproducing
Seeds from the Avocados can be grown and will produce a new variety. Seed-grown Avocados can take 10+ years to actually fruit, and you never know what the fruit will be like. The best way to reproduce is to grow an Avocado from seed and then graft onto it from a tree that is already fruiting and mature. But also, if you have the room, there is no reason not to try seed-grown as you may end up with an exciting new variety.
Cooking and Using
Avocado is a powerhouse in the kitchen and can be used in a wide array of ways.
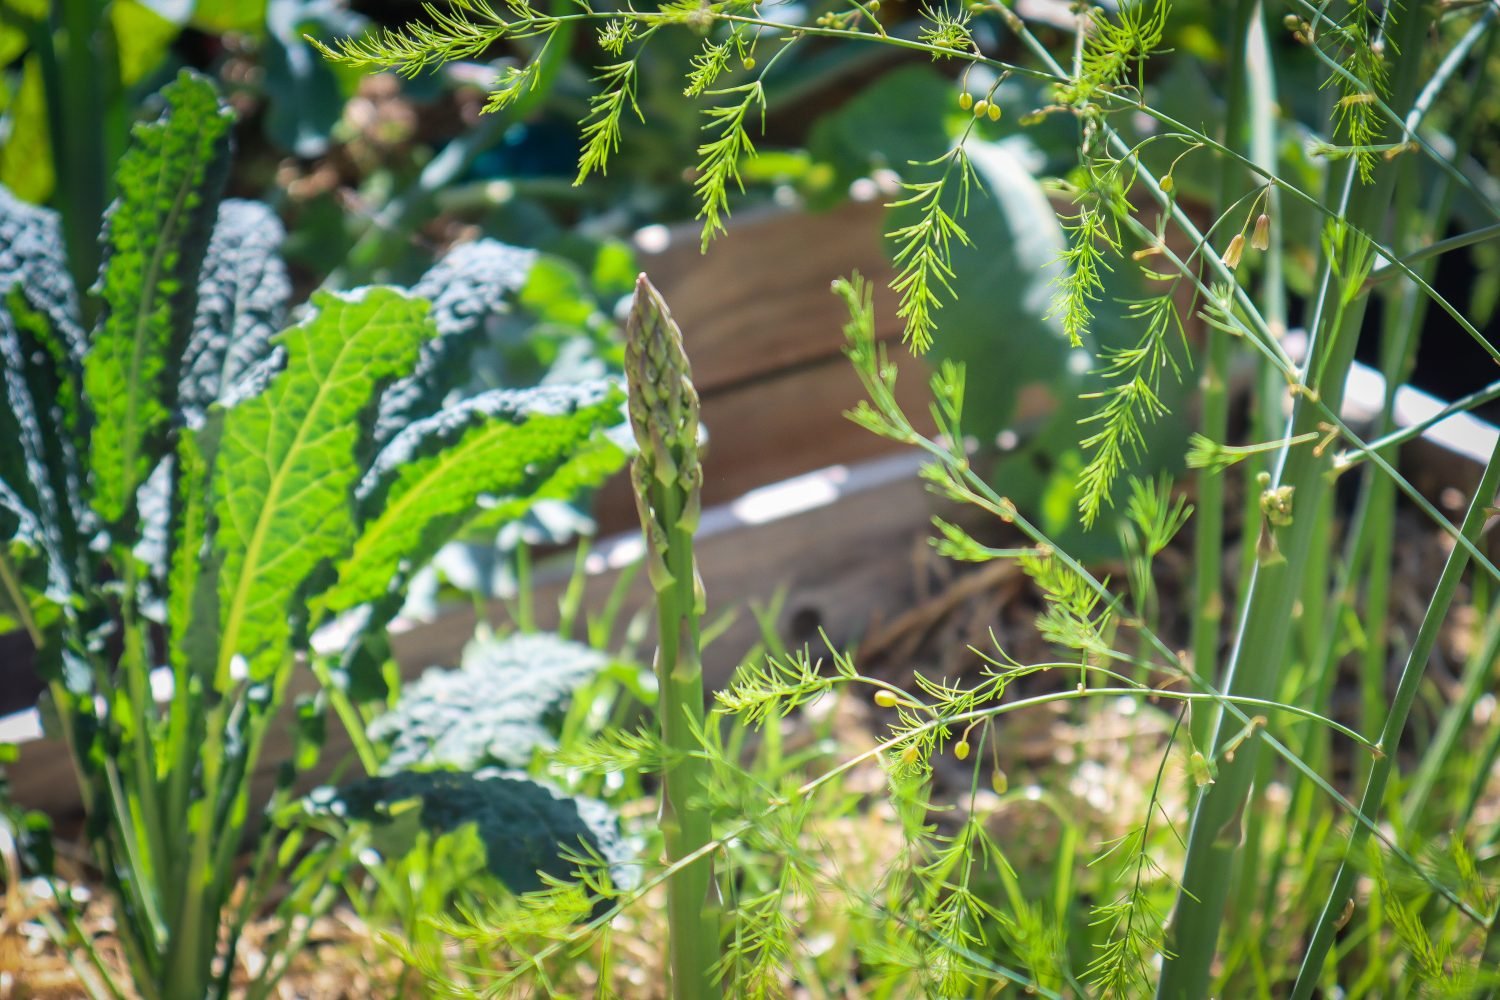
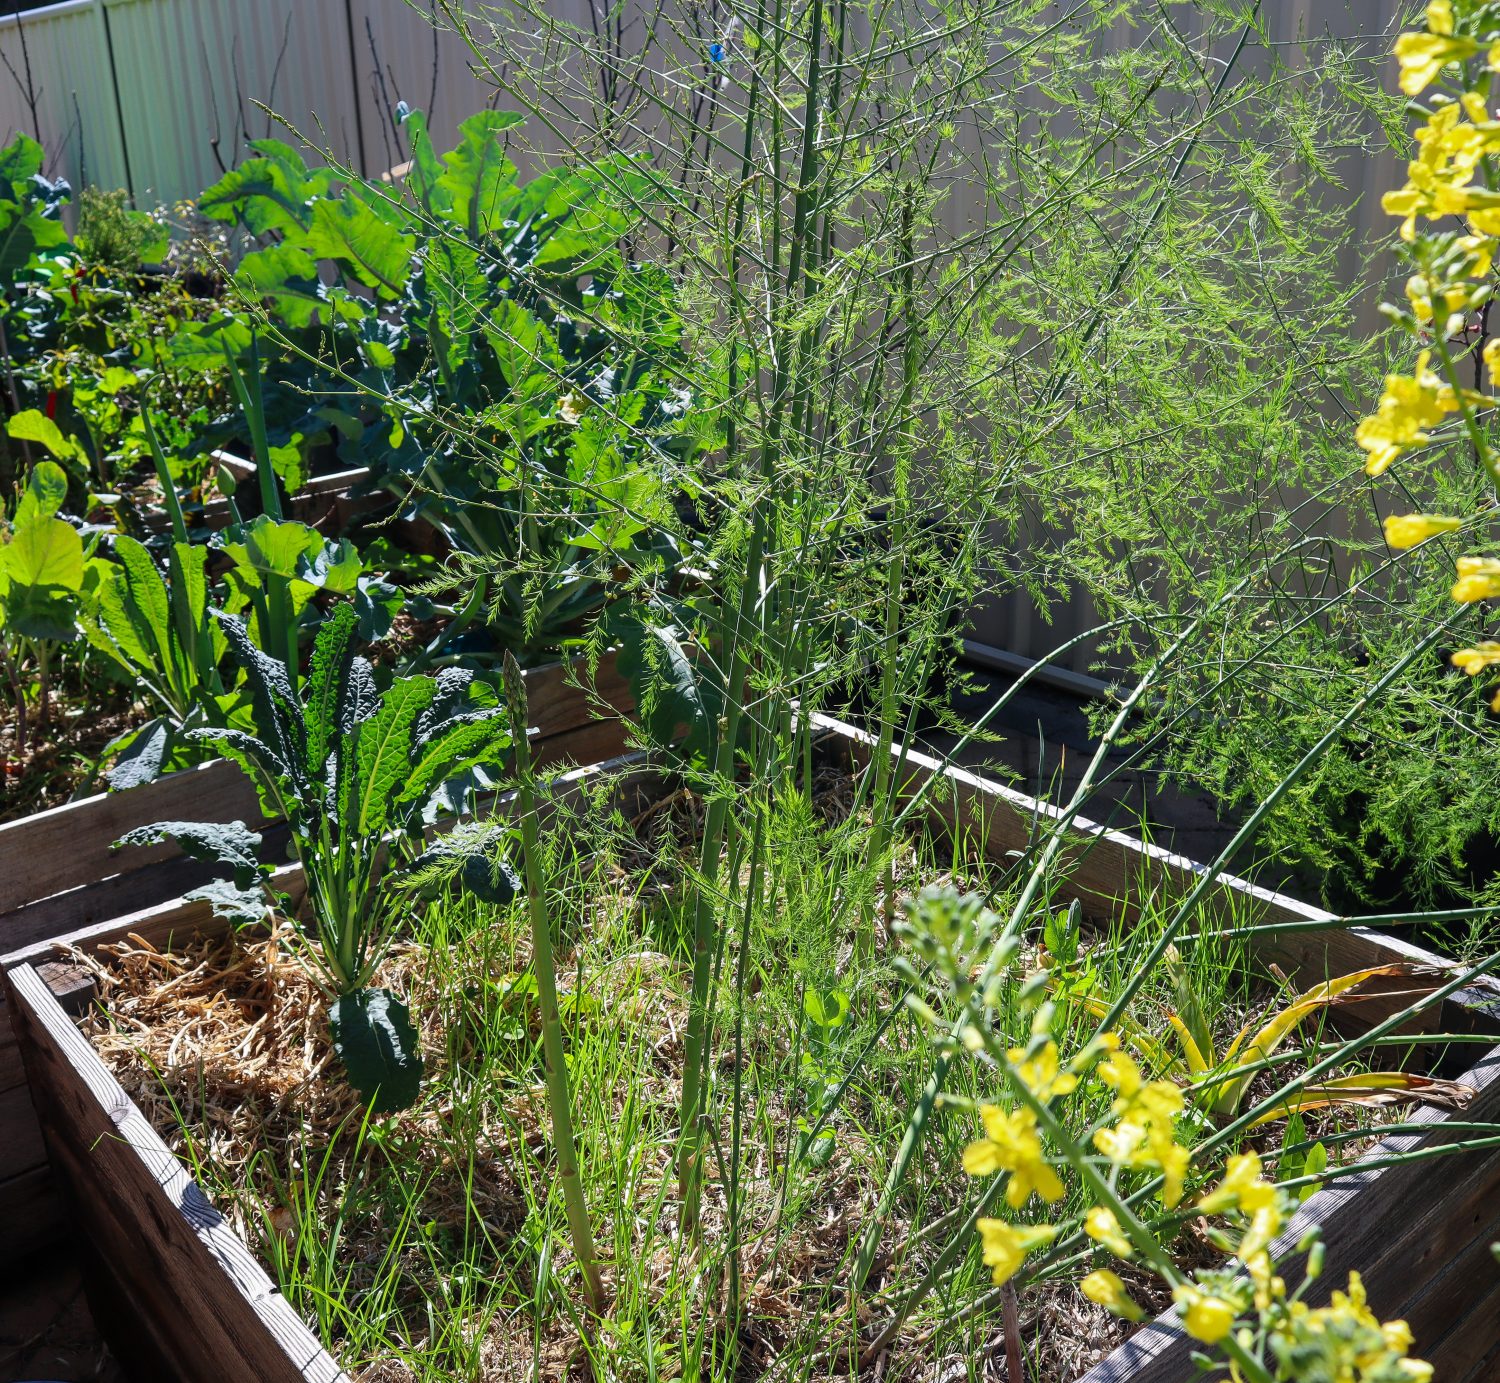
Learn how to grow Asparagus and what to make with your abundant harvests. Asparagus (Asparagus officinalis) is a perennial vegetable and is a great long-term investment in your food production. Asparagus grows back each year and can produce for up to 30 years ( or longer). The great thing about Asparagus is it produces edible spears at the start of spring, which is often an “in-between” time in the garden when winter crops have finished and summer crops are not yet ready.
Asparagus does require its own spot in the garden, but it can also be grown successfully in a container garden.
Plant seeds in spring or dormant crowns late winter.
SOIL
Free-draining compost-rich soil.Slightly acidic.
LOCATION
Full sun – part. 6-8 hours.
CARE
Keep weed-free and well mulched.
FERTILISE
Feed with compost and composted manure late winter after fronts die off.
PESTS
Aphids, snails, slaters.
HARVEST
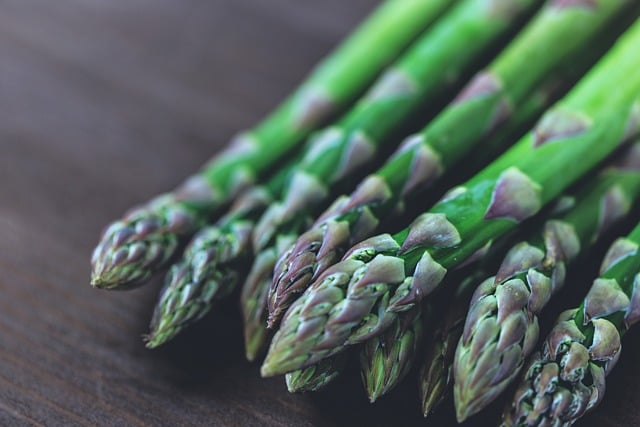
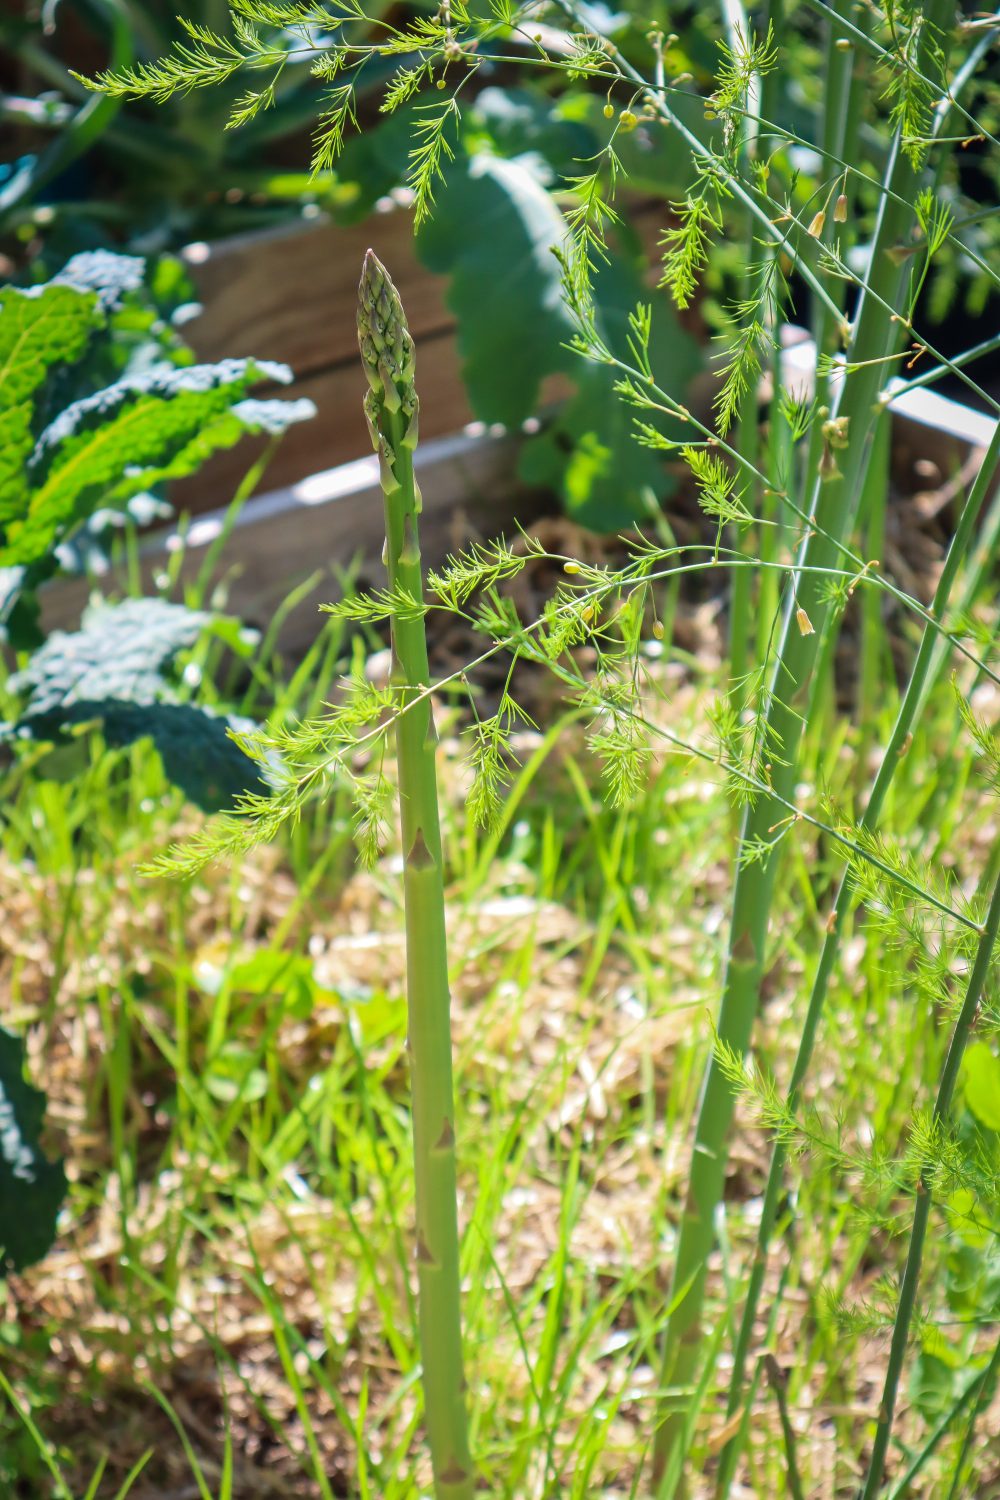
Harvest spears in spring choose spears thicker than a pencil.
REPRODUCE
Can be grown by seed but produce quickerby dividing crowns (roots)
Why Grow Asparagus at Home?
Here are some of the many reasons to grow Asparagus.
Hardy, low-maintenance vegetable
Perennial
Ornamental and edible
Prolific producer
Early Spring Harvest
Produces up to 30 years
High in Potassium
Great raw or cooked
Popular Asparagus Varieties to Grow
Mary Washington – Popular open-pollinated variety. Long, tender green spears. White spears can be produced if blocked from light.
Sweet Purple – Dark purple spears with 20% more sugar than the green variety. It is also less fibrous.
TOP TIPS ON HOW TO GROW ASPARAGUS
Choose a sunny locationthat can be a permanent home
Prepare soil with plenty of compost and well-composted manure.
Free-draining, slightly acidic soil
Grow from crowns for faster production
Feed with high nitrogen or compost at the end of winter before spring growth
Allow spears to grow into ferns for the first 2 years
Harvest the fattest spears and leave thin ones to go to ferns
Keep weed-free and well-mulched
When to PlantAsparagus?
If you are planting Asparagus from seed, sow seeds in Spring. Soak seeds in water for 2+ hours before planting for quicker germination. Seedlings can also be planted in spring. Established crowns should be planted while still dormant in late winter.
How to GrowAsparagus?
Choose a sunny location with 6-8 hours of sunlight.
Choose a location that can be a permanent home for the next 20+ years.
Be aware of surrounding trees that may grow to overshadow the asparagus patch.
Asparagus-like loose soil that is easy to burst through. Create mounts if you have hard or clay soils.
Prepare beds with plenty of compost and composted manure.
Plant 40cm apart
Give them a deep water.
Care/ Maintenance
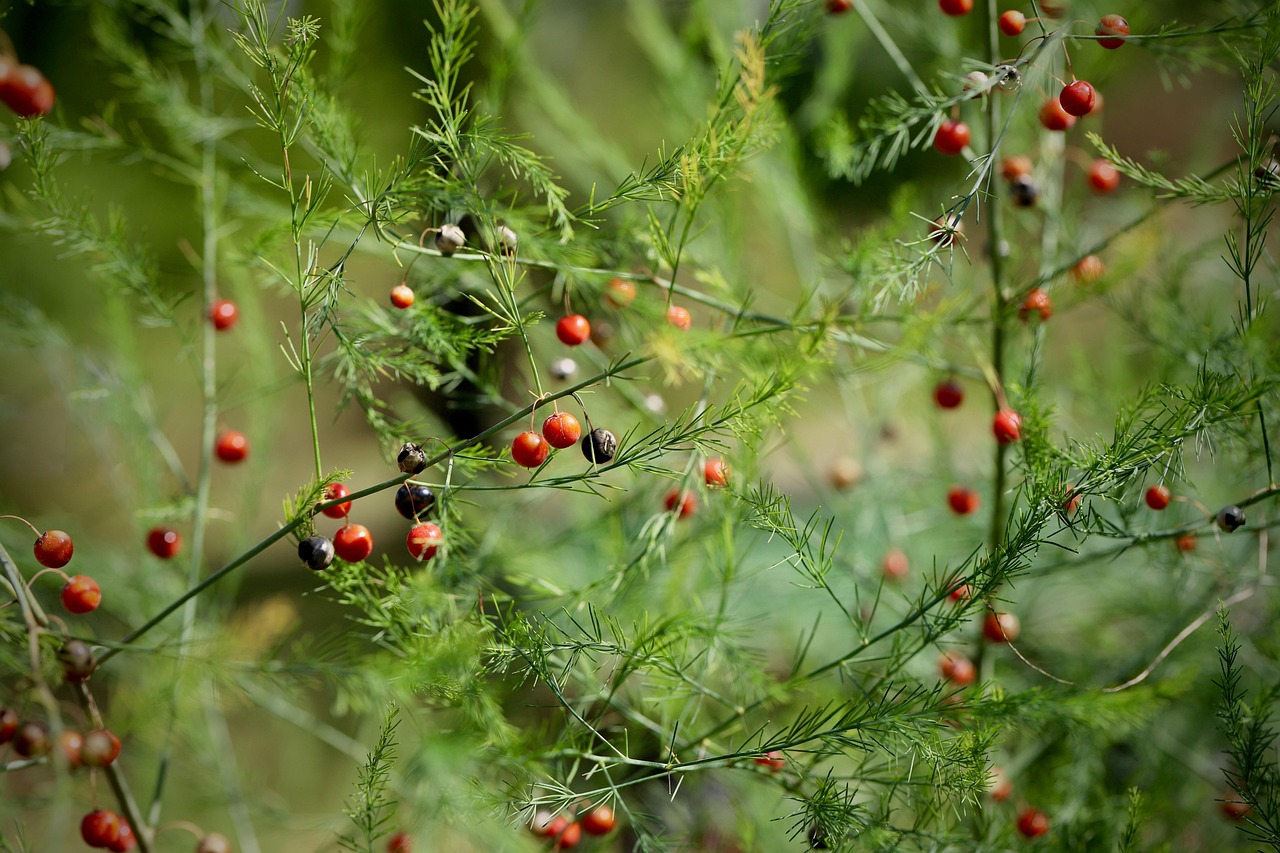
Asparagus comes in both male and female plants. They both produce spears, but the males are said to be of higher quality. The female plants can be identified as they produce berries at the end of the ferns. These berries can be saved and will have seeds inside that can be planted.
Feeding
Feed with compost or composted manure at the end of winter. Remulch with lupin, pea straw or sugarcane.
Watering
Deep water, especially in summer.
Harvesting
Asparagus holds its energy in the crowns, so it is important to allow the patch to establish before harvesting. From seed, Asparagus should be left for the first 2-3 years. If growing from crowns, Asparagus can be picked sparingly over the first 1-2 years. Choose the fattest spears at least pencil-width thick. Let the thin spears turn to ferns to conserve energy in the crowns for winter.
Pruning
If left, the spears will turn into tall ferns. This is how the plant conserves energy and repopulates. It’s important to allow this for the first few years. The green ferns will turn yellow and die off during mid-late winter. They can then be pruned and used as mulch or added to the compost. Once pruned, add a fresh layer of compost around the bed and re-mulch. This will keep them warm over winter and add nutrients back to the bed ahead of spring.
Pests / Disease
Aphids, slugs, snails, and slaters may like your young spears. Check plants in early spring. Natural pest management. Spears can also be affected with rust. Allow good airflow.
How/ When to Harvest
Asparagus is ready in early spring. Choose the fattest spears, bigger than pencil width and 20 – 25cm tall. Use a sharp knife and cut just below the soil line. Allow thinner spears to grow into ferns.
Reproducing
Female plants will produce berries at the end of their ferns, which contain seeds. These can be planted to expand your Asparagus patch. Crowns can be split when dormant in winter to create new patches.
Cooking and Using
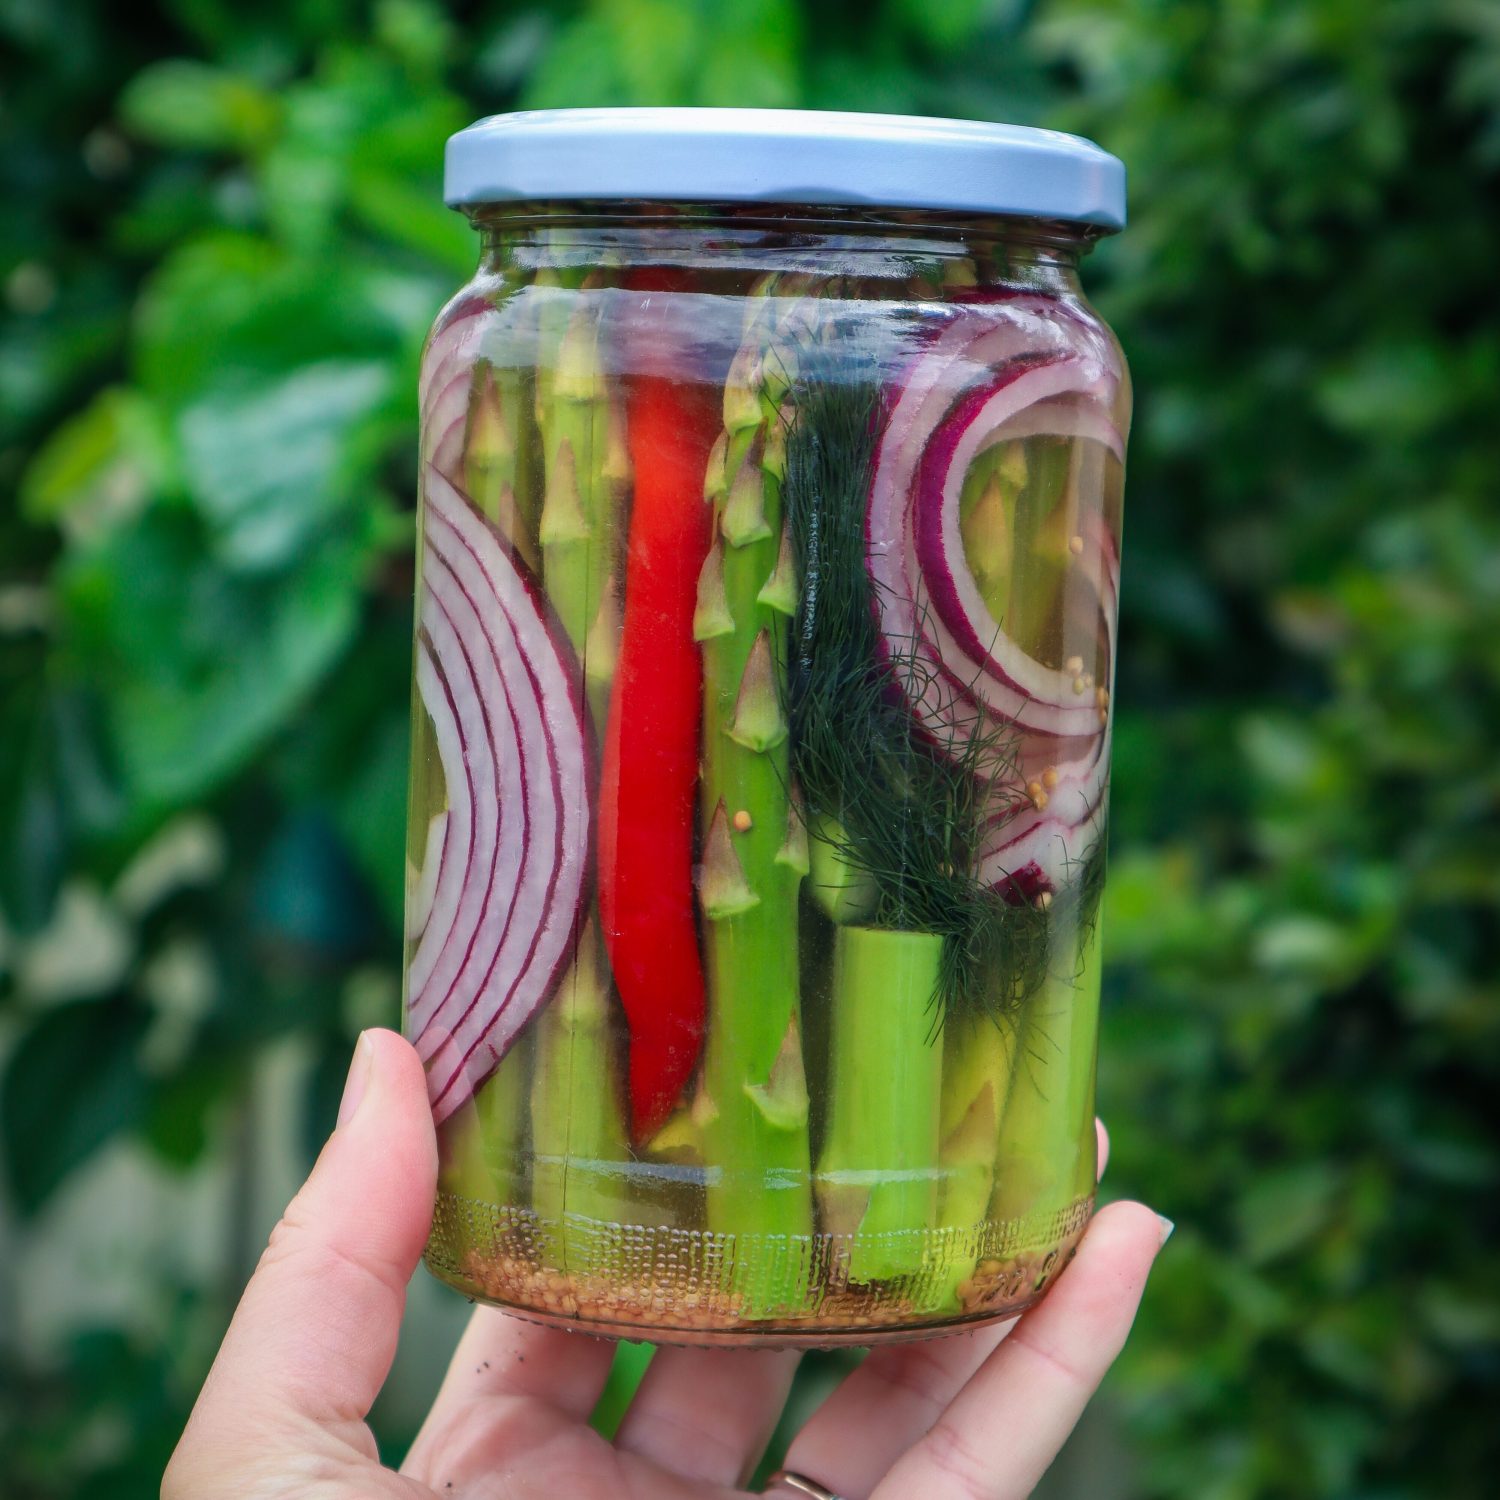
Asparagus can be eaten raw, cooked or preserved, pickled, and bottled.
Asparagus pairs well with:Mint, peas, rocket, dill, chives, cheese, eggs, cured meats, seafood, strawberry, raspberry, nuts, lemon, and potato
Learn how to grow Kumquat trees at home and what to make with your harvests with this ultimate guide! Kumquats (Citrus japonica and hybrids) or Cumquats are very ornamental citrus that produce masses of small fruit. Kumquats can be eaten straight from the tree, with the skin being edible too. They make beautiful, abundant additions to the garden, especially if you like jams and marmalades.
Kumquats are evergreen and provide dense bushy foliage, which makes them great for wind protection or screening.
Can be grown by seed but may differ from the parent plant.
Why Grow Kumquats at home?
Here are some of the many reasons to grow Kumquat
Hardy, low-maintenance fruit tree
Perennial
Ornamental and edible
Prolific producer
Dense busy shrub
Grows well in pots and containers
The whole fruit is edible
Great for making jams and preserves
Popular Kumquat Varieties
Nagami – Japanese variety with small oval-shaped fruit. Bright orange when ready. Sweet skin and tart flesh. 1-2 seeds in each fruit.
Meiwa – Larger round orange fruits. Sweet skin and flesh. A hybrid of Nagami and Marumi varieties.
Marumi – Round fruits that are quite sour or tart. Mainly used for preserving.
Variegated Kumquat – Stand out ornamental variegated leaves and fruit. Variegation disappears on fruit usually once ripe. Also known as Calamondin or Calamansi.
TOP TIPS TO GROW KUMQUAT
Choose a sunny location
Mulcharound the base (avoid touching the trunk)
Free-draining, slightly acidic soil
When to PlantKumquat
Ideally, plant your trees in Spring or Autumn. If you are growing in containers, protect new plants from extreme heat or cold.
How to GrowKumquat
Choose a sunny location with 6-8 hours of sunlight.
Dig a hole twice as big as the pot and loosen the roots if they are tightly bound.
Free-draining soil with compost.
Mulch to regulate temperatures and reduce weeds.
Give it a deep water.
Care/ Maintenance
Feeding
Feed with compost or liquid fertilisers in late winter after fruiting.
Watering
Deep water especially in summer.
Pruning
Prune after fruiting for shape. This can make it denser and bushier. Always check and remove growth below the graft.
The great thing about growing Kumquats is that they can last a long time ripe on the tree. This makes them really beautiful and ornamental and gives you time to preserve the fruit in batches. The fruit is ready when it is rich in colour. It can be a good idea to harvest using scissors or snips as the branches are thin and can rip or break if you pull the fruit off.
Reproducing
Kumquats often have 1-2 seeds inside. These can be grown, but results can vary but why not give it a try! Most citrus are grafted onto rootstock for disease resistance.
Cooking and Using
Kumquats fruit prolifically, so it’s a good idea to have a few recipes on hand. The great thing is that you don’t need to peel them as the skin is edible too!
Kumquats can be made into jams, chutney, marmalade, and relish. They can also be preserved whole in salt or liquor. Dehydrating slices is another easy way to preserve the harvest.
Learn how to grow Sage with this Garden-to-Plate Guide and preserve this staple herb. Sage (Salvia officinalis) is a hardy perennial herb found in many home gardens. Sage is known for its soft fleshy leaves and has a long history in plant medicine. Sage is a great addition to your kitchen garden due to its culinary flavour-enhancing qualities along with a long list of medicinal values.
Sage also produces beautiful flowers and is a great pollinator-friendly plant.
Full sun – part shade. Doesn’t like wet soggy ground.
CARE
Prune if it gets too woody to promote new growth.
FERTILISE
Feed with compost and keep well mulched.
PESTS
Aphids, snails, spider mites.
HARVEST
Harvest as needed, early morning or evening.
REGROW
Seed, cuttings and splitting the clump.
Why Grow Sage?
Here are some of the many reasons to grow Sage
Hardy, low-maintenance herb
Perennial
Ornamental and edible
Flavour-enhancing culinary herb
Low-lying food forest layer
Pollinator-friendly
Can have Antimicrobial qualities
Can have Antiseptic qualities
Can have Anti-inflammatory qualities
Popular Sage Varieties
Sage is part of a huge Salvia family, but for this grow guide, we are just focusing on the common Sage – Salvia officinalis
Common – Silvery grey, slim leaves. Bright purple flowers.
Variegated – Striking gold and green variegated leaves. Adds a beautiful contrast to the garden.
Purple – Dark green and purple leaves, this variety can get a bit lost in the shadows. Beautiful colour and has great flavour.
Tri-coloured – Stand-out colour and patterns with green, silver, white, and purple/pink tones.
White-edged – Stunning white and silver variegated leaves.
Berggarten –Broad, silvery green leaf popular for culinary uses. Does not flower often. Compact shrub.
QUICK TIPS ON HOW TO GROW SAGE
Choose a sunny location
Mulch
Prune in spring to encourage new growth
Avoid wet or boggy situations
Take cuttings to repopulate easily
When to Plant
Ideally, plant your Sage in Spring, although you should be able to plant seedlings throughout the year. Protect young plants in the heat of summer and allow plenty of sun over winter.
Top Tips on How to Grow Sage
Plant sage seedlings in a warm sunny position. If you live in a wet or humid climate, it can be a good idea to grow sage in pots and containers. This allows you to move it about to reduce the time it stays wet.
Dig a hole twice as big as the pot and loosen the roots if they are tightly bound.
Mulch to regulate temperatures and reduce weeds. Give it a water.
Sage grows quite slowly from seed. Plant in spring.
How to Care and Maintain Sage
Feeding
Sage is quite low maintenance but can benefit from compost tea or worm tea in Spring and Autumn.
Watering
Sage doesn’t like wet feet. If you live in a wet climate, it can be a good idea to plant on mounds so excess water can run off.
Pruning
Once Sage has finished flowering, it can be a good time to prune back the flower stems and older growth.
Pests / Disease
Caterpillars, snails, aphids and slaters can eat your Sage plants, especially when they are young or in Spring with new growth. Check out Natural pest management for more tips.
How and When to Harvest Sage
The great thing about growing Sage is that you can harvest small amounts throughout the year. Pick individual leaves or shoots as needed. Sage can also be harvested and dried to use throughout the year.
ReproducingSage
Sage does send off sideshoots that can be split off the main plant. This is the quickest and easiest way to reproduce sage from an established plant. Cuttings are the next best way. Choose stems with semi-hard wood and place them in a jar of water or moist soil to send off roots. Remove larger leaves and keep 2-3 at the top to reduce energy and moisture loss.
Ways to Cook and Use Sage
Sage is commonly used to add flavour to roast veggies but there are so many delicious ways to use Sage.
Sage can easily be dried to use throughout the year. Lay flat on a rack or hang upside down in a dry, dust-free area. Alternatively, dehydrate sage on low at 40 degrees Celsius.
IMPORTANT
Sage is best used in moderation. Avoid if pregnant and breastfeeding, as Sage has been known to reduce milk production. Seek guidance from medical professionals.