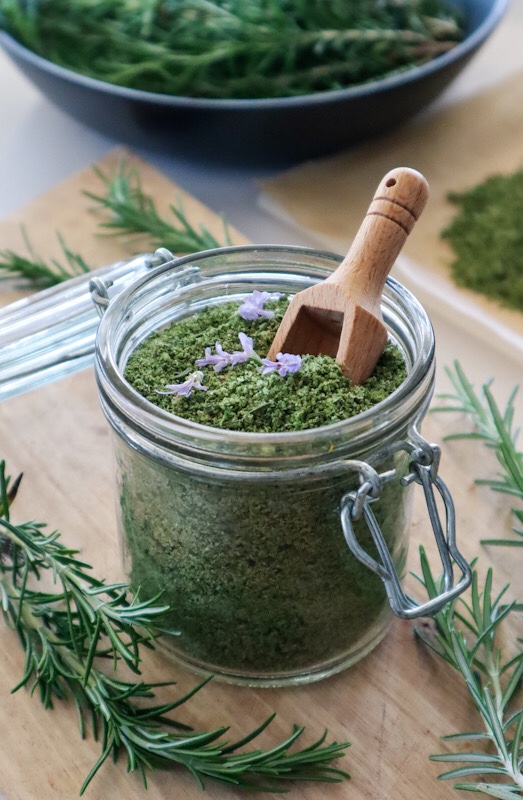
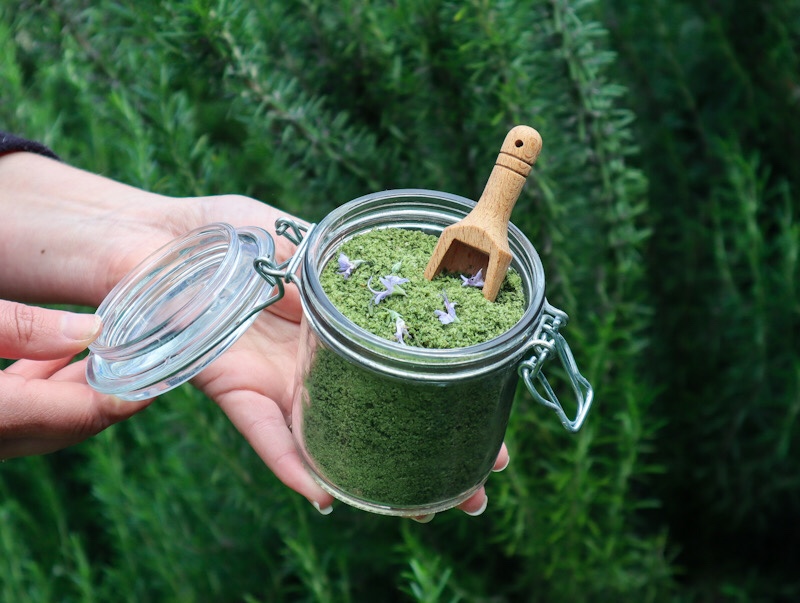
Rosemary and herb salt is a quick and easy way to preserve your homegrown herbs to use throughout the year. Herb finishing salts add so much flavour to meals in a quick and convenient way. Try Rosemary and herb salt on your roast vegetables for a delicious boost of flavour. Get the recipe below 👇
Why Make Rosemary Herb Salt?
Making your own herb salt is a great way to reduce waste and extend your harvest. If your rosemary, thyme, or sage plants are growing abundantly, herb salt is a simple preservation method that retains flavour for months. It also allows you to create custom seasoning blends tailored to your taste.
Plus, it makes a beautiful, homemade gift for Mother’s Day, Christmas, or to share with friends and family—perfect for birthdays or festive seasons.
Benefits of Rosemary in the Garden?
Rosemary is such a versatile herb and works well with both sweet and savoury dishes. It has a fragrant, pine-like aroma. Rosemary offers so many beneficial relationships within your garden. Rosemary is a hardy, drought-tolerant, ever-green perennial herb. A fantastic staple to have to grow in any edible garden. Rosemary also has many healing properties, so it is a handy plant to have near the house or in a kitchen garden.
Rosemary is more than just a tasty kitchen herb—it’s a powerhouse plant in the garden too. It’s hardy, drought-tolerant, and thrives in full sun, making it ideal for warm and dry climates. Rosemary:
Attracts pollinators like bees when in flower
Repels some common pests due to its strong aroma
Helps create structure and evergreen interest in your edible garden
Can be grown in pots or in the ground
Drought-tolerant and easy to grow
Its resilience and low-maintenance nature make it a go-to for beginner gardeners and seasoned growers alike.
When is the Best Time to Harvest Herbs?
The best time of day to harvest your herbs is first thing in the morning. This is when the plants are hydrated and full of life. As the day goes on, they will lose moisture and not be as fresh and vibrant. Early in the morning, the bees are not yet active. As the sun comes up and the dew drys, the bees will be about in a hive of activity. So, if you do pick later in the day, just be cautious, not stress them out and avoid getting stung.
Add to a mixer and blitz until breadcrumb consistency (or leave chunky if you would like too)
Add in salt and blitz quickly to combine.
Spread on to parchment and dry in the oven or dehydrator at 45 degrees celsius until dry. Stir through after one hour to loosen up the mix and allow it to dry faster. The length of time will depend on the water content of the herbs (approx 2 hours). The mixture will go a lighter green colour.
Once dry add to a clean airtight jar.
Notes
The colour may fade over time
Try herbs such as Thyme, Mint, Sage, Chilli, Oregano
How to Use Herb Salt in Cooking
Use your rosemary herb salt:
As a seasoning rub for roasted meats or veggies
Mixed into olive oil for dipping bread
Sprinkled over focaccia before baking
Stirred into soups or stews for an added depth of flavour
On scrambled eggs, grilled halloumi, or oven-baked potatoes
Just remember—herb salt is more concentrated than regular salt, so you often need less of it when seasoning.
Want More Garden Tips and Recipes?
There has never been a better time to learn how to grow healthy, organic food at home. Take back control of your food systems and start the journey to live a more sustainable lifestyle. Say goodbye to nasty chemicals and wax-coated fruit and feed your body with real, nourishing, homegrown food. Subscribe to our FREE weekly newsletter below.
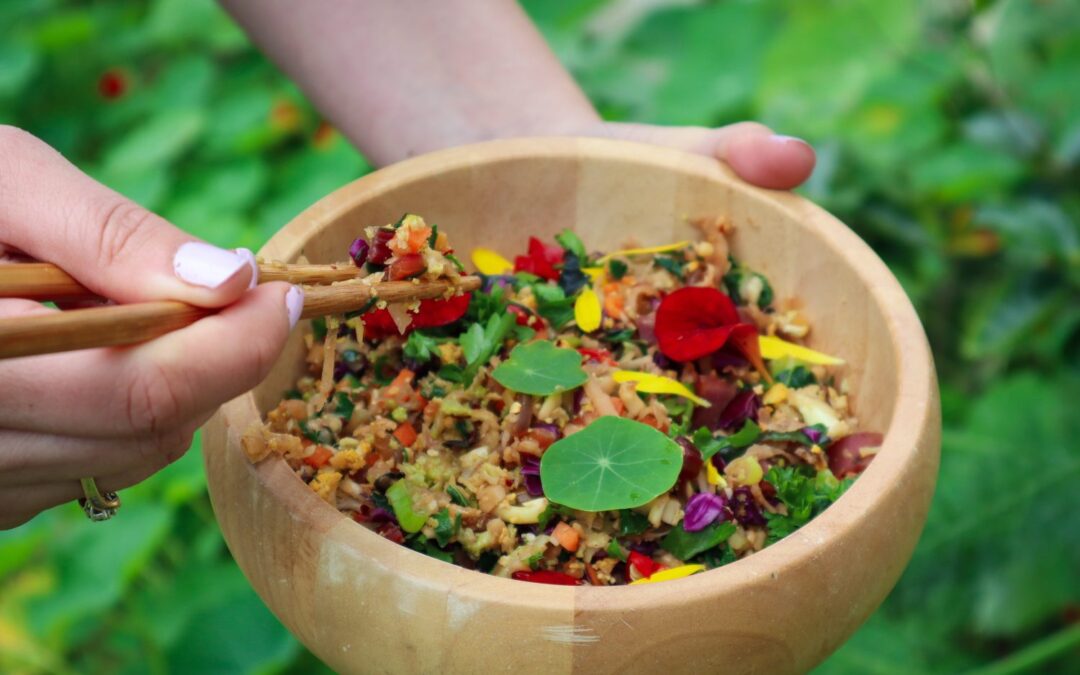
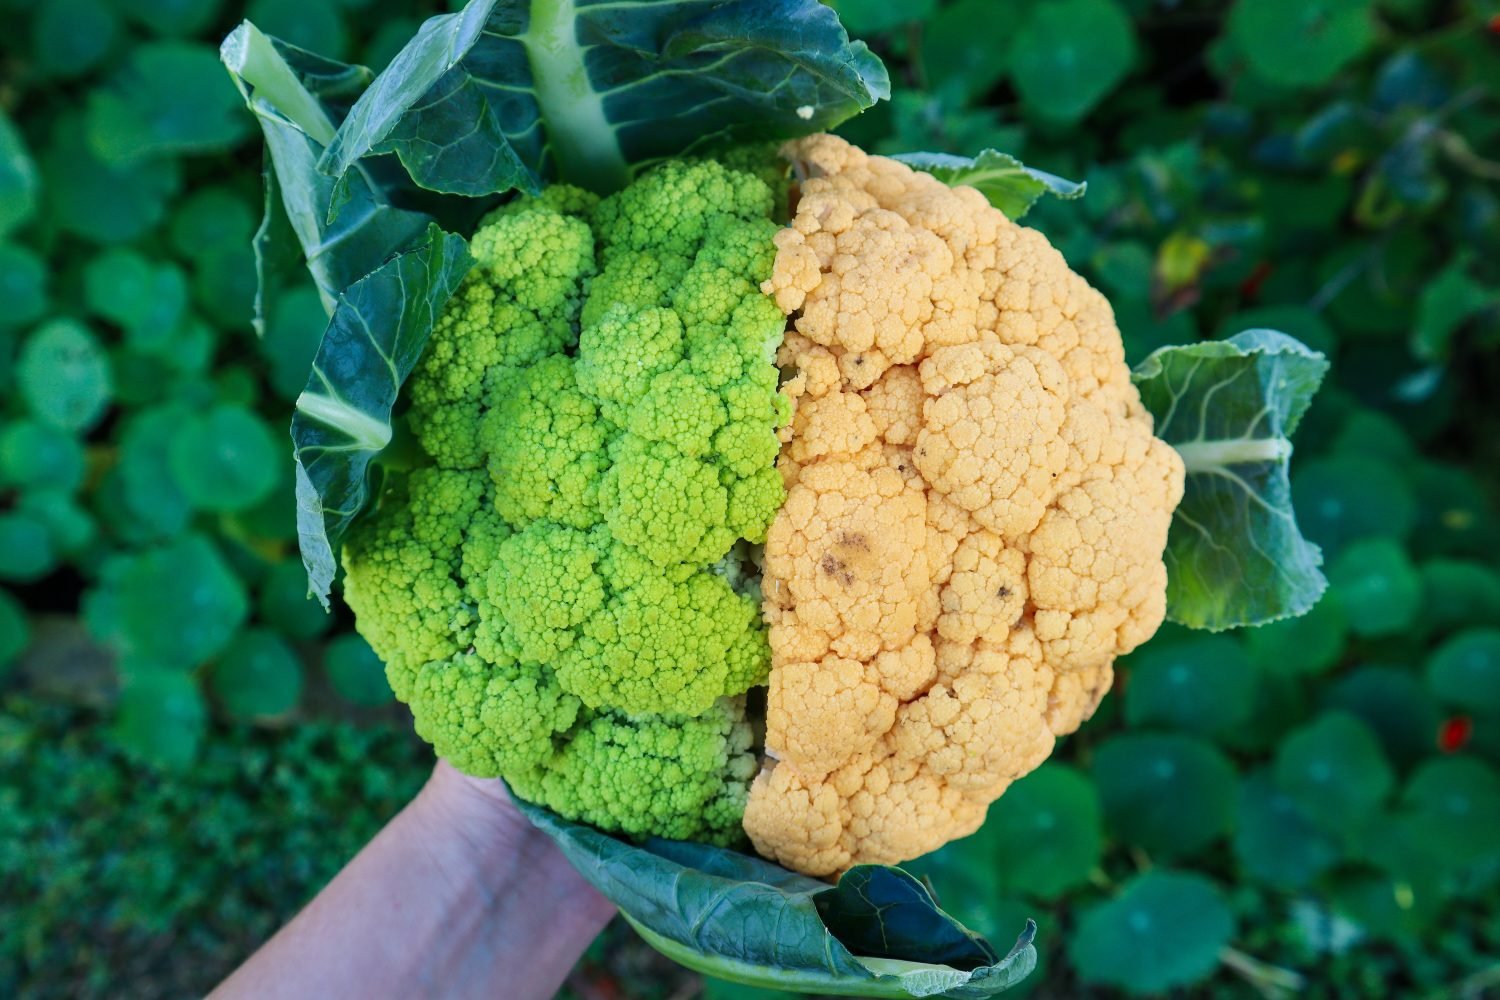
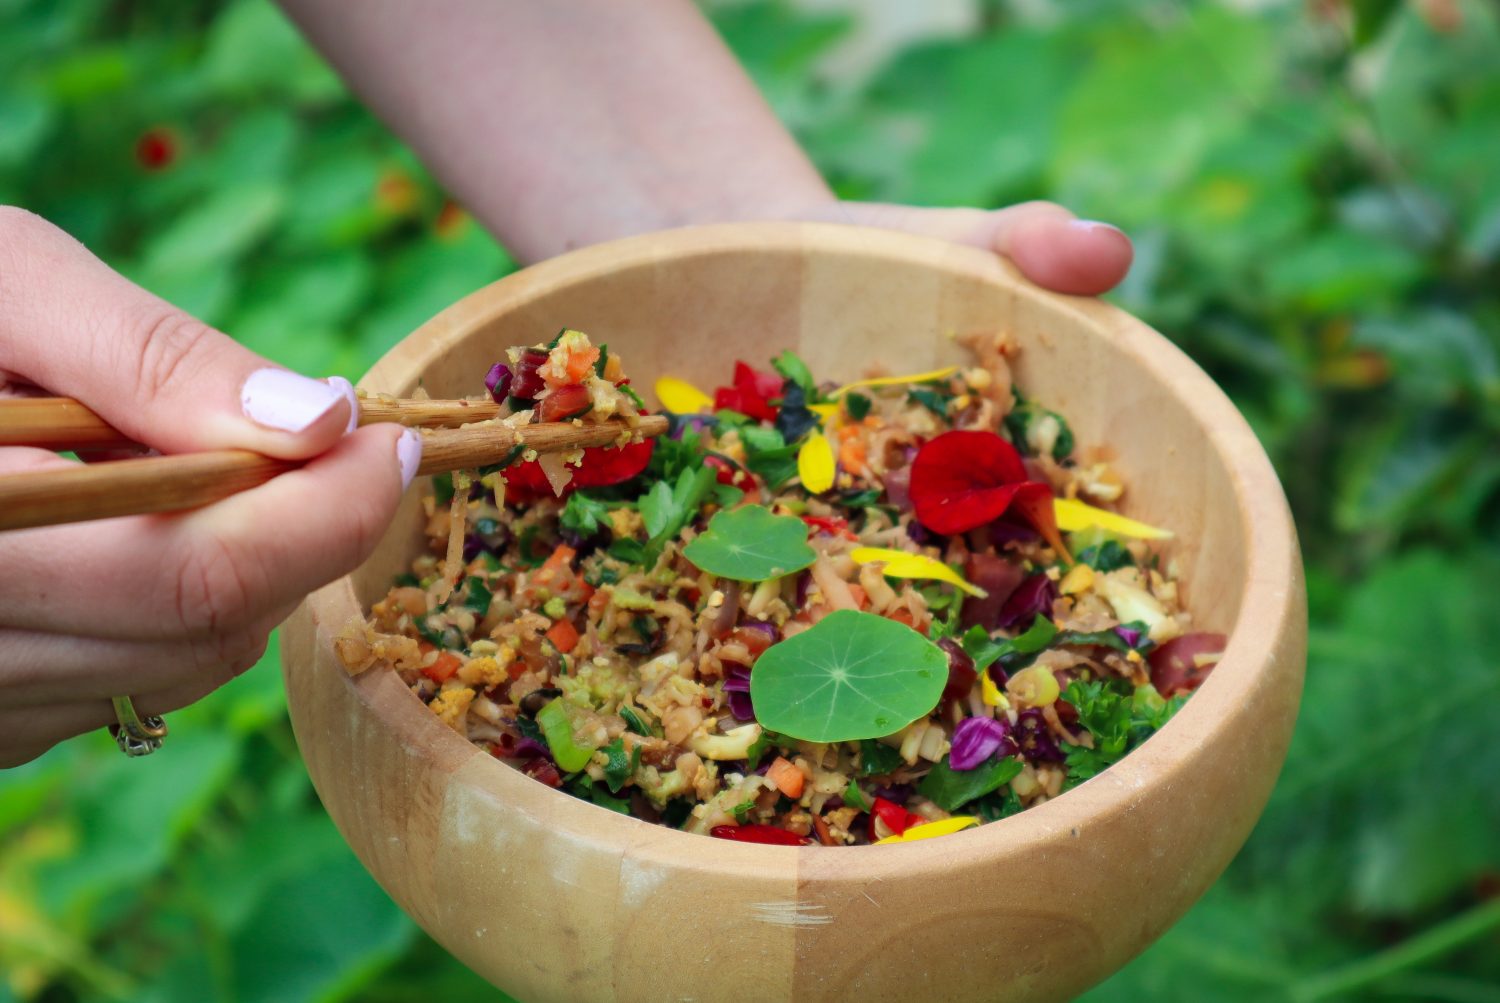
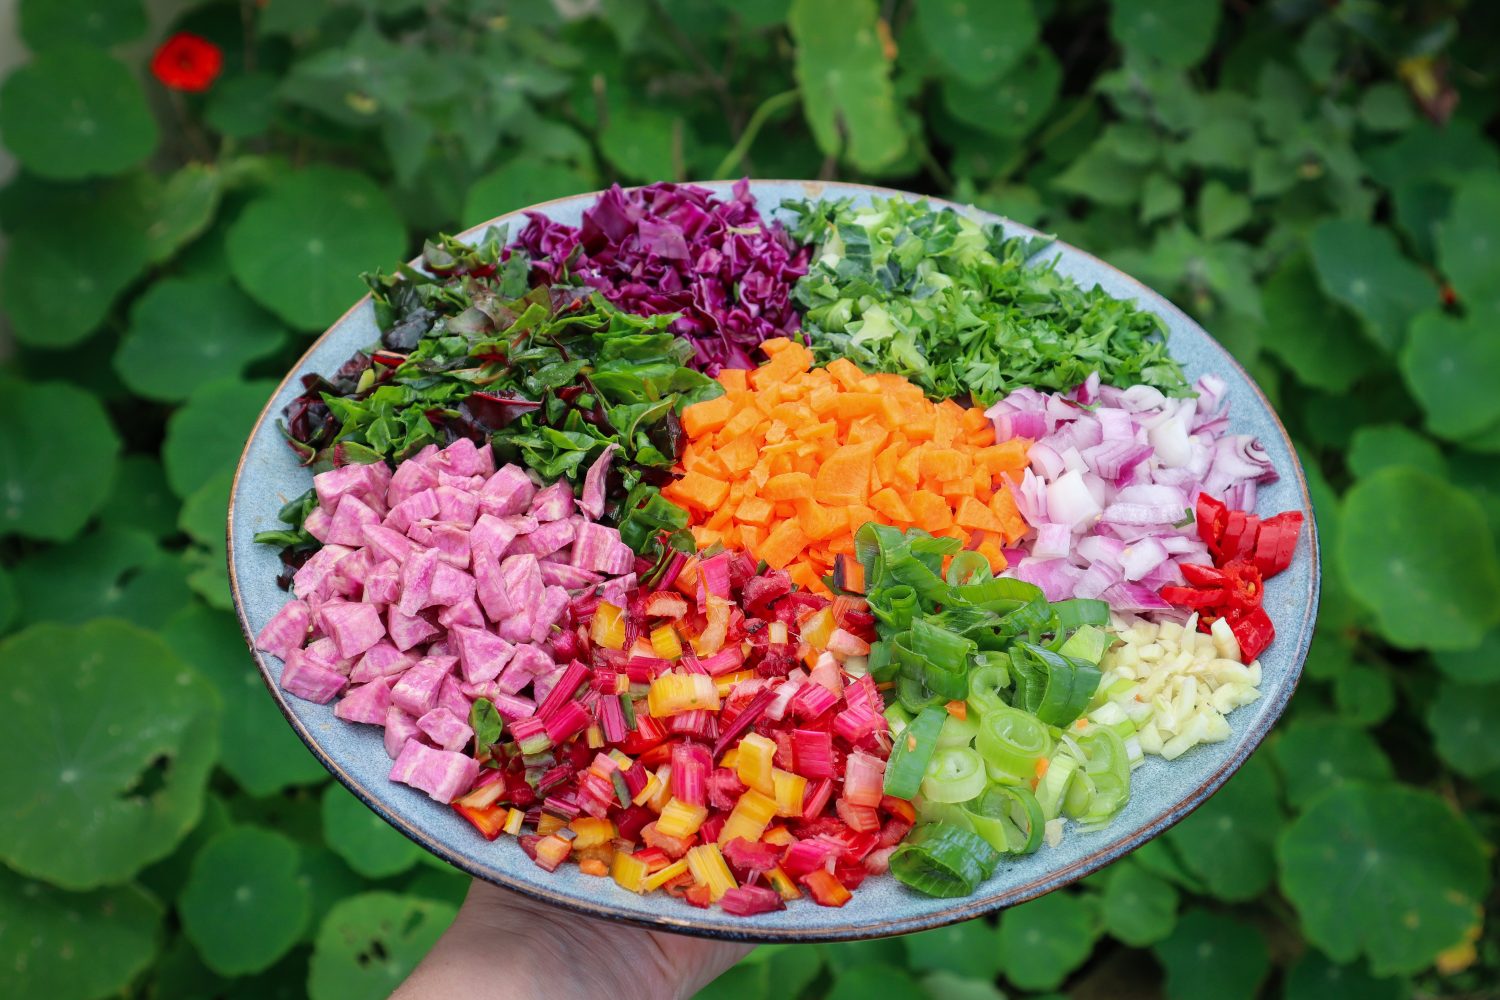
Cauliflower is fantastic at absorbing flavour which makes it a perfect substitute for rice. This Cauliflower fried rice is simple, easy to make, packed full of nutrients and tastes so so good! This recipe is flexible, so use whatever in-season veggies you have available. I have added a list of alternatives at the bottom of the recipe.
Cauliflower Fried Rice
Yield: Serves 4
Prep Time: 15 minutes
Cook Time: 20 minutes
Total Time: 35 minutes
Ingredients
1 whole cauliflower (I used half green and half yellow varieties)
1/2 tsp Ground Smoked Paprika
1/2 tsp Cumin Powder
1/2 Red Onion
2 Garlic Cloves
1 Carrot
1 Spring Onion
1 Red Chilli
1/2 cup chopped Purple Cabbage
1/2 cup chopped Sweet Potato (roughly 1/2 a sweet potato)
4-5 Rainbow Chard stems and leaves
1/2 cup chopped Parsley
2 TBS Tamari (soy sauce)
1 TBS Water
2 tsp sugar or sweeter (honey,agave)
2 tsp lemon juice
1/2 tsp sea salt flakes
Instructions
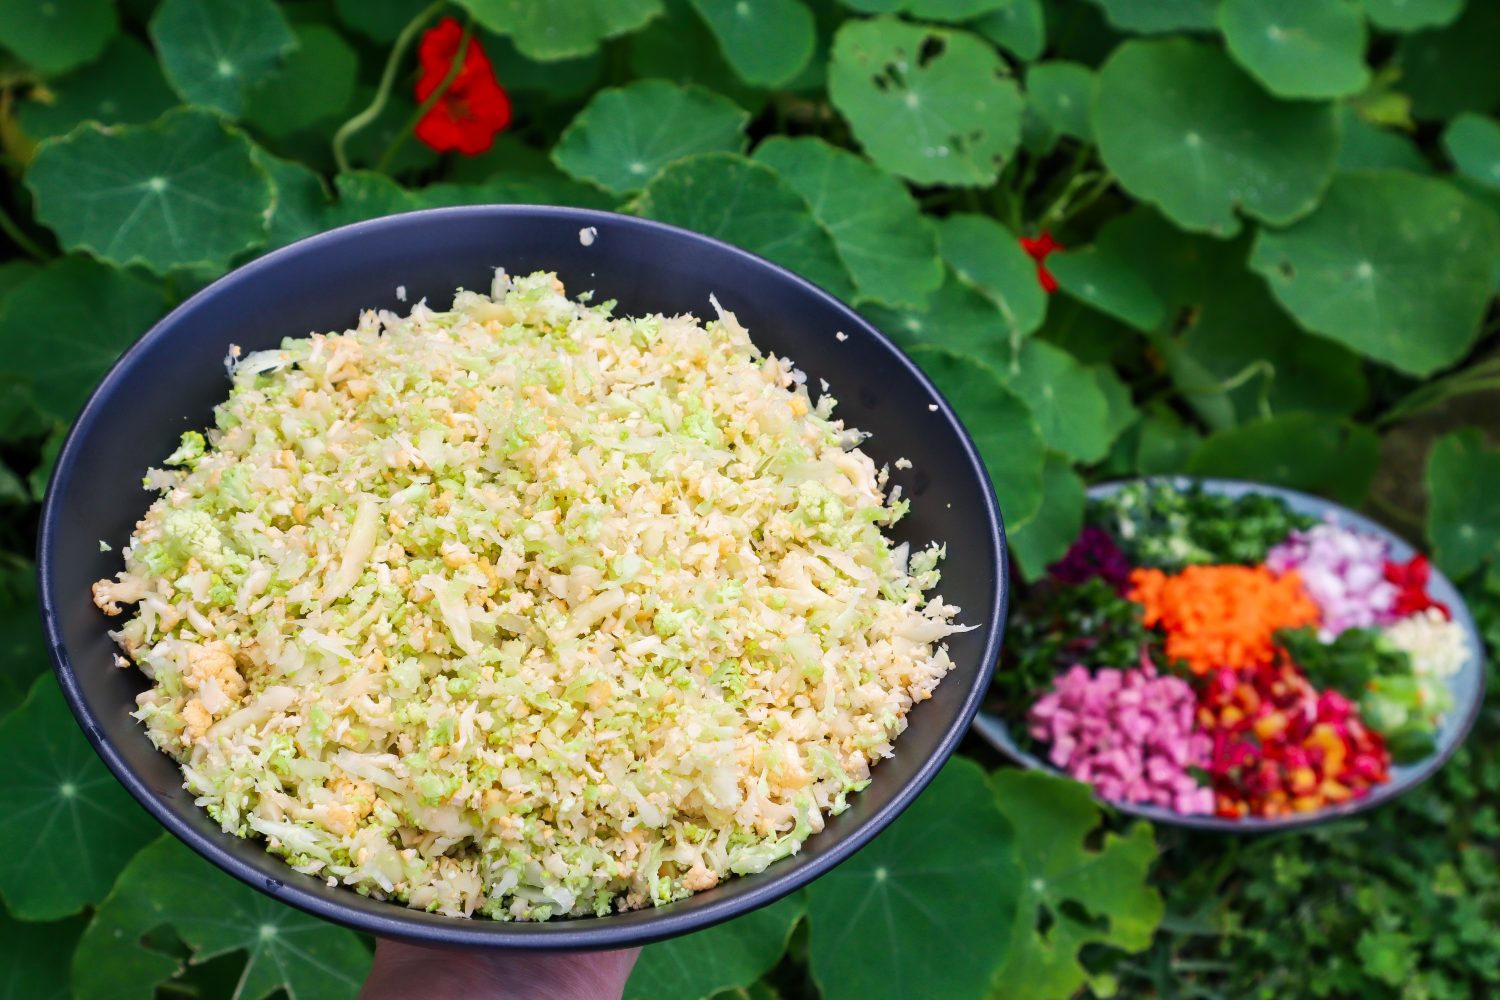
Grate or chop the Cauliflower into rice sized pieces. You can also use a food processor if you have one. You want it to still be a little chunky and no smaller than the size of a long grain rice granule.
Prepare all your vegetables: Finely dice the Onion, Carrot and Sweet Potato into 1/2 cm cubes or chop up in a food processor. Finely chop the Cabbage, Rainbow Chard Stalks, Leaves and any Cauliflower leaves into small 1/2cm pieces. Thinly slice the spring onion. Finely chop the garlic.
Prepare the sauce by mixing in a small bowl: Tamari, Water, Lemon Juice and Sugar. Stir until sugar is dissolved.
Heat a large frying pan or wok with a drizzle of oil on a medium-high heat and cook the Onion and Sweet Potato until they soften (5-10mins). Stir regularly for even cooking.
Add Cumin, Paprika and Garlic to the pan and mix to combine for 1 minute.
Then add the Carrot and mix to combine.
Then add in the Cauliflower and mix to combine. Sprinkle over Sea Salt Flakes. Cook for 2-3 minutes.
Add in the Cabbage, Rainbow Chard, and Leaves. Mix to combine.
Drizzle over the sauce and mix to combine. Cook for a further 5 minutes or until vegetables are soft but still have some texture or crunch to them.
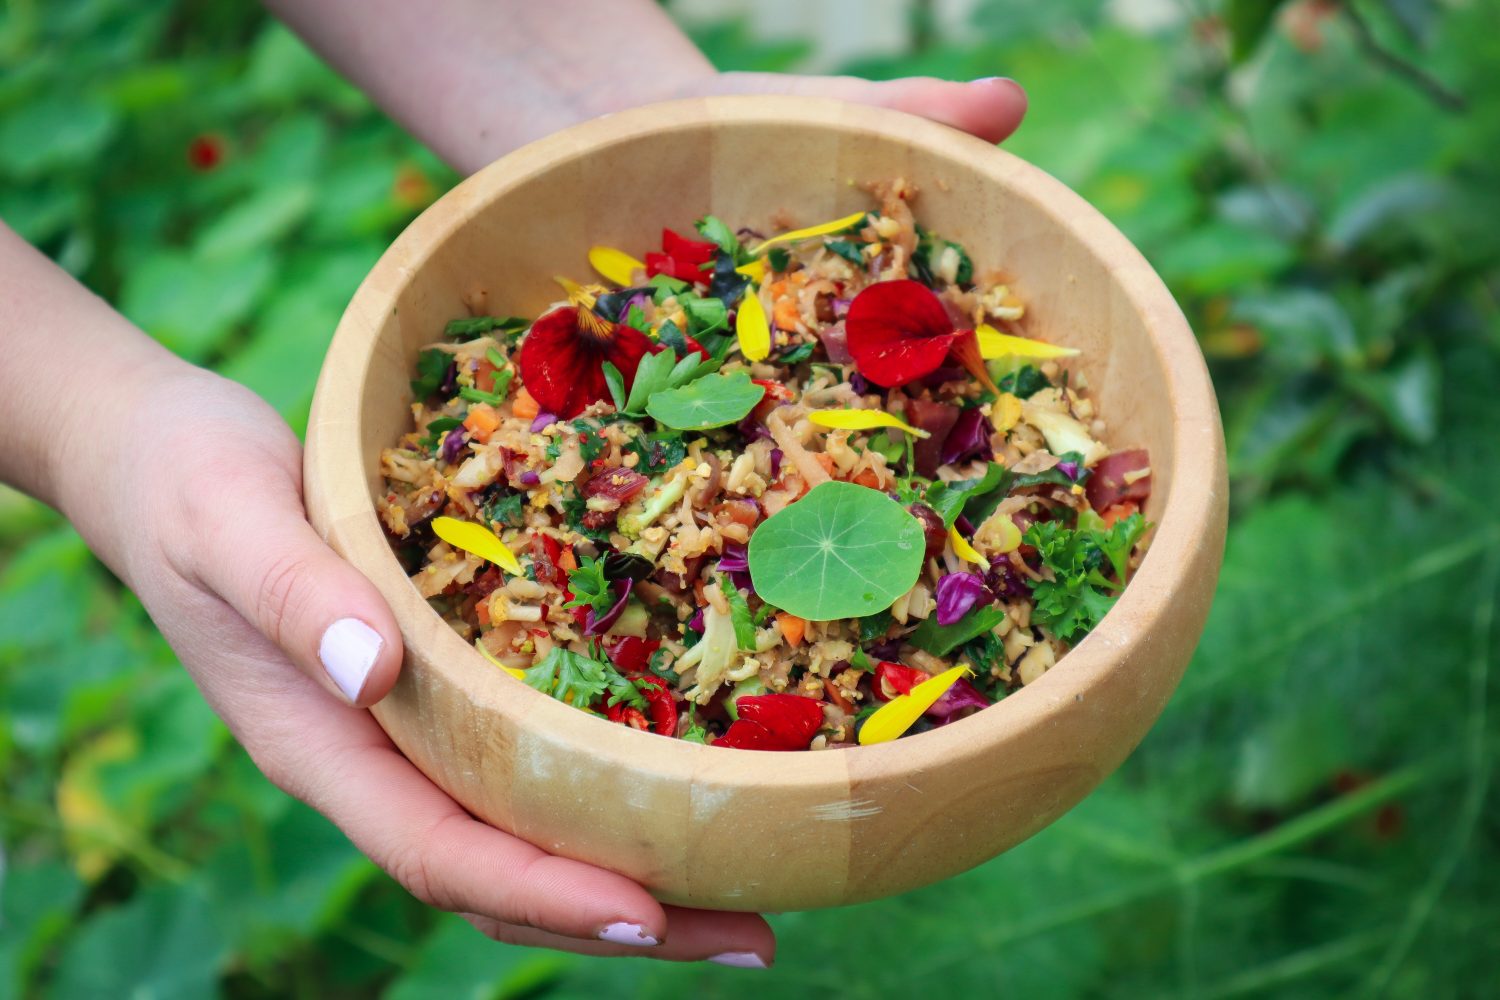
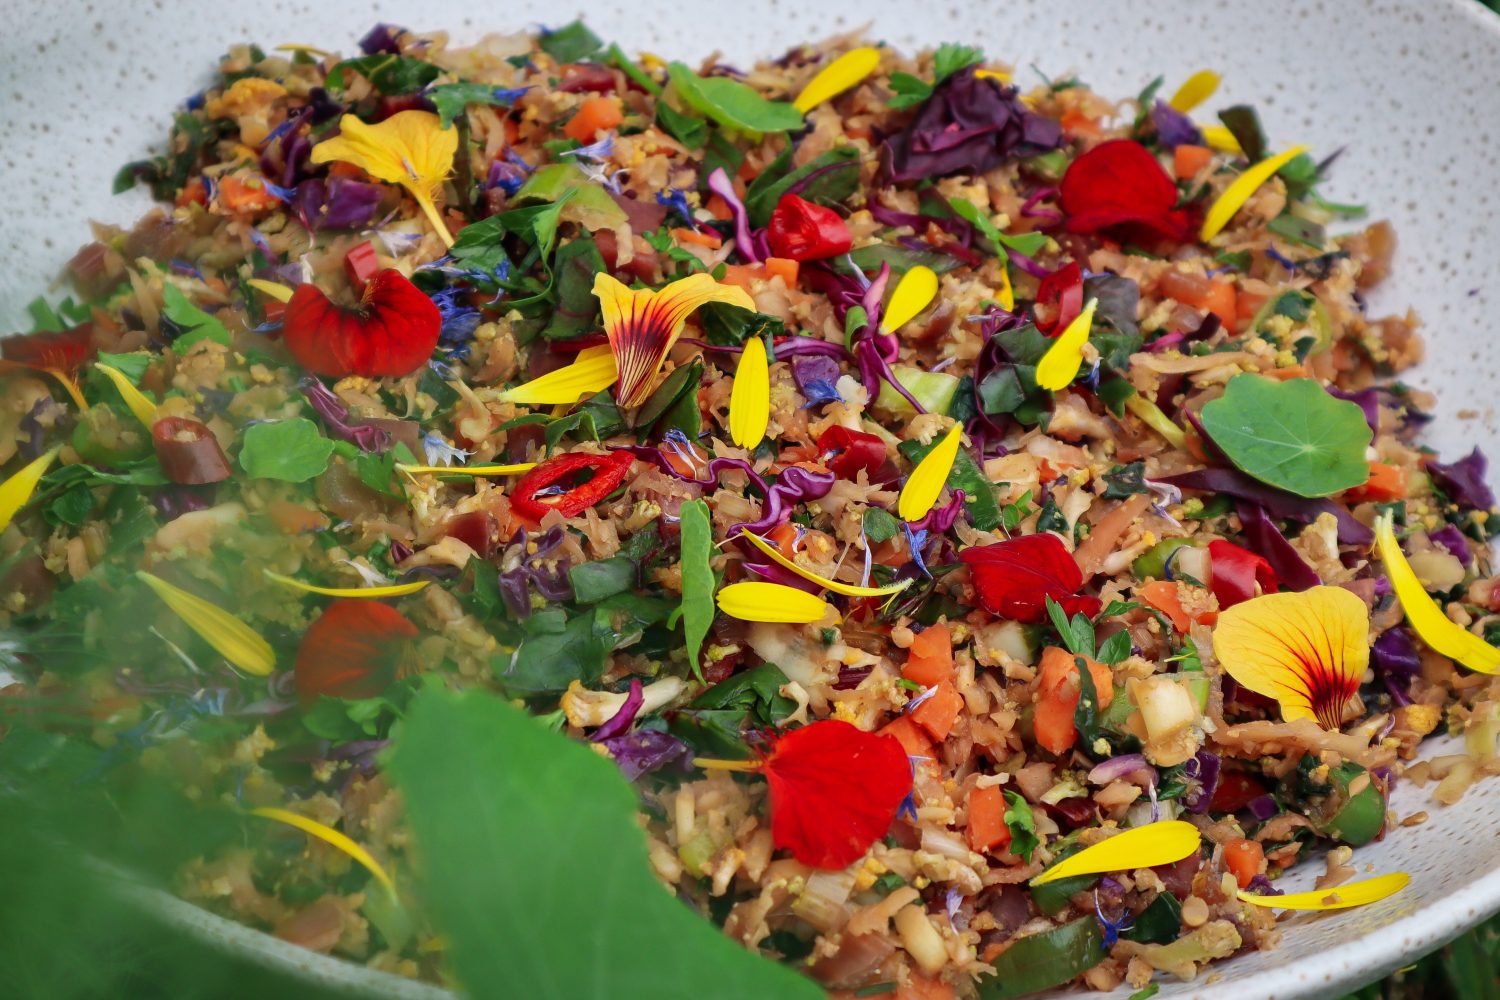
Remove from the heat and add to a large serving dish or individual bowls. Garnish with fresh chopped parsley, baby nasturtium leaves and edible flowers ( I used Nasturtiums, Calendula and Blue Cornflowers).
Notes
This recipe is flexible and you can use the vegetables you have in season. A total of 2-3 cups of diced vegetables. Other vegetables to try: Capsicum, Pineapple, Bokchoy, Spinach, Sugar Snap Peas, Beans,
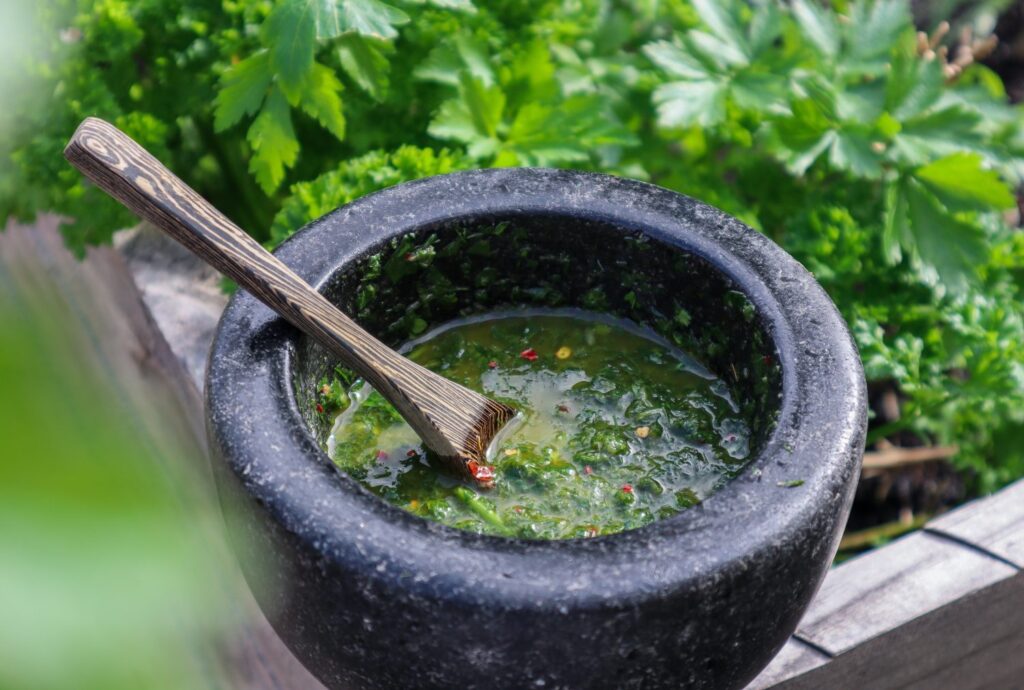
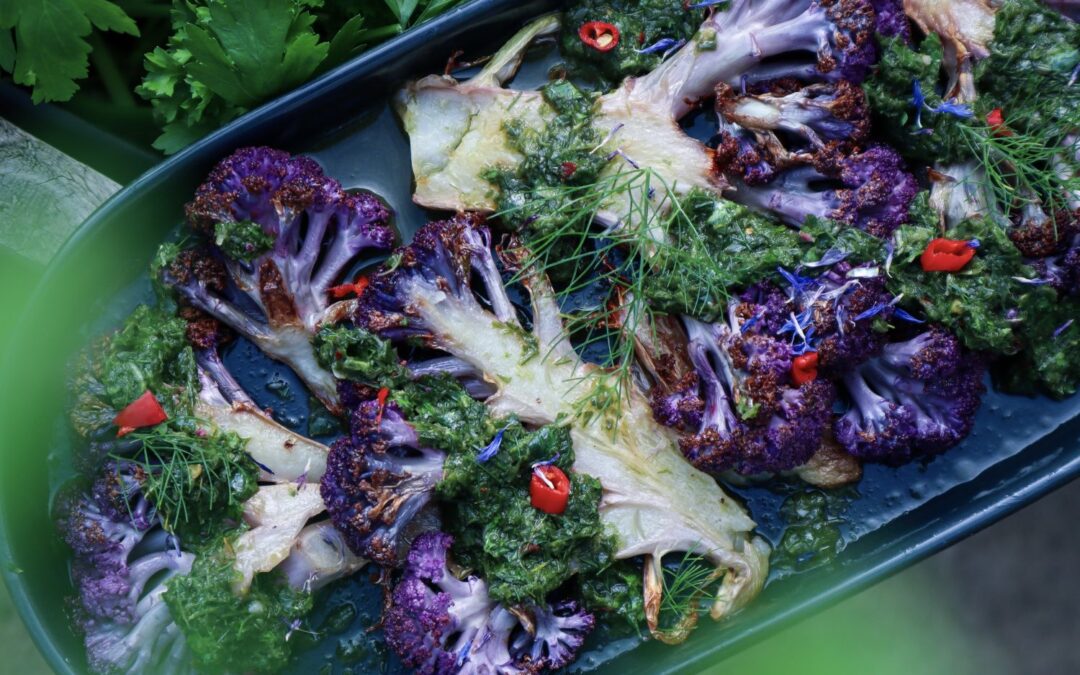
Cauliflower is such a hearty vegetable and can provide nutritious and filling meals. Cauliflower is a great vehicle for flavour! As it absorbs and holds flavour so well. Cauliflower is a great source of fibre, vitamin C, B,A,K and Folate. Roasting Cauliflower brings out more of its natural nutty flavours. These roasted cauliflower steaks are so easy to make and go great with this punchy green sauce. Inspired by chimichurri, this green sauce is packed full of herbs and has a zesty, vinaigrette flavour. Adapt this recipe to suit what herbs you have in the garden.
Cauliflower Steaks with Green Sauce
Roasted Cauliflower is so full of flavour and has subtle nutty flavours. Purple Cauliflower is striking to use but this can be made with any cauliflower variety. This vibrant green sauce is packed full of flavour and would be great used on many chicken or fish dishes too.
Ingredients
1 whole Cauliflower
2 TBSP Oil
1 cup Parsley
1 1/2 TBSP lemon juice
1 TBSP Red Wine Vinegar
1/4 cup olive oil
1/2 cup Fennel fronts
1/2 tsp Chilli
1 tsp sugar
3 Garlic Cloves
Sea salt flakes to season
Fresh Red Chilli
Instructions
Preheat oven to 190 degrees celcius. Rinse the Cauliflower and cut into x4 steaks. Cut from the top of the Cauliflower 2cm thick slices.
Drizzle with oil and cook for 30- 40mins or until the edges start to brown up.
While the Cauliflower cooks prepare the green sauce. Add Parsley, Lemon juice, Vinegar, Sugar, Fennel Fronts and Garlic to a mixer or mortar and pestle. Blitz or crush to combine and make a green sauce. Then gradually add oil to combine. Add Chilli flakes and a Pinch of Sea Salt flakes. Taste and balance with more salt if needed.
Place the Cauliflower on a serving dish and drizzle over the green sauce. Garnish with sliced red chilli, fennel fronts and edible flowers ( i used blue cornflowers).
There may be a little extra sauce than needed so you can keep in the refrigerator to use within a few days or freeze in ice cubes to use in cooking.
Notes
Swap or add seasonal herbs such as coriander or mint.
Pumpkin soup is like a warm, comforting hug during winter. This recipe uses the whole Butternut Pumpkin including the skin and seeds to add a toasty, crispy topping. The best addition to a soup! Turmeric has great natural anti-inflammatory properties and carrots have vitamin K and potassium for bone health. Freeze your extra soup in portions to pull out for a quick and easy winter meal.
Don’t throw out your Butternut skins and seeds, toast them to make delicious soup toppings or just a healthy snack.
Pumpkin, Tumeric, and Carrot Soup with Crispy Skins
Yield: 4-6 serves
Prep Time: 10 minutes
Cook Time: 50 minutes
Additional Time: 10 minutes
Total Time: 1 hour10 minutes
This warming winter soup with crispy skins and seeds is full of flavour and so satisfying. Using the whole vegetable to add texture and a beautiful nutty flavour.
Ingredients
1 medium butternut Pumpkin/squash
2 small-medium Carrots
1 brown Onion
1 red Onion
1 TBSP Oil
1 TBSP Tamari (or soy sauce)
1/2 tsp Ground Tumeric
2 tsp Sea Salt Flakes
1/2 tsp Chilli Flakes
1 can Coconut Milk
2 cups Water
Instructions
Dice and saute onions and place in a large pot or saucepan with oil until cooked through - approx 5minutes. Then add the Turmeric and mix to combine.
While your onion is cooking peel the Butternut as close to the skin as possible so there is very little flesh left on the skin. Place the skin and seeds in a bowl and set them aside.
Dice the rest of the Butternut into chucks - approx 3-4cm. Add to the pot with the onions.
Chop the carrot including the skin into 1cm slices and add to the pot.
Add in water, Tamari, salt, chilli, and coconut milk. Stir to combine.
Place a lid on top and reduce the temperature to a light simmer - 40minutes.
Once the pumpkin and carrot are cooked through and soft, remove from the heat and allow to cool slightly.
Turn your oven on high to 200degrees celsius.
Blend soup using a stick mixer or blender (ensure the soup is not too hot if you are using a blender or it may burst through the lid). Blend to a smooth soup consistency.
Place the soup back in your pot to reheat.
Coat the Butternut skin and seeds in oil and sprinkle with extra salt flakes and chilli flakes. Place on an oven tray and cook until golden and crispy. Watch them carefully as this will only take about 5 minutes. They will crisp up even more as they cool.
Serve your soup in a bowl and top with crispy skins and seeds. Garnish with edible flowers (i used rosemary flowers) and fresh herbs (thyme or parsley).
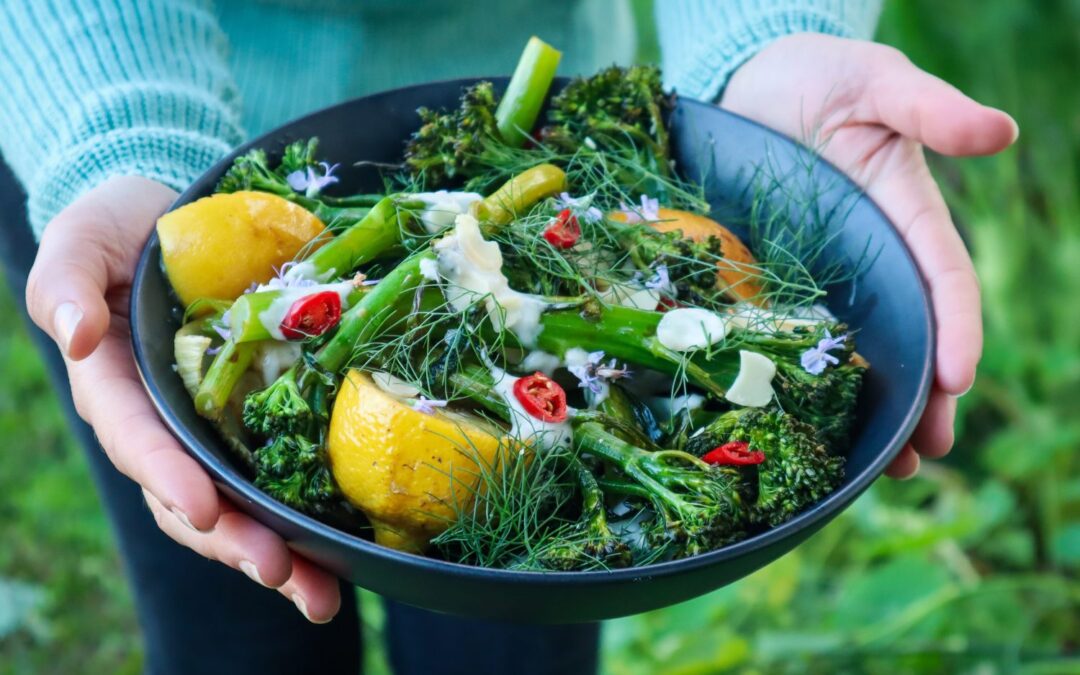
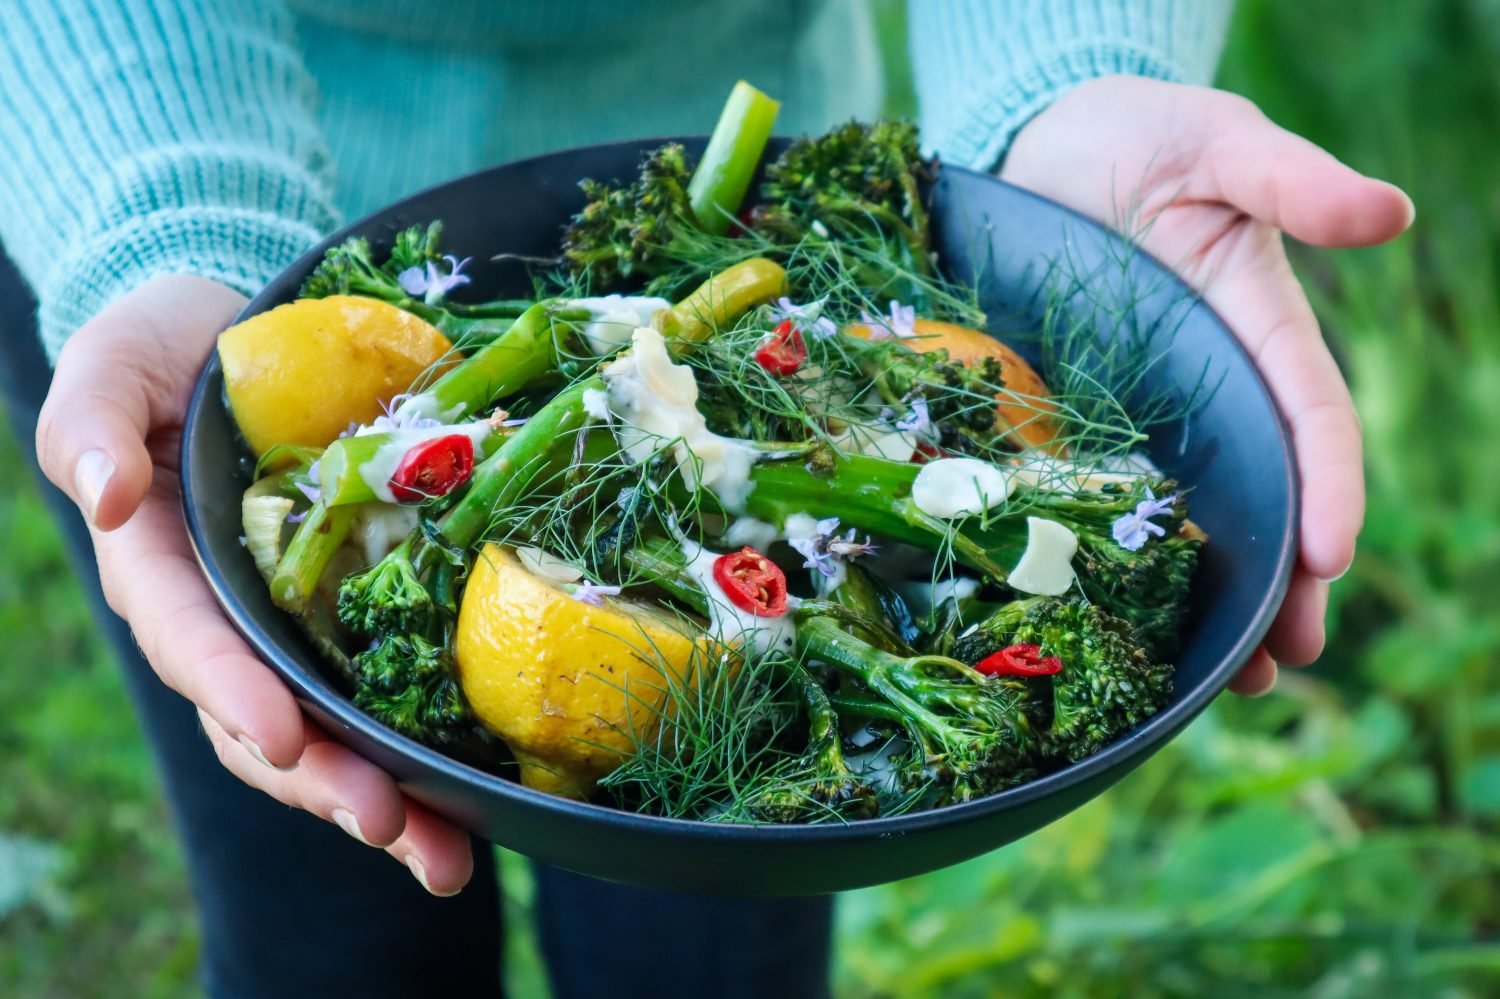
Broccolini or Broccoli is in abundance during the winter months and it is important to have some quick and easy meals or sides dishes to mix things up and let the vegetable shine. Roasted lemon has a mild, caramelized flavour and makes a delicious dressing to any salad or roast vegetables. This dish makes the perfect side of winter greens with a fresh, zingy flavour.
Roasted Broccolini with Lemon and Garlic Yoghurt Dressing
Fresh, vibrant, and delicious, this wintery Broccolini dish is a must-try. Lemons and Broccoli are ready and in-season at the same time and they also make a great pair on the plate.
Ingredients
2 Tbsp Coconut Yoghurt (or greek yoghurt)
1 Clove Garlic
1/2 tsp Lemon Zest
1 or 2 lemons
1 Bunch Broccolini
1 Fennel (optional)
1 sprig of Fennel Frond
1 Tbsp Flaked Almonds
Pinch of Sea Salt Flakes
1 Tbsp Olive Oil
Instructions
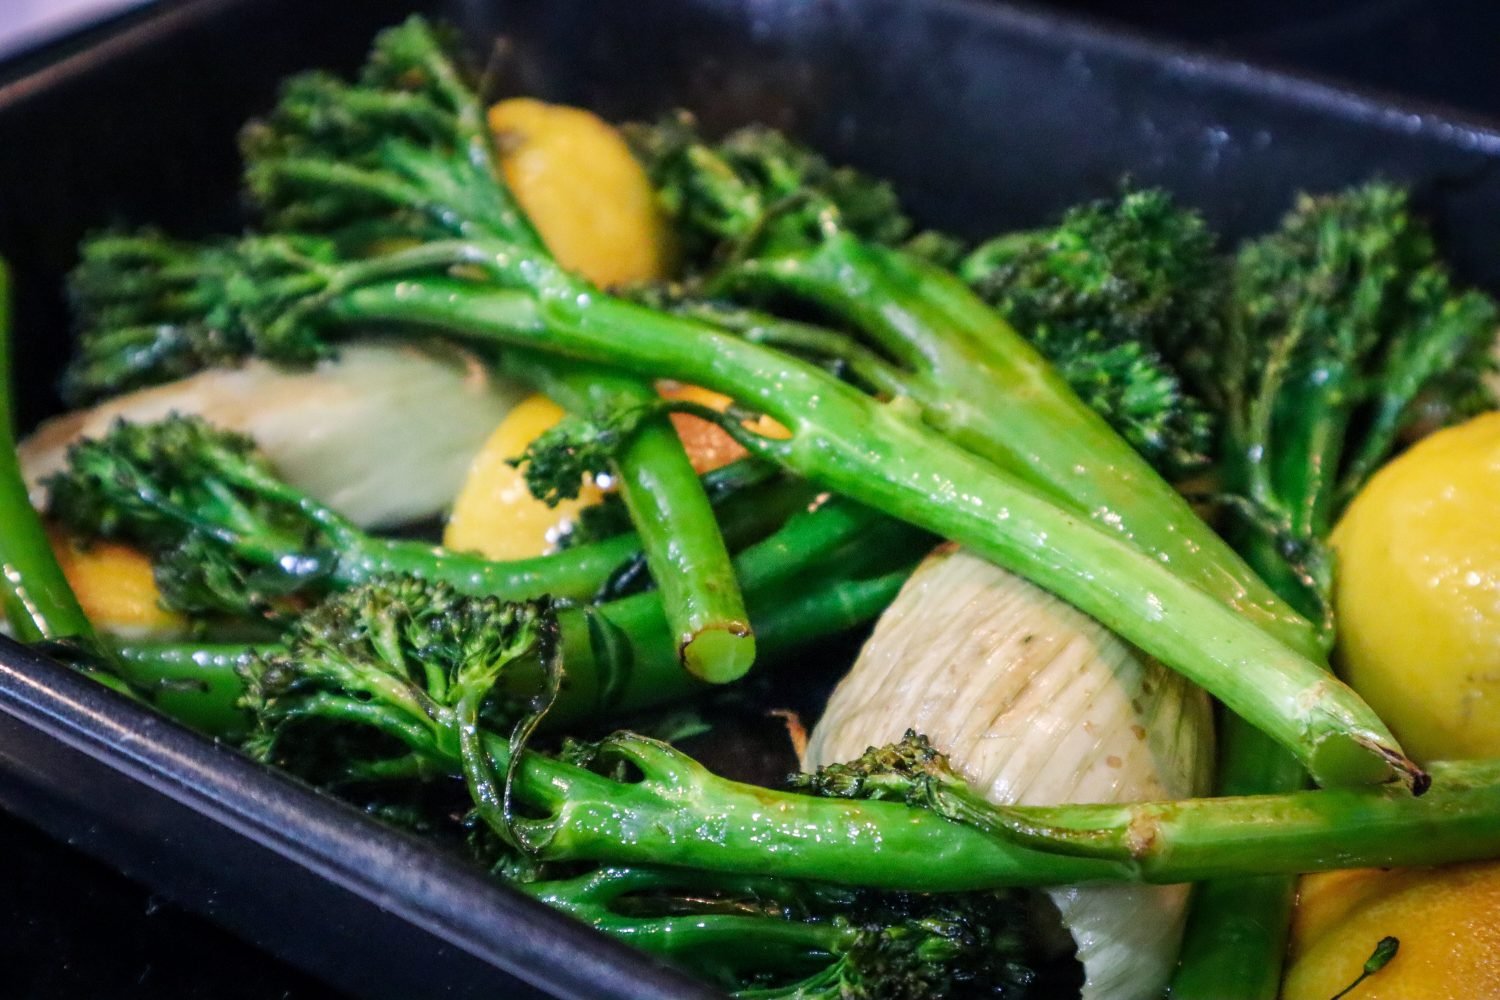
Preheat oven to 200 degrees Celcius. Wash and chop Fennel into quarters and place in a roasting dish. Cut the lemon in half and place face down. Drizzle with oil and ensure it is under the lemon and fennel so they do not stick. Place in the oven for 10minutes.
Prepare the dressing by adding the yoghurt to a small mixing bowl and finely grating in the garlic. Add a pinch of salt and 1/2 tsp of finely grated lemon zest. Mix to combine.
Remove the lemons and fennel from the oven and add in your Broccolini. Mix to coat with oil or juices from the pan. Return to the oven for a further 10minutes or until the Broccolini is bright green and slightly browning. You want it to still have some crunch to it and not be too well done.
Remove and add to a serving dish. Squeeze a little of the roasted lemon over the broccolini and leave the rest in the bowl to serve. Spoon over the yoghurt dressing. Top with almonds, red chilli, fennel fronds and a pinch of seas salt flakes.
Garnish with edible flowers (i used purple rosemary flowers)
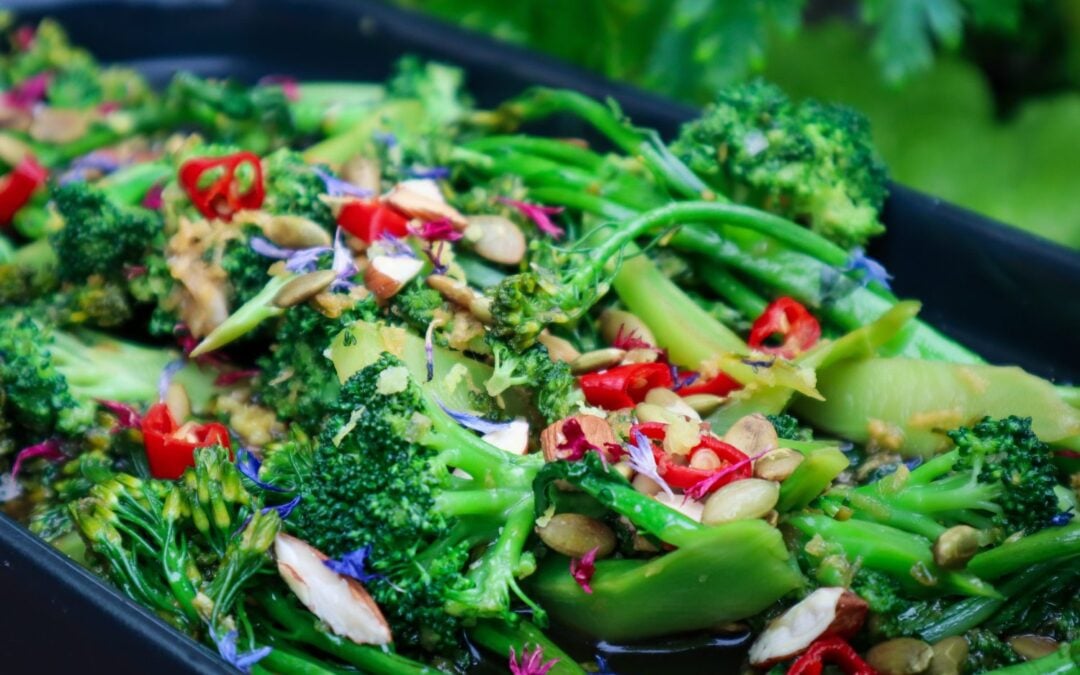
This Stirfry Broccoli dish is super quick and easy to make and packed full of flavour! A great side dish to serve with any rice or noodle meal, or just to spice up your weekly dinners. The contrasting Red chilli really makes this dish sing! I keep my chillies whole in the freezer to pull and use in meals throughout the year.
This stir fry sauce is one of my favourites and can be used with many other dishes. Just double the recipe to use for a full stir fry meal.
Stirfry Broccoli with Tamari, Chilli and Garlic
Prep Time: 5 minutes
Cook Time: 5 minutes
Additional Time: 2 minutes
Total Time: 12 minutes
A super quick and easy Broccoli side dish to serve that is packed full of flavour. Use Broccoli, Broccolini or a mix of both.
Ingredients
1 Tbsp Tamari (soy sauce)
1 Tbsp hot water
1 tsp Honey
1 tsp Lemon juice
1 Red Chilli
1 Garlic Clove
1cm cubed fresh Ginger
1 tsp Olive oil
1 Broccoli or Bunch of Broccolini
10 Almonds
1 Tbsp of Pepita seeds
Instructions
Add Tamari, Water, Honey, Lemon and Oil into a small mixing bowl. Using a fine grater, grate in ginger and garlic. Slice the red chilli and add half to the mix. Stir until honey is combined.
Roughly chop almonds into 2-3 pieces into a small frying pan. Toast for 1 minute and add the Pepita seeds until the seeds are slightly golden and remove from the heat.
Slice the Broccoli into pieces including the stem. Add to a frying pan on medium-high heat with a splash of oil.
Toss and add the dressing. Cook until the broccoli is bright green and still has a bit of crunch to it.
Place Broccoli onto a serving bowl or dish and add drizzle any extra sauce from the pan.
Top with toasted nuts and the rest of the red chilli. Season with a pinch of salt flakes and garnish with edible flowers (i used dried cornflowers)