Pick your fresh greens and herbs straight from the garden and turn them into these delicious green flatbreads. This recipe is quick and easy to make and can be used for a wide range of dishes. Roll thin for flatbread wraps or tear up and use as a dipping bread for hummus and other summery dips. These would also be delicious served with curry or stew.
Garden Green Flatbread
Yield: 8-10
Prep Time: 10 minutes
Cook Time: 5 minutes
Additional Time: 15 minutes
Total Time: 30 minutes
Garden Green Flatbreads are easy to make and packed full of nutritious greens and herbs from the garden. These flatbreads are great for serving with summer dips, hummus or pile on your favourite salad for a healthy wrap.
Ingredients
3 cups Flour
1 1/2 tsp Baking Powder
1 tsp Salt
4 TBS Vegetable Oil
2 cups mixed greens and herbs*
1 sprig fresh Rosemary
3/4 cup milk
Instructions
In a large mixing bowl add flour, salt, baking powder, and mix. Then add in the oil and mix to a crumbly dough.
Remove the stalk and roughly chop up the rosemary leaves and add to the mix.
Prepare a bowl of iced water. Blanch the greens in a large shallow pan of boiling water for 30 seconds then add to the bowl of iced water to cool.
Warm the milk in a saucepan and add to a Blender. Strain the excess water off the greens and add to the blender. Blitz until smooth and combined.
Add the green mix to the flour to form a dough. Add a little extra flour if it is too wet and sticky.
Roll the dough into a ball, wrap with film, and refrigerate for 15mins.
Lightly flour the bench, roll out your flatbreads using golf ball-sized amounts of dough. The thinner the dough is the easier it will be to bend and wrap.
Heat a large pan with oil then add your flatbreads for 30 seconds on each side or until slightly golden.
Tear up the flatbreads and serve with dip, hummus or add your favourite salad to use as a wrap.
Notes
- The darker the greens are you use the more vibrant the colour will be.
- *Use greens such as Spinach, Chard leaves, Asian Green leaves, Parsley, Nasturtium, Sweet Potato, Fennel Frond
Nasturtium Bread Rolls are bright, vibrant and all-natural colouring. Create WOW factor food with this garden-inspired bread recipe. Nasturtiums are the plant that keeps on giving! Nasturtiums make a beautiful lush living ground cover and are so easy to grow! Once you have them in your garden they will pop up every year without any effort on your behalf. They have so many uses and integrated relationships within your garden which makes them one of my favourite permaculture plants. You can read more about growing Nasturtium and uses here.
I love trying to get the most out of the things I have growing in my Urban Permaculture garden and that means lots of kitchen experiments! These Nasturtium bread rolls do have a nasturtium flavour once cooked but once I added ingredients for a burger it was not very noticeable. Just beautiful lush green tasty burgers!
This recipe would be great for a garden party, high tea, or just for something fun and interesting! I am a big believer in making everyday special. Make your own magic!
Nasturtium Bread Roll Recipe
Yield: 8 Burger Buns or 10-12 Rolls
Prep Time: 2 hours
Cook Time: 20 minutes
Total Time: 2 hours20 minutes
These Nasturtium bread rolls were a fun kitchen experiment to make vibrant green bread naturally. These Nasturtium bread rolls were a fun kitchen experiment to make vibrant green bread naturally. They have a mild nasturtium flavour when eaten on their own but served with chutney or as a burger, the flavour is very subtle.
Ingredients
4 cups flour
2 cups lukewarm water
3 tsp dry yeast
1 tsp salt
1 tsp sugar
1 Tbs oil
2 cups greens (i used Nasturtium leaves and fennel fronds)
Instructions
1. Blend greens in 1/2 cup of lukewarm water using a Nutribullet or blender. Then add the remaining water and mix.
2. Pour greens and water into a bowl and add sugar and yeast. Whisk to combine. Set aside for 5 - 10 mins to activate.
3. In a large bowl mix flour, oil and salt. Add in your green mixture half at a time and mix. It may need more water to form a dough so add water to your green bowl to mix and use up any of the residual greens. Add to the mixture as needed to form a dough. Knead for 1-2 mins.
4. Rub some oil in a bowl and add the dough ball. Cover and set aside somewhere warm to rise for 1-2 hours.
5. Cut and lightly roll dough into round buns. 8 large or 10-12 regular size. Cover and allow to rise again for 30mins - 1hr.
6. Whisk an egg and brush a light coat on top of the bread rolls. This is just to make them shiny and is optional. Place them on a lightly greased or non-stick tray. Bake at 180 degrees Celcius for 20mins or until slightly golden.
Notes
Best served fresh with butter. I rolled butter into a ball and coated with edible flowers (calendula and cornflower petals) for added WOW! Delicious on their own or as I have in this video make your favourite burgers using lots of salad and veggies from the garden!
There are so many ways to use Nasturtiums and I have plenty more ideas to try out. The most common way to use Nasturtium is in a salad. The leaves, flowers and seed pods are all edible. The flowers have a mild peppery taste and the leaves are a lot stronger in flavour. It is so important to learn how to use your edible plants so that you can get the most out of them! Especially in small space gardening. Below is a list of Nasturtium Recipes I have made so far:
If you haven’t already make sure you subscribe to my Youtube Channel to get all my lastest Gardening tips, garden tours and Kitchen experiments. Your support helps me create more free content so you can get the most out of your garden and sustainability journey!
If you have any questions please leave me a comment below.
Happy Gardening!
Holly
MY GARDENING ESSENTIALS // Fertiliser spray gun: https://bit.ly/366nL1t Retractable Hose: https://bit.ly/2TSC0Bo More gardening tools: https://bit.ly/32IQmbD
DISCLAIMER: Links included in this description might be affiliate links. If you purchase a product or service with the links that I provide I may receive a small commission. There is no additional charge to you! Thank you for supporting my page so I can continue to provide you with free content!
Focaccia bread is so easy to make and I use a basic bread recipe that I also use for pizza bases. With heaps of basil still in my garden, I thought I would make some delicious herb focaccia. You can use any herbs and greens you have in your garden for this Focaccia Bread recipe and get creative with the topping design!
Bread Ingredients – makes 2 focaccia
1 tsp Sugar
2 1/4 tsp Active Dried Yeast
4 cups Flour
1 1/2 cups lukewarm water
1 tsp salt
1 TBS olive Oil
Topping ingredients
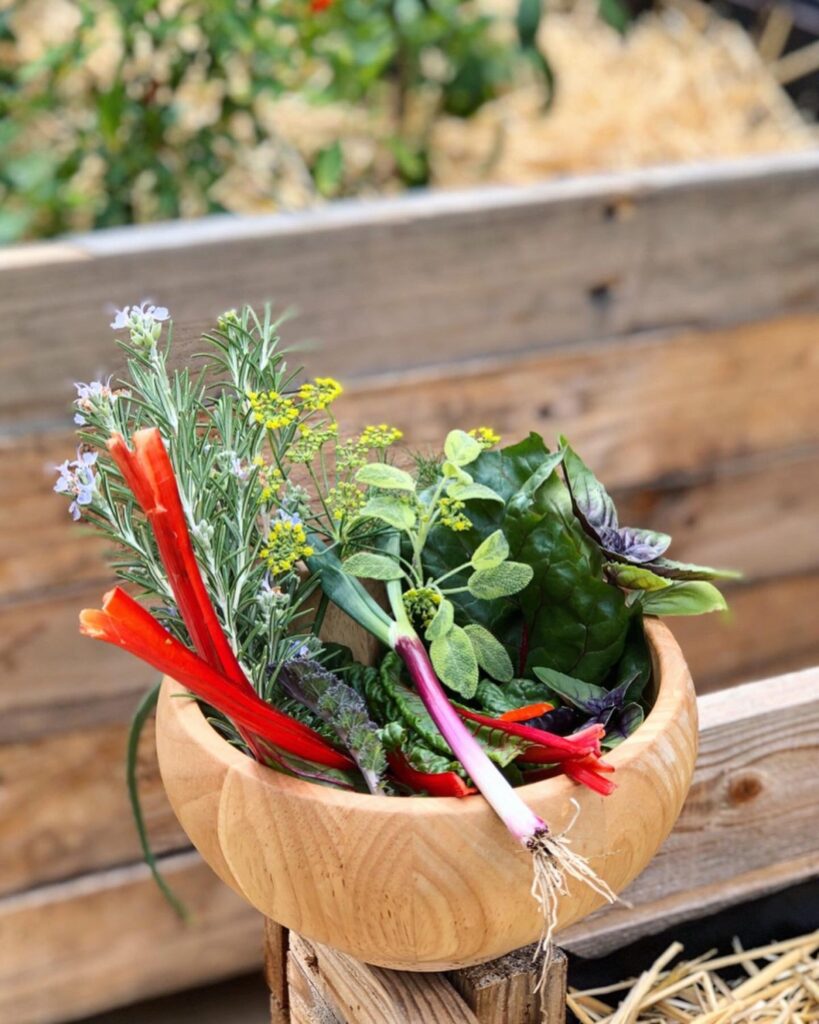
2 cups of herbs ( I used 70% basil, chives, sage, dill, nasturtium leaves)
4 Chillis
4 Cloves Garlic
1/2 tsp rock salt
2-3 TBS Olive Oil
1 small Red Onion
1 small Red Bunching Onion or spring onion
Baby Rainbow Chard
Dill flowers
Rosemary
Method
To make the bread combine water, sugar and yeast in a jug or bowl. Whisk to mix and set aside for 10mins.
In a large bowl mix flour, salt and Olive oil and then add yeast mix. Stir and form a dough. Add extra flour or water if needed.
Cover and leave somewhere warm for 1-2 hours to rise.
Whilst waiting for the dough start making your herb mix. Finely chop garlic, herbs and chilli (remove seeds if you don’t like too much heat and place in a pestle and mortar. Add rock salt and 1 TBSP Olive oil. Grind to a paste. If you don’t have a pestle and mortar just chop finely and crush in a bowl using the end of a rolling pin or similar.
Add the remaining 2 TBS of oil and stir to combine.
Finely slice rings of red onion. I use the thin fitting on my mandoline. Place in a bowl and add your baby greens, then drizzle with oil.
Cut your spring onion or bunching onion down the middle lengthways.
Once the dough has doubled in size, place on a floured bench and split in half. Roll each half out to form your focaccia. Place on a greased oven tray.
Using the end of a chopstick or teaspoon handle, make small indents into the dough so that the flavour can get right in. Brush on your oily herb mix and then place on your extra toppings as desired. Red onion, spring onion, rosemary, extra herbs or chilli, baby greens.
Add an extra drizzle of olive oil and cover with a tea towel. Let them rise again somewhere warm for about 10mins.
Heat oven to 170degrees celsius and cook for 25mins or until slightly golden.
Top with fresh herbs and serve. Delicious by themselves but amazing with chutney. I had extra herb oil left so I added more herbs/ chilli and made a green curry to eat with my bread and it was so good together!!
Other topping suggestions: Feta, olives, cheese, sundried tomatoes, caramelised onion… the options are endless for Focaccia Bread toppings!
Get creative and make your Focaccia bread your own piece of art. Be sure to tag me so I can see your amazing creations!
Holly 🌱
MY GARDENING ESSENTIALS // Fertiliser spray gun: https://bit.ly/366nL1t Retractable Hose: https://bit.ly/2TSC0Bo More gardening tools: https://bit.ly/32IQmbD
DISCLAIMER: Links included in this description might be affiliate links. If you purchase a product or service with the links that I provide I may receive a small commission. There is no additional charge to you! Thank you for supporting my page so I can continue to provide you with free content!