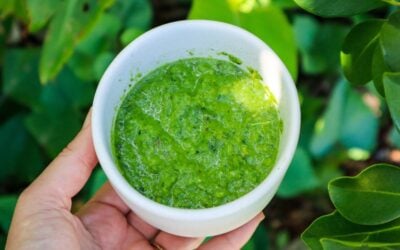
Making your own homemade green curry paste is so easy! You will never want to buy it again after you get the perfect blend. It will need adjusting to your heat tolerance, but mine is quite low, so you can always build on it from there. Using fresh herbs and ingredients from your garden takes this vibrant green curry paste to the next level! Extra curry paste can be frozen for a future quick and easy garden-to-plate meal.
See the bottom of the page for how to turn this green curry paste into a delicious meal.
Garden-to-Plate is flavour-packed!
If you grow your own herbs and chillies, this recipe is a fantastic way to use up extra harvests. Here’s a look at a few of the key ingredients and how they contribute to your garden and kitchen:
Green chillies: Long cayenne or similar varieties are perfect for this. They’re productive, easy to grow in pots, and can be frozen or dried for later use.
Lemon balm or lemongrass: Lemon balm is a wonderful lemony herb that grows like a weed. It’s a great lemongrass substitute and adds a bright citrus note.
Basil: Thai basil is traditional, but any sweet basil works. It’s easy to grow and makes this paste extra aromatic.
Spring onion: Grows well in containers or in-ground. The green tops add a mellow onion flavour.
Ginger and garlic: While not always garden-grown, both are staples in many food gardens and can be preserved or grown in pots in warm climates.
This paste also works beautifully as a marinade for grilled veggies or protein or as a punchy flavour boost in soups and noodle dishes.
Swaps & Substitutions
Lemon balm vs. lemongrass: Lemon balm is great if lemongrass isn’t available, but either works well.
Chillies: Use what you have! Bird’s eye chillies for more heat, jalapeños or milder green varieties if you prefer it gentle.
Herbs: Try coriander or mint for a different twist.
Green Curry Paste
Yield: 1-2
Fresh and vibrant green curry paste to make a delicious garden-to-plate meal from scratch!
Ingredients
6 Green Chillies (long cayenne) - see notes
1 Spring onion
3 Garlic cloves
10 cm piece of fresh ginger
1 lime
1/2 cup lemon balm (or 1 stalk lemon grass)
1/4 cup fresh basil
1 tsp Raw sugar
1/2 tsp Sea Salt
Instructions
Cut the ends of the green chillies and remove the seeds (this is optional. Keep to the side if you want to add extra heat) and slice and add to a blender or mortar and pestle.
Peel the ginger using the back of a spoon and slice it into small pieces.
Zest the lime and add the zest and juice to the mix.
Dice and chop all other ingredients and add everything to the mix.
Blitz or pound until a paste-like consistency. You may need to add a splash of water if it is not mixing.
Use immediately or freeze for future use.
Notes
Green Cayenne are on the mild side. If you are using hotter chillies use less or more to your heat preference. I also remove the seeds because I like it mild. Keep the seeds to the side and add extra during the cook if you want to increase the heat.
Other herbs and greens can be added such as parsley or corriander
Tips for Storing and PreservingGreen Curry Paste
Fridge: Store in a sealed jar for 5–7 days.
Freezer: Freeze in tablespoon-sized portions in ice cube trays, then transfer to a container or zip-lock bag for up to 3 months.
Pro tip: Label your frozen curry cubes so you know what’s what when digging through the freezer later!
How to make a Green Curry with the Homemade Paste
To turn your green curry paste into a delicious garden-to-plate meal follow these steps.
In a deep pan or Wok, brown onions in 1TSBP Olive Oil.
Add your protein of choice and brown off.
Add the green curry paste and stir to combine for 1 minute
Add 400ml of Coconut cream.
Stir and taste. Add extra sugar or salt if needed. Salt helps bring out more flavor. Sugar can ease some of the spice.
Add chopped greens and veggies such as Zucchini, Capsicum, Carrot, Snow Peas, Beans, and Chard.
Cook until protein is cooked through and veggies are softened but still have a bit of crunch.
Roasted Sweet Potato rounds are also delicious on top of a green curry!
Homemade green curry paste is a game-changer—flavourful, fresh, and full of your garden’s best. Whether you grow a few herbs on your balcony or have a thriving backyard veggie patch, this recipe is a wonderful way to make the most of your harvests.
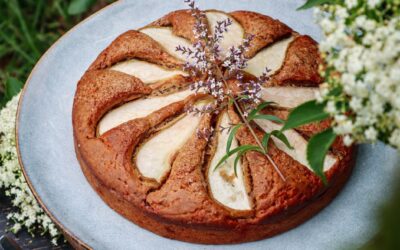
Ginger and Pear is a match made in heaven. This spiced ginger and pear tea cake is the perfect way to refuel after knocking out some tasks in the garden. Enjoy whilst sitting out in the garden with a cup of tea or coffee. If you love the warm, comforting flavors of ginger and pear, this Spiced Ginger and Pear Tea Cake is the perfect bake for you. This moist and fragrant cake combines fresh, juicy pears with the bold spice of ginger, making it a delightful treat for afternoon tea, cozy gatherings, or as a simple homemade dessert. Whether you’re an experienced baker or just starting out, this easy-to-follow recipe will quickly become a favorite in your kitchen.
Delicious Garden to Plate
Bursting with Flavor – The combination of fresh pears, fresh ginger, cinnamon, and honey creates a perfectly spiced cake that’s both aromatic and delicious.
Moist and Tender Texture – Thanks to the natural juiciness of the pears and creamy yoghurt, this cake stays wonderfully soft and moist.
Simple Ingredients – You probably already have most of these pantry staples at home, making it an easy go-to bake.
Perfect for Any Occasion – Enjoy a slice with a cup of tea, serve it as a weekend brunch treat, or bring it to your next gathering.
Tips for the Best Spiced Ginger and Pear Tea Cake
Use ripe but firm pears for the best texture and flavor.
Grate 1/4 tsp fresh ginger into yogurt or cream to serve for an extra kick
This cake is naturally sweet, lightly spiced, and absolutely delicious. If you’re looking for a cozy, homemade treat that highlights seasonal produce, give this Spiced Ginger and Pear Tea Cake a try!
Spiced Ginger and Pear Tea Cake
Sugar and spice this tea cake is so nice! The perfect morning or afternoon tea treat to be enjoyed with a tea or coffee in the garden.
Ingredients
1 1/4 cups plain flour
1/2 cup coconut yoghurt*
1/3 cup olive oil
1 tsp baking powder
½ tsp baking soda
2 tsp freshly grated ginger
3/4 cup brown sugar
2 TBSP honey
1/2 tsp mixed spice*
1/2 tsp cinnamon
1 tsp ground ginger
1/3 cup milk
1 tsp apple cider vinegar or lemon juice
1 medium pear
1 TBSP raw sugar to sprinkle over the top
Instructions
Preheat oven to 180 degrees Celcius.
Mix all dry ingredients in a large mixing bowl.
Mix wet ingredients including grated ginger in a separate bowl.
Wash and slice pears into slices lengthways. About 0.5cm - 1cm thick. (Thinner if you want them soft, thicker if you like them to still have some bite). Peel if you like but I don't bother.
Grease a 15-20cm cake tin.
Make a well in the center of the dry ingredients and gently mix the wet ingredients in until just combined. Don't over-mix.
Pour cake batter into the cake tin and level out to form a flat top. Place the pear slices in and gently push into the mixture. Sprinkle the TBSP of sugar on top.
Bake for 30- 45mins or until the cake skewer comes out clean.
Allow to cool and serve with extra yogurt or cream.
Ginger (Zingerber officinale) is a perennial herb with beautiful lush leaves and produces edible rhizomes that are both flavour-enhancing and medicinal. Ginger is a great addition to your edible garden as it can be grown in pots or as an understory part of your food forest. Ginger easily self propagates and you can divide the rhizomes up to regrow more and more ginger each year. Ginger is a staple for your medicinal garden.
Fertile, moist, well-drained soil. Plenty of compost.
LOCATION
Dappled or part shade position. Sheltered and warm.
CARE
Regular watering.
FERTILISE
Compost teas or liquid fertilisers.
PESTS
HARVEST
Harvest in autumn or 8-10 months after planting. When leaves die off. Harvest all at once or leave some to regrow.
REPRODUCE
Cut the rhizomes into pieces with at least 2 “eyes”. Allow cuts to dry off before planting.
Why Grow Ginger?
Ginger is a slower grower but low maintenance and produces an abundance of rhizomes beneath the surface.
Here are some of the many reasons to grow Ginger
Easy to grow
Versatile produce
Low maintenance
Aids in nausea
Antioxidants
Flavour enhancer
Visual Aesthetics
Supports Immune health
Rich in Vitamin A,B,C
Can be eaten raw, cooked, or pickled
Anti-inflammatory properties
Popular Ginger Varieties
Ensure you have edible ginger plants before planting as there are many types of ornamental gingers that can be invasive. Selecting organic locally grown ginger rhizomes from the shops can be a good way to regrow ginger plants.
When to Plant Ginger
Ginger is a warm loving tropical plant. It thrives in humid conditions but can still be grown in a range of different climates. Plant ginger late winter-spring depending on how cold your climate is. Plant after the last frost when temperatures are warming up. Ginger likes temperatures between 20-30 degrees and needs at least 5-8 months to grow. If you live in a cooler climate you may need to start or finish your ginger of indoors or in a greenhouse to keep it warm.
How to Grow Ginger
Choose a sheltered, sunny spot with dappled or part shade.
Prepare the soil with rich compost or a pot at least 300mm wide.
Cut Rhyzomes into pieces with at least 2 “eyes each. The eyes are on the end of the knobs and have a little circle. Wait a few days until the cuts have dried off to prevent rot.
Plant 15cm apart.
You can also plant the whole piece in the ground without cutting it first.
Ginger can be a little slow to get growing and show through the soil so don’t stress. Keep them moist but not soggy.
Care/ Maintenance
Keep Ginger well-watered but not soggy. Ginger doesn’t like strong winds so protection using larger trees or plant in sheltered locations.
Once the leaves start to die off in Autumn reduce the watering and let the plants start to die down to put energy into the rhizomes.
You can harvest ginger throughout the growing period the young ginger or “green ginger” has a more mild flavour and can be used raw. Just ensure you don’t disturb the patch too much.
Once the leaves are all brown dig up the patch.
You can select some to regrow and plant straight back in the soil.
Rinse off the soil and remove the roots. These are the skinny smooth parts below the rhizomes.
Reproducing
Ginger is best reproduced by cutting up the rhizomes to produce more plants or left to repopulate on its own. Leaving ginger in the ground without harvesting can help produce an established patch. Then each year in Autumn harvest what you need and leave the rest to regrow.
Cooking and Using Ginger
Ginger can be eaten raw, cooked, pickled or fermented.