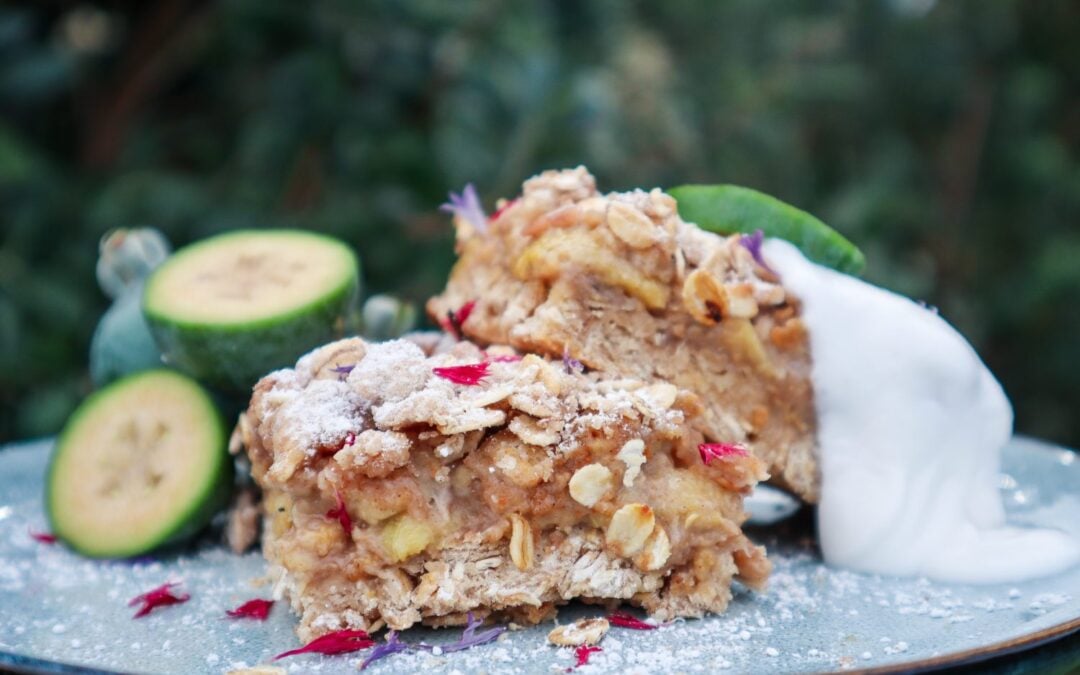
Feijoas or pineapple guavas come in thick in fast over the Autumn month. Their sweet, perfumey flavour is delicious and eaten fresh but once the trees are established you will have a hard time keeping up with them! This Feijoa crumble is delicious and not too sweet. Serve with ice cream yogurt or custard. Feijoas can be frozen to make this throughout the year or switch out the feijoas with other fruit such as apples, apricot, or plum.
Feijoa Crumble Slice
Prep Time: 20 minutes
Cook Time: 35 minutes
Total Time: 55 minutes
Feijoa crumble slice is delicious served warm with icecream, yoghurt, or a sweet treat for packed lunches.
Ingredients
Crumble
2 cups flour
1 1/2 cup rolled oats
1/2 cup shredded or desiccated coconut
1/2 teaspoon baking powder
1 /2 teaspoon cinnamon
1/8 teaspoon salt
1/4 cup yoghurt
1/3 cup maple syrup
1 teaspoon vanilla extract
80g Butter
Filling
3 cups Feijoa flesh (scooped out of the skin)
1 TBSP Raw sugar (or honey)
1 TBSP Flour
1 tsp Lemon Juice
1/2 tsp Cinnamon
Instructions
Preheat oven to 180 degrees Celsius.
Scoop out the flesh of the Feijoa (or thaw out previously frozen ones).
Add Crumble ingredients to a bowl and lightly mix into a crumble.
Grease or line a 20cm baking dish and press 2/3rds of the mixture in to form a base.
Bake for 15 minutes or until edges turn golden.
Mix filling ingredients together and pour over the base.
Evenly spread the remaining crumble on top and bake for a further 20-30 minutes until golden.
Enjoy!
Notes
Feijoas can be mixed with finely sliced apple if you do not have enough.
Swap out the Feijoas for whatever fruit you have in season such as Strawberry, Plum, Apricot
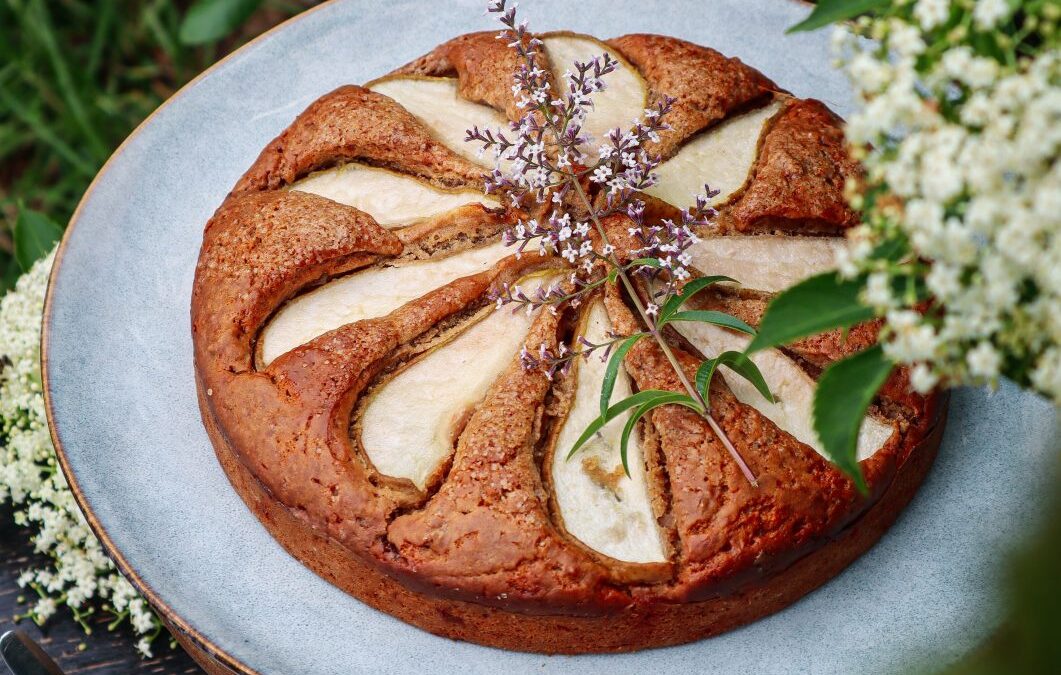
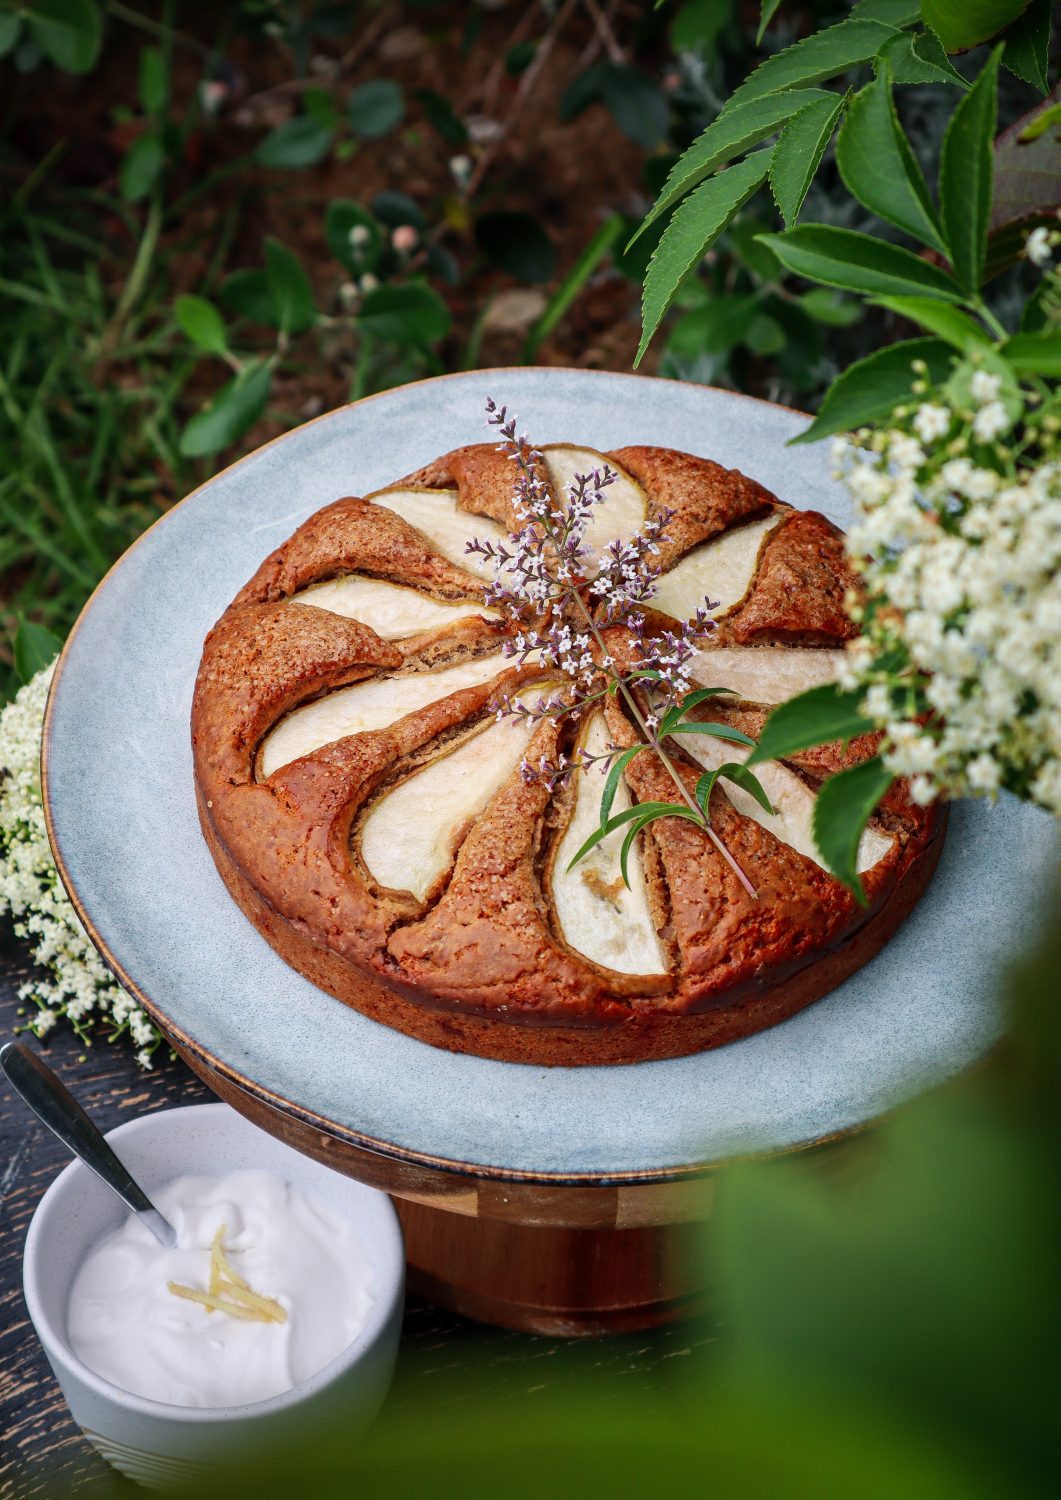
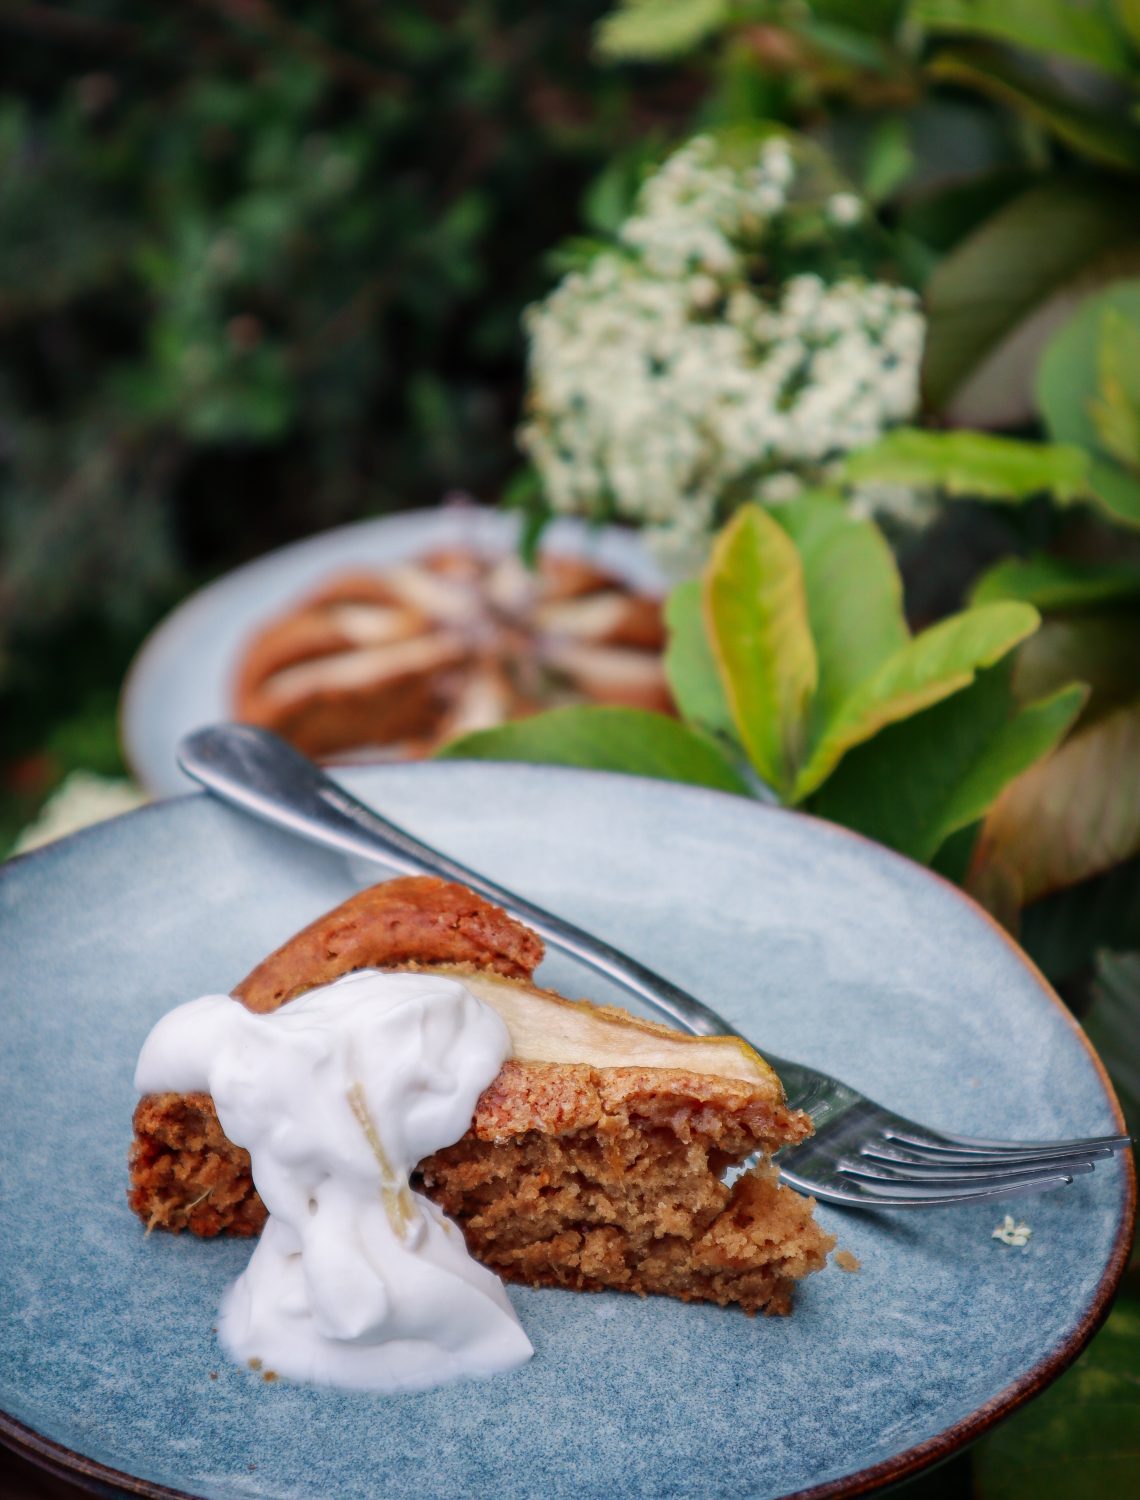
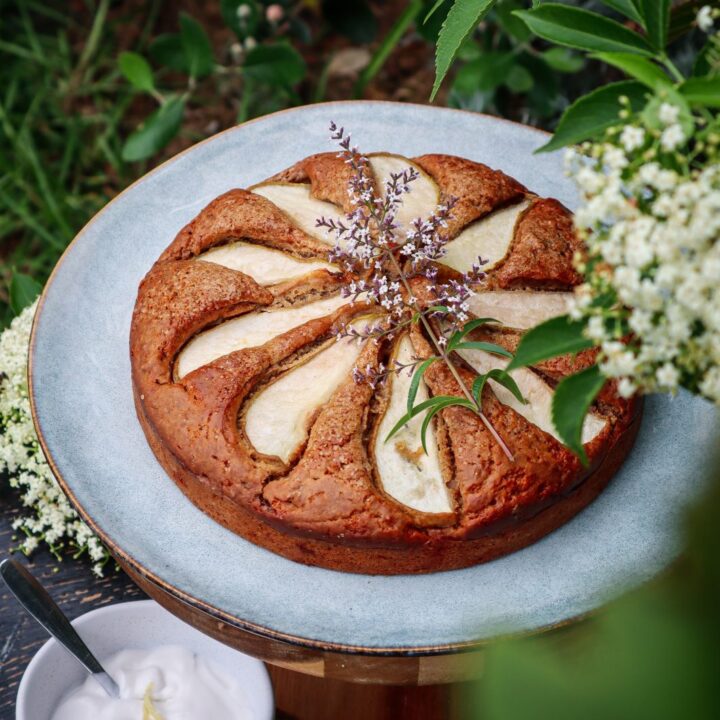
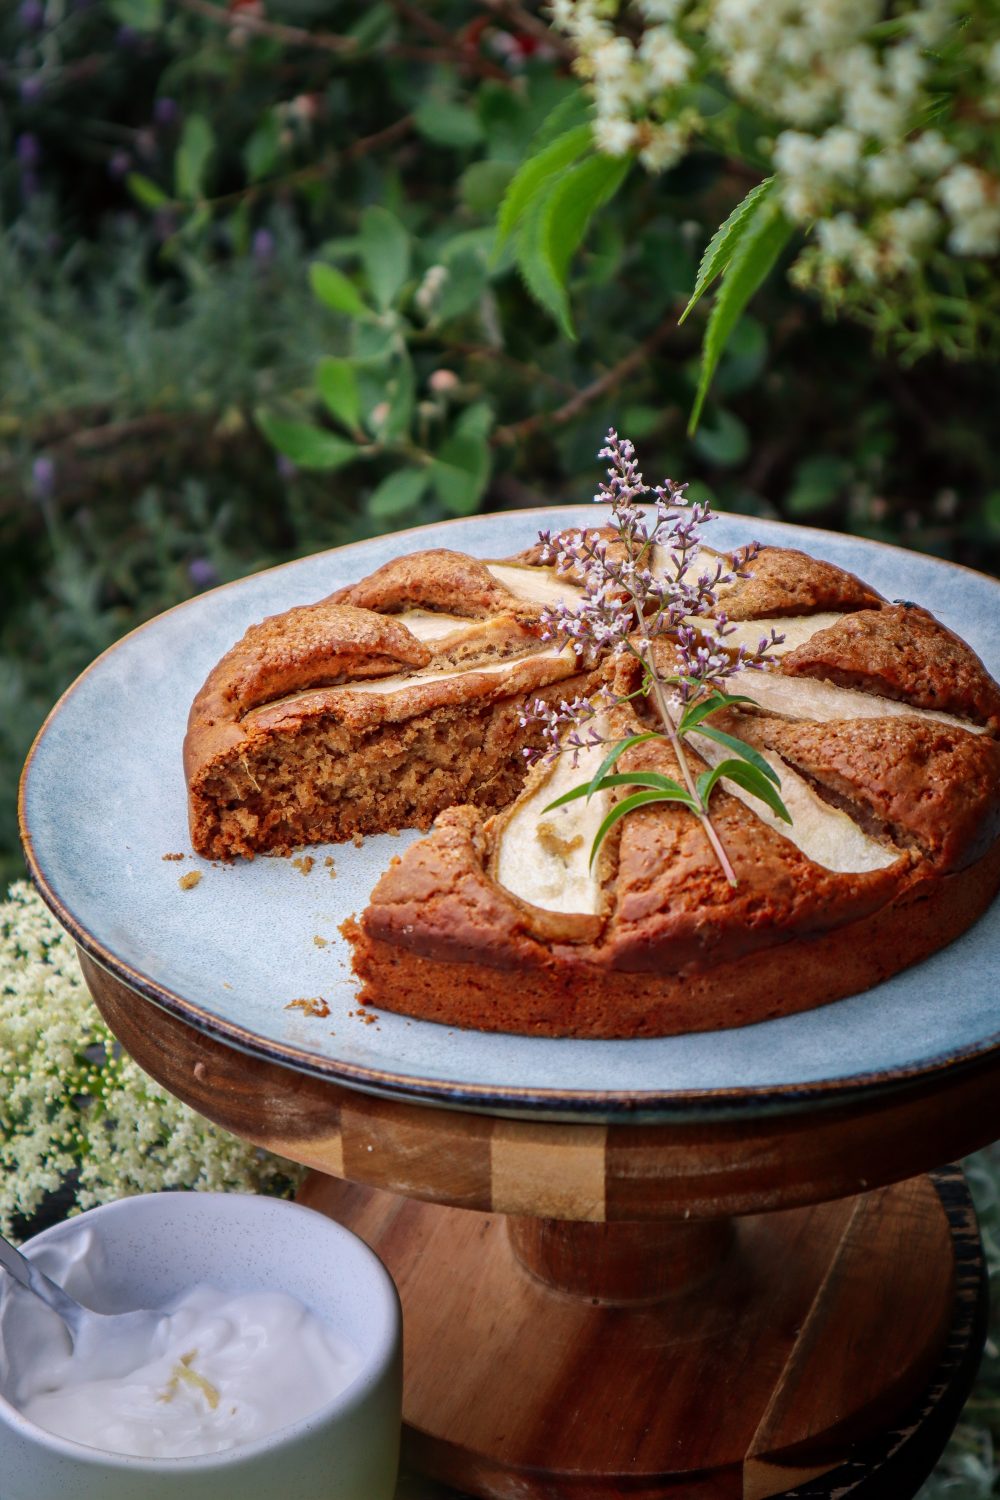
Ginger and Pear is a match made in heaven. This spiced ginger and pear tea cake is the perfect way to refuel after knocking out some tasks in the garden. Enjoy whilst sitting out in the garden with a cup of tea or coffee. If you love the warm, comforting flavors of ginger and pear, this Spiced Ginger and Pear Tea Cake is the perfect bake for you. This moist and fragrant cake combines fresh, juicy pears with the bold spice of ginger, making it a delightful treat for afternoon tea, cozy gatherings, or as a simple homemade dessert. Whether you’re an experienced baker or just starting out, this easy-to-follow recipe will quickly become a favorite in your kitchen.
Delicious Garden to Plate
Bursting with Flavor – The combination of fresh pears, fresh ginger, cinnamon, and honey creates a perfectly spiced cake that’s both aromatic and delicious.
Moist and Tender Texture – Thanks to the natural juiciness of the pears and creamy yoghurt, this cake stays wonderfully soft and moist.
Simple Ingredients – You probably already have most of these pantry staples at home, making it an easy go-to bake.
Perfect for Any Occasion – Enjoy a slice with a cup of tea, serve it as a weekend brunch treat, or bring it to your next gathering.
Tips for the Best Spiced Ginger and Pear Tea Cake
Use ripe but firm pears for the best texture and flavor.
Grate 1/4 tsp fresh ginger into yogurt or cream to serve for an extra kick
This cake is naturally sweet, lightly spiced, and absolutely delicious. If you’re looking for a cozy, homemade treat that highlights seasonal produce, give this Spiced Ginger and Pear Tea Cake a try!
Spiced Ginger and Pear Tea Cake
Sugar and spice this tea cake is so nice! The perfect morning or afternoon tea treat to be enjoyed with a tea or coffee in the garden.
Ingredients
1 1/4 cups plain flour
1/2 cup coconut yoghurt*
1/3 cup olive oil
1 tsp baking powder
½ tsp baking soda
2 tsp freshly grated ginger
3/4 cup brown sugar
2 TBSP honey
1/2 tsp mixed spice*
1/2 tsp cinnamon
1 tsp ground ginger
1/3 cup milk
1 tsp apple cider vinegar or lemon juice
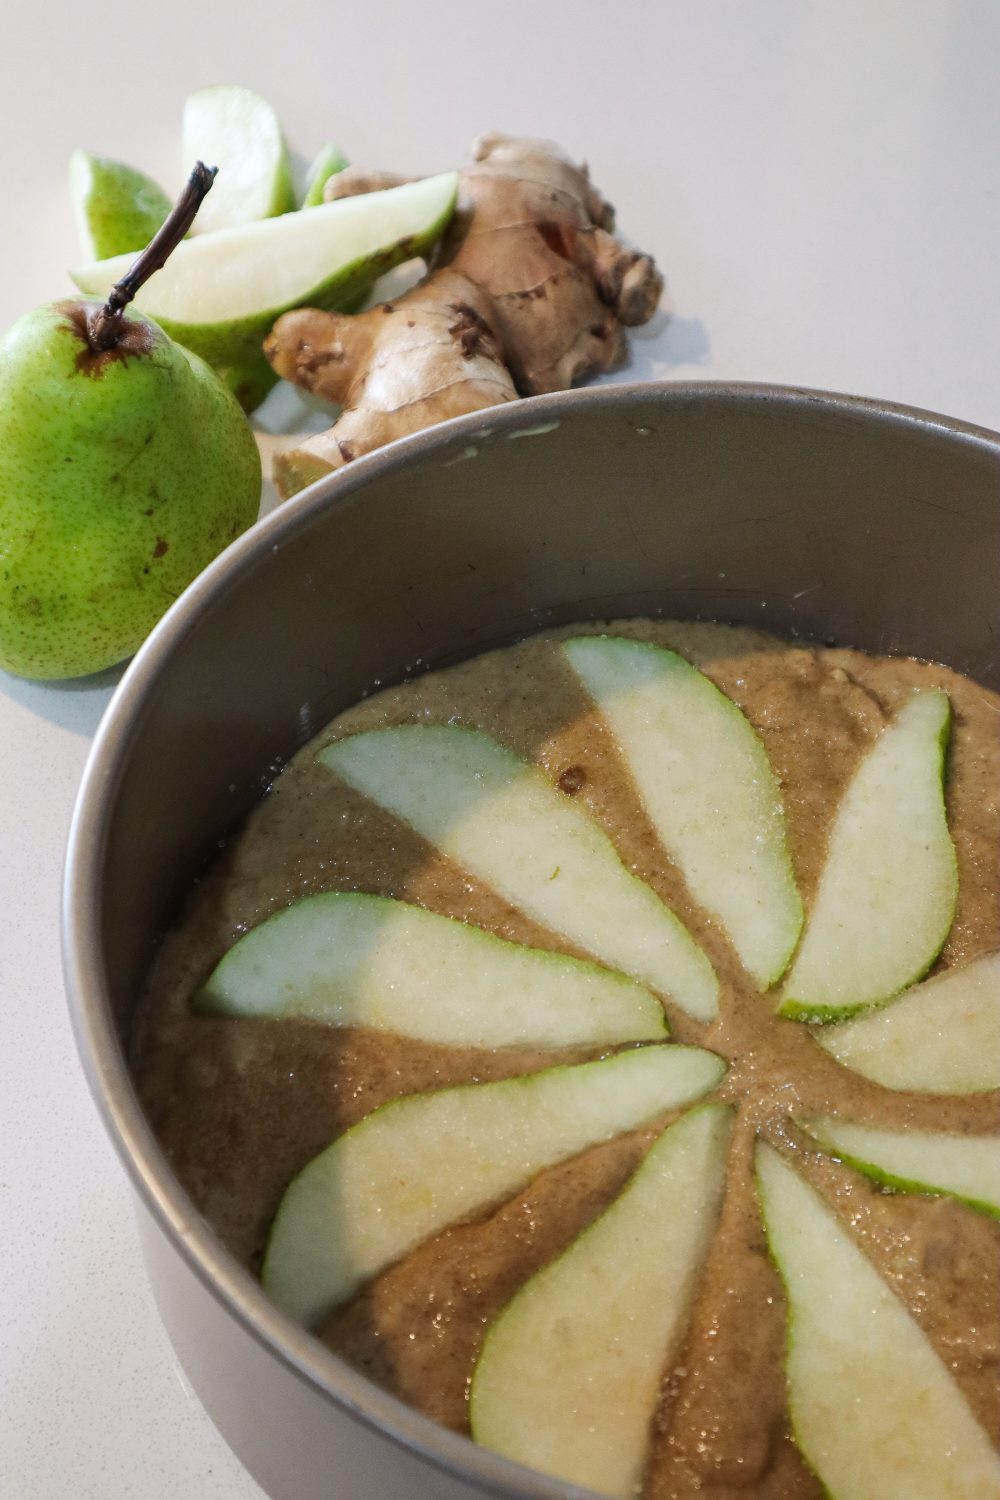
1 medium pear
1 TBSP raw sugar to sprinkle over the top
Instructions
Preheat oven to 180 degrees Celcius.
Mix all dry ingredients in a large mixing bowl.
Mix wet ingredients including grated ginger in a separate bowl.
Wash and slice pears into slices lengthways. About 0.5cm - 1cm thick. (Thinner if you want them soft, thicker if you like them to still have some bite). Peel if you like but I don't bother.
Grease a 15-20cm cake tin.
Make a well in the center of the dry ingredients and gently mix the wet ingredients in until just combined. Don't over-mix.
Pour cake batter into the cake tin and level out to form a flat top. Place the pear slices in and gently push into the mixture. Sprinkle the TBSP of sugar on top.
Bake for 30- 45mins or until the cake skewer comes out clean.
Allow to cool and serve with extra yogurt or cream.
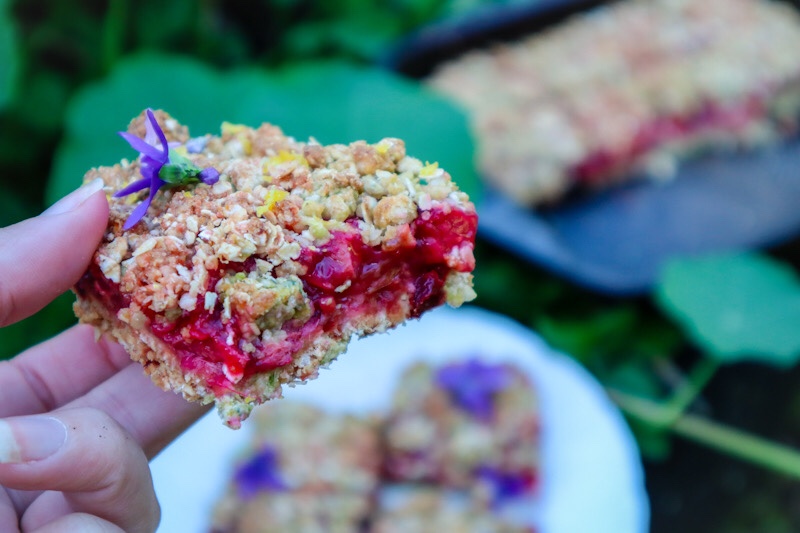
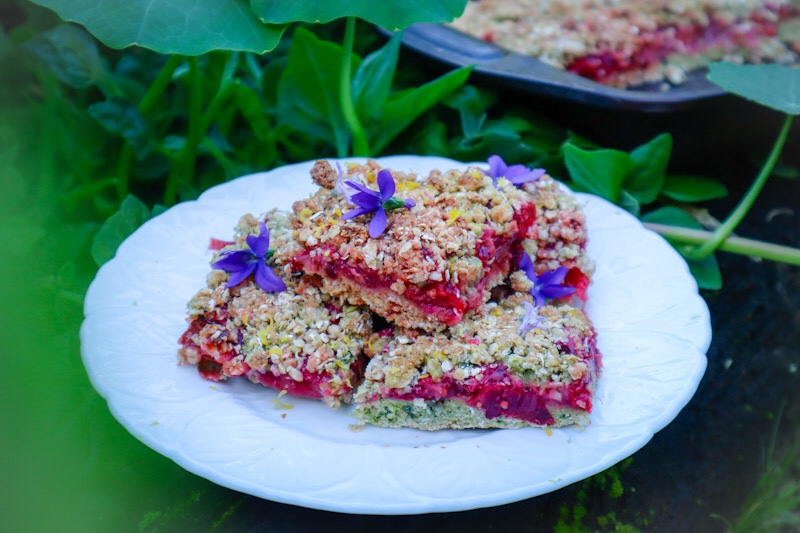
Deliciously sweet, and tart Rhubarb Crumble Slice with hidden garden greens. This gooey-centered slice is easy to make and will make a yummy dessert or sweet treat for lunches.
Rhubarb Crumble Slice
Yield: 12- 15 slices
Delicious sweet and tart slice with refreshing hints of lemon. An easy snack for lunches or serve with yogurt or icecream for a yummy dessert!
Ingredients
Crumble / base
1 1/2 Cups Rolled Oats
1 3/4 Cups Plain Flour
1 tsp Baking Powder
1/4 tsp Salt
1 tsp Lemon Zest
1/2 cup Melted Butter
3/4 cup brown sugar
2 TBSP Pureed Spinach Greens (1 1/2 cup fresh greens)*
Rhubarb Filling
2 Cups Chopped Rhubarb (2cm chunks)
1/4 Cup Sugar
2 TBSP Cornflour
3/4 Cup Water
3 TBSP Fresh Lemon Juice
Instructions
Preheat the oven to 180degrees Celcius. Grease a 25cm square dish.
Add all the filling ingredients into a saucepan on medium-low heat until the Rhubarb has softened. Add a little extra water if it is too thick. You want it to be thick but still be able to roll off the spoon.
Allow to cool while you prep the base.
Mix together all the dry ingredients for the crumble. Add in the melted butter and greens. (You can skip the greens and add an extra TSPB of butter).
Press 3/4 of the mixture into the dish to form the base. Bake for 10 minutes and remove from the oven.
Pour over the filling and sprinkle the remaining crumble on top.
Bake for 30-40minutes until slightly golden.
Grate extra lemon zest on top to serve.
Notes
*Blanch greens such as spinach or chard leaves, blitz to puree, and add into crumble for added nutrition.
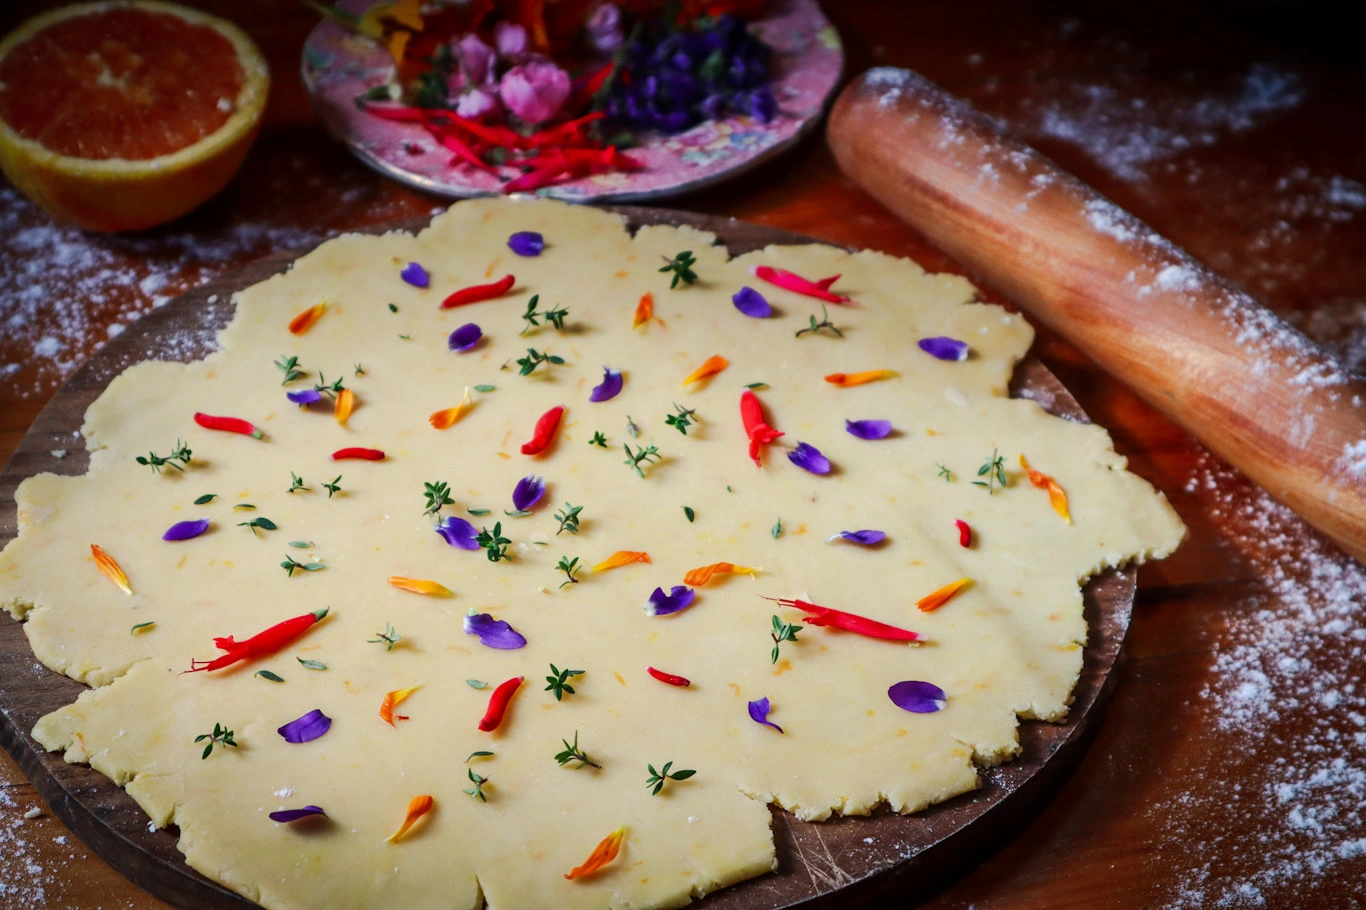
Beautiful and delicious floral shortbread with subtle flavours of orange and thyme. This basic shortbread recipe can easily be adjusted to add seasonal edible flowers and herbs from the garden. I created this recipe when I was home (New Zealand) in my mum’s garden. Although she has very limited baking equipment….she made up for it with her inspiring gardens and the perfect eclectic set of vintage floral tea cups and saucers. I hope you also find some inspiration. The perfect treat to spoil your friends and celebrate spring with a tea or coffee in the garden.
Orange and Thyme Botanical Shortbread
Prep Time: 20 minutes
Cook Time: 20 minutes
Additional Time: 1 hour
Total Time: 1 hour40 minutes
Fresh, subtle flavours infused in soft melting biscuits. These botanical shortbread biscuits can be made using seasonal edible flowers and herbs.
Ingredients
250gram butter
1 cup icing sugar
3 cups flour
2 tbsp orange juice
2 tbsp ( 1 orange) zest
1 tsp chopped fresh thyme
1 /2 cup edible flowers
Instructions
Beat sugar and butter until very pale yellow/white and creamy.
Grate the zest of one large orange and add to the mix along with 2 TBSP of juice.
Mix through the flour to make a soft dough.
Wrap or cover the bowl and refrigerate for at least 1 hour.
Preheat the oven to 140 degrees. Lightly dust a baking tray with flour.
Remove the dough and lightly knead to bring it together.
Roll out the dough on a lightly floured surface to approximately 1 cm thick (easier to manage using 1/2 the dough at a time)
Sprinkle over edible flower petals and fresh thyme leaves (removed from the stalk).
Gently roll over the flowers. Some may not stick, so just lightly press them into place. Cut out shapes using a cookie cutter and place them onto the baking tray.
Merge the leftover edges and re-roll out, and continue to cut shapes. The second roll will incorporate the flowers into the dough, so you may want to add extras on top.
Bake for 15-20mins or until very slightly starting to go golden. You want to keep them pale so they don't become too dry and crumbly. Remove and allow to cool on a wire rack.
Notes
Edible flowers I used: Pineapple Sage (red flowers), Calendula, Rose, Sweet Violet, and Nasturtium.
Use seasonal edible flowers and herbs: other options to try are Lemon and Lavender, Lemon and Rosemary, or Mint.
Celebrate summer with these delicious watermelon choc-tops. Indulge in a sweet treat without all the added refined sugars. These watermelon choc-tops can be made frozen for an iceblock or chilled in the fridge for a refreshing summer treat. If you don’t like biting into a frozen iceblock, the refrigerated versions may be the best for you. These were such a hit and will now be a summer staple in our house!
With just two simple ingredients you can quickly and easily make these Watermelon Choc-tops that are sure to impress! Sprinkle with edible flowers before the chocolate sets to add a little extra magic.
Watermelon Choc-tops
Prep Time: 5 minutes
Additional Time: 2 hours
Total Time: 2 hours5 minutes
Watermelon Choc-tops are the ultimate summer treats! Quick and easy to make using simple ingredients.
Ingredients
Watermelon
Chocolate buttons (or whatever chocolate you prefer)
Edible Flowers
Iceblock sticks
Instructions
Slice your watermelon up into Iceblock sized pieces around 1cm thick and place in a container in the fridge to cool while you melt your chocolate.
To melt the chocolate I place my chocolate buttons in a small saucepan and set it over another saucepan with water and allow the steam to heat it.
Once your chocolate has melted remove it from the heat.
Create a rack to hold your watermelon iceblocks by placing two sticks (or chopsticks or knives) across the top of a cup.
Push the iceblock stick into the watermelon pieces so that they are secured.
Spoon over your melted chocolate and sprinkle on edible flowers. I used dried cornflower. Carefully place your chocolate-coated watermelon upright on your makeshift rack by holding the bottom edge of the watermelon.
Place in the freezer to set. The watermelon will be frozen and ready to eat within 2hours. Or place in the fridge until the chocolate has set for the fresh version.
Notes
Both fresh and frozen are good! However, I do prefer the frozen ones.
The difference between the fresh or frozen versions is :
Fresh - Sweeter, very juicy, a little hard to eat.
Frozen- Mild watermelon flavour, not too sweet, need to be good with biting into frozen food.