From invasive root systems to aggressive self-seeding, I will share why urban gardeners should Avoid Planting these in the Ground. These 15 Fruit Trees & Edible Plants can take over your garden, damage nearby structures, or require constant maintenance. Planting fruit trees and edible plants in the ground might seem like the best way to grow them, but some plants can quickly become a headache in urban gardens!
If you have limited space or an urban garden, this will be important info to know BEFORE you plant these in the ground! In this post, I’ll explain why these plants are better suited for containers, raised beds, or controlled areas, helping you avoid common gardening mistakes.
Fig Trees
Figs are delicious and easy to grow, but their strong root systems can cause major problems. They have the potential to damage pavers, concrete, and even underground drains as they search for water. If planted in raised beds, they can take over the space, outcompeting other plants.
A better option? Grow figs in a pot. This allows them to focus on fruit production rather than excessive growth. You may find they fruit quicker and more prolifically in a pot when they focus more on fruit production than on establishing their size. If you have plenty of space, you can plant them in the ground—just keep them away from structures, driveways, and pipes.
Kumquat Trees
Kumquats are a fun citrus tree, but for many gardeners, they end up being more ornamental than practical. While they produce masses of fruit, the small, tart fruits are best suited for jams, chutneys, or cocktails—not for everyday snacking.
A small potted tree will be much easier to manage and will give you great harvests to experiment with. Rather than a full-sized tree overloaded with fruit that becomes a chore to harvest.
Blackberry
Blackberries are known for their invasive growth habits. They send suckers underground, making them hard to contain, and if their stems bend over and touch the ground, they root and spread even further.
To keep them under control, grow blackberries in containers or install a deep garden edge to prevent runners from escaping. Otherwise, they can quickly take over your garden or spread into neighboring gardens or properties.
Blueberry
Blueberries thrive in acidic soil, which can be challenging to maintain in the ground. Without consistent soil pH, they may struggle to produce fruit.
Growing blueberries in pots allows you to control soil acidity, ensuring healthier plants and bigger harvests. Plus, container-grown blueberries take up less space and can be moved easily.
Grafted Passionfruit
Grafted passionfruit vines are notorious for causing problems in the garden, especially for beginner gardeners. The rootstock can take over, killing off the main plant and leaving behind a non-fruiting, invasive vine. The suckers can spread over 50 meters, making them extremely difficult to remove once established.
For a hassle-free option, grow non-grafted passionfruit vines to avoid rootstock takeover.
Mint
Mint is one of the worst plants for spreading aggressively. It sends out underground runners that allow it to jump containment and take over nearby garden beds. Even in pots, it can escape through drainage holes and establish itself in the soil.
Since a single plant can produce more than enough for home use, keep mint contained in a pot or raised bed to prevent it from becoming invasive.
Elderberry
Elderberry bushes are great for their medicinal berries and flowers, but they send out suckers that make them difficult to control. Even if you try to remove them, they can keep coming back for years.
If you’re growing elderberries in a small space, consider pots or designated garden areas to manage their spread.
Goji Berry
Goji berries grow fast and aggressively, spreading through self-seeding and suckering. While they are packed with nutrients, they can quickly take over garden beds if not regularly pruned.
For better control, grow goji berries in a pot to keep them manageable.
Jerusalem Artichoke (Sunchoke)
Jerusalem artichokes send out underground tubers that spread rapidly and uncontrollably. Once established, they are nearly impossible to remove.
To prevent them from taking over, grow sunchokes in large containers or contained garden beds where they can be harvested easily.
Yarrow
Yarrow is a fantastic medicinal herb. It also attracts a lot of beneficial insects and pollinators to the garden. However, it has an aggressive spreading growth habit in the garden. It spreads throughrunners under theground that can invade neighboring properties and garden beds. Yarrow can be hard to get rid of once a patch is established.
If you want to grow Yarrow in an urban garden, try containers or root barriers to keep it in check.
Malabar Spinach
This fast-growing vine can take over trellises and nearby plants. It also self-seeds aggressively, meaning it will pop up all over your garden. It is also more ornamental than edible so you don’t need to have it regrowing everywhere.
For better management, grow it in containers or a dedicated trellis space.
Lemon Balm
Lemon balm is one of my FAVOURITE herbs. It is part of the mint family and spreads rapidly through self-seeding. Once established, it can take over veggie patches.
Keep it pruned to stop flowering and contained by growing it in pots rather than directly in the ground.
Choko (Chayote Vine)
Chayote vines are a great perennial vine but do grow extremely fast, climbing over fences, trees, and garden beds. They also regrow from tuberous roots, making them hard to remove once established.
To prevent it from taking over, grow choko in containers or on a dedicated trellis.
Loquat
Loquats are delicious, but birds spread their seeds, causing them to self-sow aggressively. These trees also grow large, shading out other plants and taking up valuable space.
If you plant a loquat tree, be prepared for regular pruning and fruit netting.
Nasturtium
While nasturtiums are great companion plants, they self-seed aggressively and can quickly take over garden beds. In warm climates, they may become invasive.
To keep them in check, grow nasturtiums in pots or confined spaces.
Where & How to Plant Instead:
1. Large Pots & Containers 🪴
Great for invasive trees like figs, bamboo, or mulberries.
Controls root spread and makes maintenance easier.
Use at least a 50L (13-gallon) pot with good drainage.
2. Raised Garden Beds 🌱
Ideal for shallow-rooted plants that need better soil structure.
Prevents aggressive roots from spreading into pathways or damaging pipes.
Use deep beds (40cm/16” or more) for trees like bananas or certain berry bushes.
3. Root Barrier Systems 🚧
Works well for trees with aggressive or spreading roots (e.g., willows, mulberries).
Install a thick plastic or metal barrier at least 60cm (24”) deep around the root zone.
4. Espalier Against a Fence or Trellis 🌿
Perfect for space-saving and controlling growth (e.g., citrus, apples, pears).
Improves air circulation and prevents disease.
Train branches horizontally along wires or a fence.
5. Food Forest or Dedicated Zone 🌳
Some trees, like guavas or loquats, spread but work well in food forests.
Plant in designated areas where spreading isn’t an issue.
Use companion planting to balance growth and improve soil health.
6. Grow Bags or Air-Pruning Pots 🛍️
Good for trees like figs or pomegranates that do well in restricted root spaces.
Promotes healthy root structure and prevents circling roots.
Use 40L+ fabric pots for long-term growth.
Planting in the ground
While these plants can all be great additions to your garden, planting them directly in the ground can lead to maintenance headaches and invasive growth. By growing them in containers or designated areas, you can still enjoy their benefits without the stress of keeping them under control.
Have you had trouble with any of these plants? Leave a comment below and share your experience! Don’t forget to subscribe to my YouTube channelfor more gardening tips. 🌱
Links included in this description might be affiliate links. If you purchase a product or service with the links that I provide I may receive a small commission. There is no additional charge to you! Thank you for supporting my blog so that I can continue to provide you with free content.
Rich, creamy, and dairy-free decadence straight from the garden. If you’ve ever wondered what to do with an abundance of ripe avocados, this Avocado Chocolate Tart is the answer. It’s rich, silky, and deeply chocolatey—yet made with simple, wholesome ingredients. Best of all, it’s quick to prepare, doesn’t require any complicated steps, and feels like something straight out of a fancy café.
This is one of my go-to dessert creations whenever avocados are in season. The creamy avocado filling pairs beautifully with a nutty, chocolate-infused base, while the candied mint leaves and fresh strawberries add balance, brightness, and a little garden-to-plate magic.
Whether you’re looking for a showstopper dessert for guests or just want something rich and indulgent for yourself, this tart is a winner.
Why Avocados Make the Perfect Dessert
What makes this tart extra special is the use of avocados, not just as a healthy substitute, but as a creamy, indulgent base that rivals any traditional custard or ganache. Avocados are packed with healthy fats, fiber, and essential nutrients. The natural creaminess of ripe avocados blends beautifully with dark chocolate, creating a smooth, luscious texture without the need for cream or butter. It’s a great way to sneak more whole foods into your diet while still treating yourself. Plus, using seasonal produce like homegrown avocados makes this dessert even more rewarding, connecting what’s on your plate to what’s growing in your garden.
Avocado Chocolate Tart with Candied Mint Leaves
Prep Time: 6 hours
Cook Time: 15 minutes
Additional Time: 45 minutes
Total Time: 6 hours
Ingredients
Chocolate base
2 1/2 cups (225g) walnuts (or any nut/seed)
1 1/2 cups pitted dates soaked*
Pinch salt
3 TBSP Cocoa powder
Filling
3 ripe Avocados
4 tsp maple syrup or brown sugar
120grams dark melting chocolate
pinch salt
1/4 cup oat milk (or milk of choice)
Optional strawberries to garnish
Candied Mint Leaves
10 + Mint leaves
1 Egg White or Aquafaba (chickpea water)
Caster sugar to sprinkle
Instructions
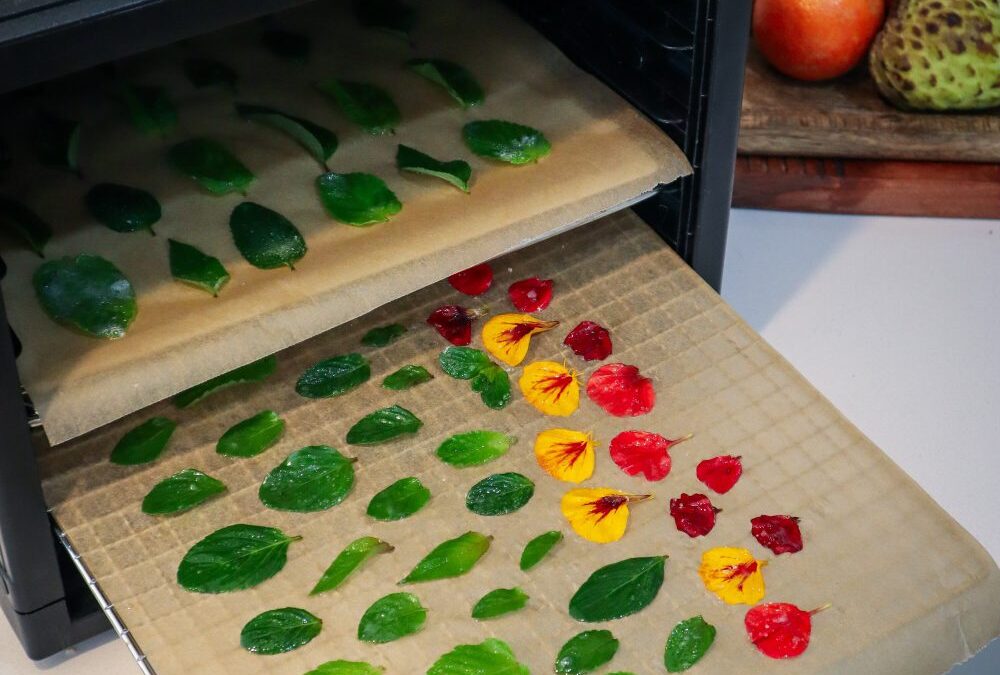
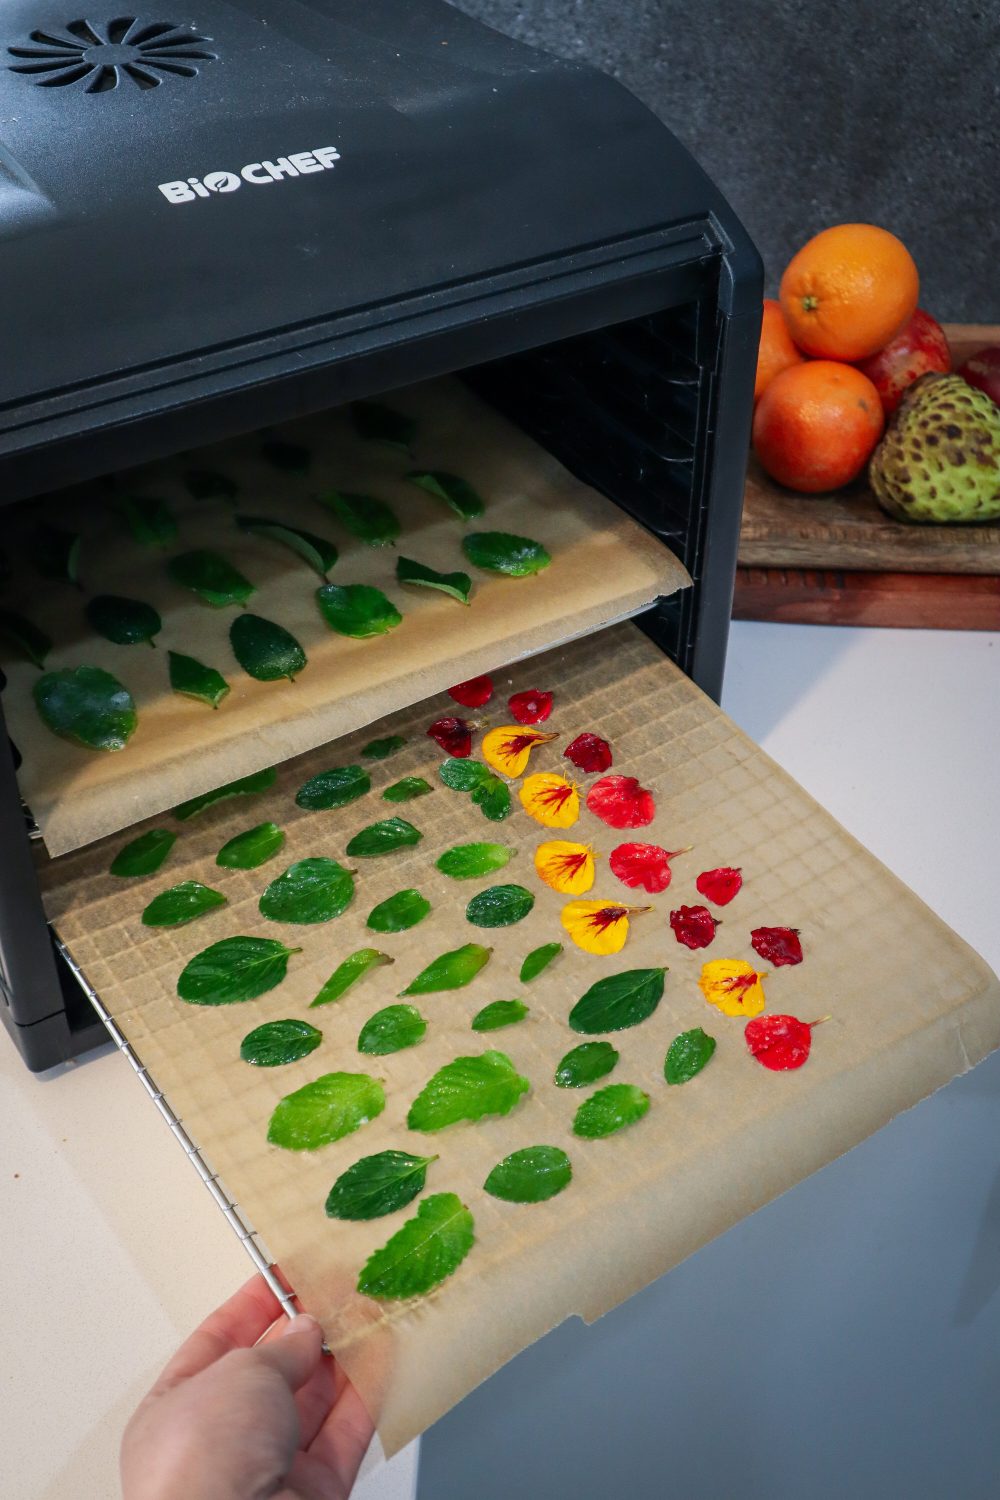
MINT LEAVES - Prepare the candied mint leaves ahead of baking for at least 6 hours (ideally the night before).
Whisk egg white until frothy.
Prepare a tray with baking paper. Lightly coat the mint leaves in egg white by dipping them in and wiping off excess on the edge of the bowl.
Sprinkle both sides with sugar and place on the baking paper tray.
Allow to rest at room temperature for 6 hours + or overnight. I stored them in my dehydrator (switched off) to keep any bugs off. Store in an airtight container and use within a day or two.
BASE:Soak the dates in a bowl with hot water for 1 hour prior to starting.
Blitz the nuts in a food processor or similar until a fine crumble.
Add in drained dates, salt, and cocoa, and blitz to combine. The mix should be moist enough to hold shape in your hands and not fall apart.
Press base mix into a greased 25cm tart pan.
Bake at 160 degrees for 15 minutes or until edges start to brown.
Remove and allow to cool. Remove from the tray when half cooled and place on the serving dish.
FILLING - Scoop avocado flesh out into a mixer and add the maple syrup, salt, and milk. Blitz to combine and there are no chunks of avocado left.
Melt chocolate over a double boiler (place a saucepan of water on the stove and add the chocolate to a second pot sitting on top).
Pour melted chocolate into the avocado mix and continue to mix until combined.
Spread filling into the cooled base and top with fresh strawberries, candied mint leaves, and edible flowers.
Finishing Touches
Top your avocado chocolate tart with sliced fresh strawberries, candied mint leaves, and a few edible flowers if you have them. The combination of textures and colours not only makes this tart visually stunning, but also elevates the flavours to something truly special.
Celebration of Seasonal Abundance
This avocado chocolate tart is a celebration of seasonal abundance and simple ingredients. It’s a beautiful example of how your garden can inspire decadent, nutritious treats that impress without fuss. Whether you’re growing avocados or simply want to try a plant-powered dessert, give this recipe a go.
Links included in this post might be affiliate links. If you purchase a product or service with the links that I provide I may receive a small commission. There is no additional charge to you! Thank you for supporting my blog so that I can continue to provide you with free content.
Add a little bit of flair to your desserts, baked treats, or cocktails with these sparkly, sweet candied mint leaves. They’re beautiful, easy to make, and add a delicate crunch with a refreshing minty finish. Perfect for when you want something a little special to top a cake, tart, pavlova, or even a fancy iced drink.
Mint on its own can sometimes be a little overpowering, but candying softens that intense bite while preserving all the aromatic freshness. The sugar balances the strength of the mint, leaving you with a light, sweet leaf that melts in your mouth and looks stunning as a garnish.
How to Make Candied Mint Leaves
All you need are a few fresh mint leaves, some egg white (or aquafaba for a vegan version), and a sprinkle of caster sugar. Simply coat each leaf in a bit of frothy egg white, dust with sugar on both sides, and let them dry for several hours until crisp. I like to leave mine on baking paper in a switched-off dehydrator or a warm, dry spot in the kitchen. They’re best made the night before and can be stored in an airtight container for a day or two.
Candied mint leaves are a great way to use up any extra mint growing in the garden, especially when it starts to take over. You can also try this method with other edible leaves like lemon balm or even tiny herb leaves for a twist.
They’re not just decorative—they’re delicious! Whether you’re topping an avocado chocolate tart, dressing up a fruit salad, or adding charm to a summer cocktail, these little leaves add a handmade, whimsical touch that’s sure to impress.
Candied Mint Leaves
Prep Time: 10 minutes
Additional Time: 6 hours
Total Time: 6 hours10 minutes
Sweet and minty these candied mint leaves are a delicious addition to decorate baking or cocktails.
Ingredients
10 + Mint leaves*
1 Egg White or Aquafaba (chickpea water)
Caster Sugar
Instructions
Whisk egg white until frothy.
Prepare a tray with baking paper.
Lightly coat the mint leaves in egg white by dipping them in and wiping off excess on the edge of the bowl.
Sprinkle both sides with sugar and place on the baking paper tray.
Allow to rest at room temperature for 6 hours + or overnight. I stored them in my dehydrator (switched off) to keep any bugs off.
Store in an airtight container and use within a day or two.
Notes
* Try with edible flowers or other herbs such as pineapple sage
Garden to Plate Magic
Candied mint leaves are a simple yet elegant way to elevate your homemade treats. With just a few ingredients and a bit of drying time, you can transform humble garden mint into a beautiful garnish that looks impressive and tastes delicious. Whether you’re making them for a special occasion or just to enjoy some creative time in the kitchen, they’re a fun way to celebrate what’s growing in your garden.
Links included in this post might be affiliate links. If you purchase a product or service with the links that I provide I may receive a small commission. There is no additional charge to you! Thank you for supporting my blog so that I can continue to provide you with free content.
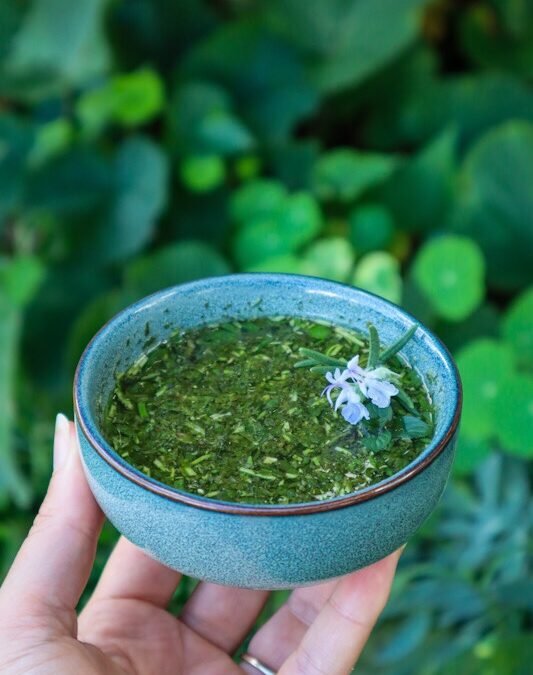
Homemade Mint and Rosemary Sauce is so fresh and delicious. With just a few ingredients and fresh herbs from the garden, you can whip this flavour-packed sauce to serve with any Sunday Roast.
Mint and Rosemary Sauce
Prep Time: 5 minutes
Cook Time: 2 minutes
Total Time: 12 minutes
Fresh and zingy Mint and Rosemary Sauce.
Ingredients
1 Cup chopped Mint Leaves (3-4 Sprigs)
1 TBSP Roughly Chopped Rosemary Leaves (1 Sprig)
1/4 cup White Wine Vinegar (or white vinegar)
2 TBSP Water
1 Pinch Sea Salt Flakes
2 tsp Raw Sugar
Instructions
Rinse off the Mint and Rosemary and remove the leaves from the stems. Roughly Chop.
In a saucepan add the vinegar and sugar. Heat until sugar is dissolved. Add the herbs and remaining ingredients and stir to combine.
Lightly blitz using a stick mixer or blender.
Serve hot or cold.
Notes
Store leftovers in the refrigerator in an airtight jar for 1 week.
Green salads are a staple in any homegrown, garden-to-plate lifestyle — but that doesn’t mean they have to be boring. This simple green salad is fresh, vibrant, and packed with flavour, using ingredients that grow during the spring months. It’s the kind of salad you throw together in five minutes, but it tastes like something you’ve put real effort into. The secret is in the sauce! What I love most is how adaptable it is. Rocket brings a peppery bite, zucchini adds sweetness and crunch, peas bring that soft pop of freshness, and the mint ties everything together with a cooling lift. It’s the perfect side dish for spring and summer meals, or an easy way to use up handfuls of garden produce when everything is growing at once.
Try this delicious mint sauce recipe to dress potatoes or roast veggies!
Green Living
This is also a great recipe for anyone trying to reduce food waste — baby zucchinis, slightly overgrown rocket, or peas that aren’t “pretty” enough for a pod-and-eat moment all shine beautifully in this salad. Serve it alongside grilled veggies, roast chicken, a simple pasta, or enjoy it as a refreshing lunch on its own. And if you want to take it to the next level, try dressing it with my fresh mint sauce — it’s unbelievably good drizzled over potatoes, tossed through greens, or spooned onto roasted vegetables.
Growing your own food is all about keeping things simple, seasonal, and flavourful — and this salad does exactly that. Fresh, light, nourishing… and straight from the garden.
Rocket, Zucchini, Pea and Mint Green Salad
Prep Time: 10 minutes
Total Time: 10 minutes
Simple and packed full of flavour this green salad is sure to impress!
Ingredients
3 cups of Rocket and mixed greens*
1/2 Zucchini
6-8 Sugar Snap Peas
5-6 Mint Leaves for serving
1/2 cup Mint Dressing (see recipe below)
Instructions
Add Rocket and Greens to a mixing bowl and drizzle with 1/2 the mint sauce. Mix lightly to coat.
Add greens to the Serving dish.
Using a wide peeler, peel long strips of zucchini lengthwise. Add to mixing bowl and coat with a little extra dressing. Add on top of the salad mix.
Cut the Peas in half-length ways and place them throughout the salad.
Place mint leaves throughout the salad and top with edible flowers. (I used Mint flowers and white Alyssum). Drizzle over the remaining mint sauce to serve.
Notes
* Use seasonal salad greens such as Mizuno, Lettuce, Nasturtium, and Baby Spinach
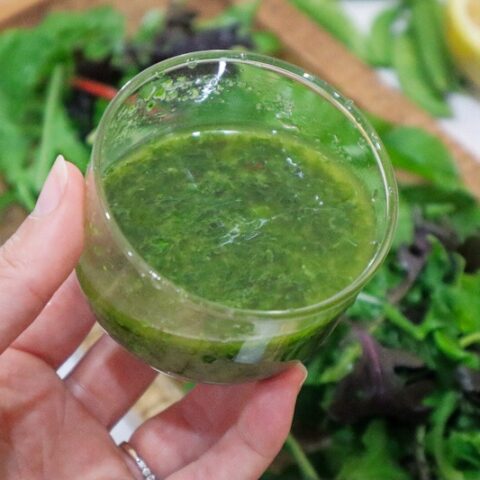
Mint Sauce/ Dressing
Yield: 1/2 cup
Prep Time: 10 minutes
Total Time: 10 minutes
Ingredients
1/2 cup Mint leaves (Spearmint or common mint)
1 tsp Lemon Juice
1 tsp ACV
1 Tbsp Red Wine Vinegar
1 Tbsp Olive Oil
2 Tbsp Water
Salt to season
1/2 tsp Honey
Instructions
Roughly chop up the Mint leaves and add to a Mortar and Pestle
Add in the remaining ingredients and grind to a combined dressing.
Taste and add more lemon, honey, or salt to balance if needed.