Chimichurri dressing is a delicious and fresh condiment to serve on so many of your homegrown meals. I adapt this sauce regularly using different herbs or greens such as Radish or Carrot tops! Drizzle this dressing over your roasted Radish or veggies for a zero-waste meal. See notes for some of the swaps I often use. This sauce is so fresh and zingy which is great to serve over foods that are rich or creamy to give them a fresh kick!
Chimichurri Dressing
Prep Time: 10 minutes
Total Time: 10 minutes
This vibrant green dressing is packed full of flavour and is a delicious way to add a fresh zing to your meals.
Ingredients
1 cup Parsley*
1 1/2 TBSP lemon juice
1 TBSP Red Wine Vinegar
1/4 cup Olive Oil
1/2 cup Fennel Fronds*
1 tsp Sugar
2-3 Garlic Cloves
Sea salt flakes to season
Fresh Red Chilli or 1/4 tsp chilli flakes
Instructions
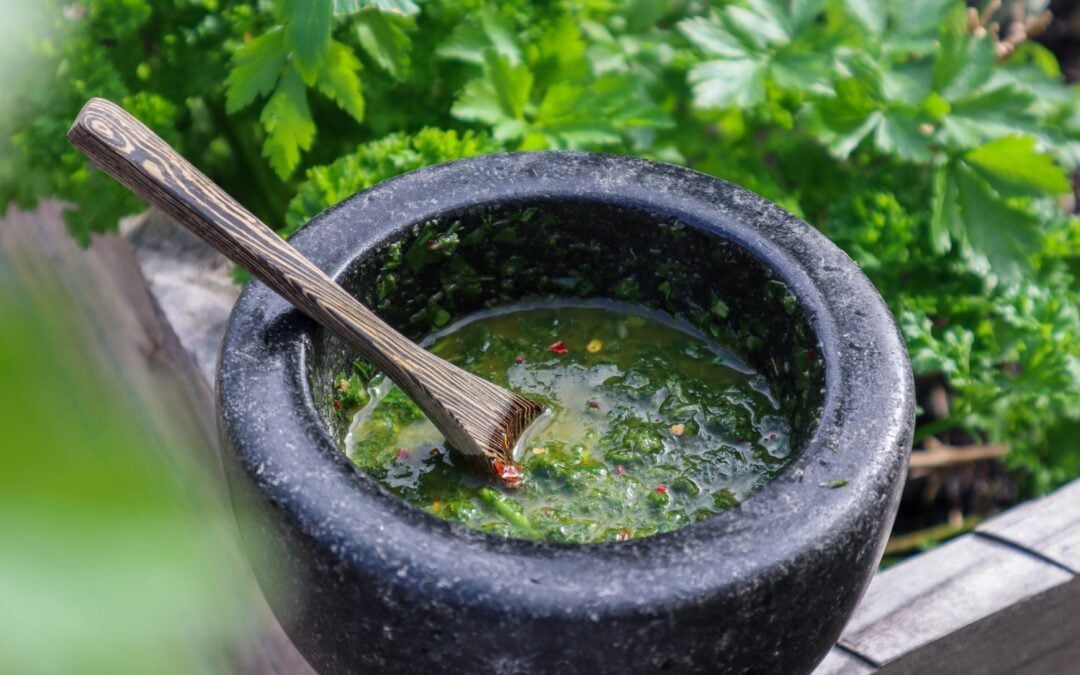
Add Parsley, Lemon juice, Vinegar, Sugar, Fennel Fronts, and Garlic to a mixer or mortar and pestle. I prefer a mortar and pestle as I like it chunky and not to blended. Blitz or crush to combine and make a green sauce.
Then gradually add oil to combine. Add Chilli flakes and a pinch of Sea Salt Flakes. Taste and balance with more salt if needed.
Drizzle over the green sauce. Garnish with sliced red chilli, fennel fronts, and edible flowers.
Notes
* Swap Parsley or Fennel fronds for Radish tops, Carrot tops, Corriander, or a mix.
There may be a little extra sauce than needed so you can keep it in the refrigerator to use within a few days or freeze it in ice cubes to use in cooking.
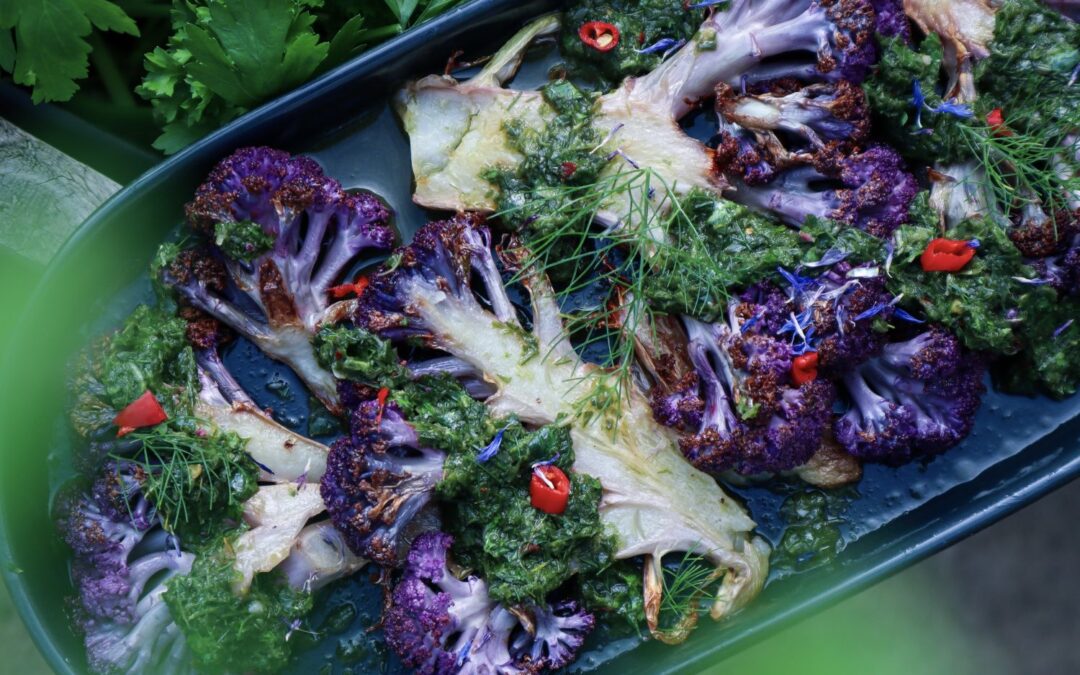
Cauliflower is such a hearty vegetable and can provide nutritious and filling meals. Cauliflower is a great vehicle for flavour! As it absorbs and holds flavour so well. Cauliflower is a great source of fibre, vitamin C, B,A,K and Folate. Roasting Cauliflower brings out more of its natural nutty flavours. These roasted cauliflower steaks are so easy to make and go great with this punchy green sauce. Inspired by chimichurri, this green sauce is packed full of herbs and has a zesty, vinaigrette flavour. Adapt this recipe to suit what herbs you have in the garden.
Cauliflower Steaks with Green Sauce
Roasted Cauliflower is so full of flavour and has subtle nutty flavours. Purple Cauliflower is striking to use but this can be made with any cauliflower variety. This vibrant green sauce is packed full of flavour and would be great used on many chicken or fish dishes too.
Ingredients
1 whole Cauliflower
2 TBSP Oil
1 cup Parsley
1 1/2 TBSP lemon juice
1 TBSP Red Wine Vinegar
1/4 cup olive oil
1/2 cup Fennel fronts
1/2 tsp Chilli
1 tsp sugar
3 Garlic Cloves
Sea salt flakes to season
Fresh Red Chilli
Instructions
Preheat oven to 190 degrees celcius. Rinse the Cauliflower and cut into x4 steaks. Cut from the top of the Cauliflower 2cm thick slices.
Drizzle with oil and cook for 30- 40mins or until the edges start to brown up.
While the Cauliflower cooks prepare the green sauce. Add Parsley, Lemon juice, Vinegar, Sugar, Fennel Fronts and Garlic to a mixer or mortar and pestle. Blitz or crush to combine and make a green sauce. Then gradually add oil to combine. Add Chilli flakes and a Pinch of Sea Salt flakes. Taste and balance with more salt if needed.
Place the Cauliflower on a serving dish and drizzle over the green sauce. Garnish with sliced red chilli, fennel fronts and edible flowers ( i used blue cornflowers).
There may be a little extra sauce than needed so you can keep in the refrigerator to use within a few days or freeze in ice cubes to use in cooking.
Notes
Swap or add seasonal herbs such as coriander or mint.
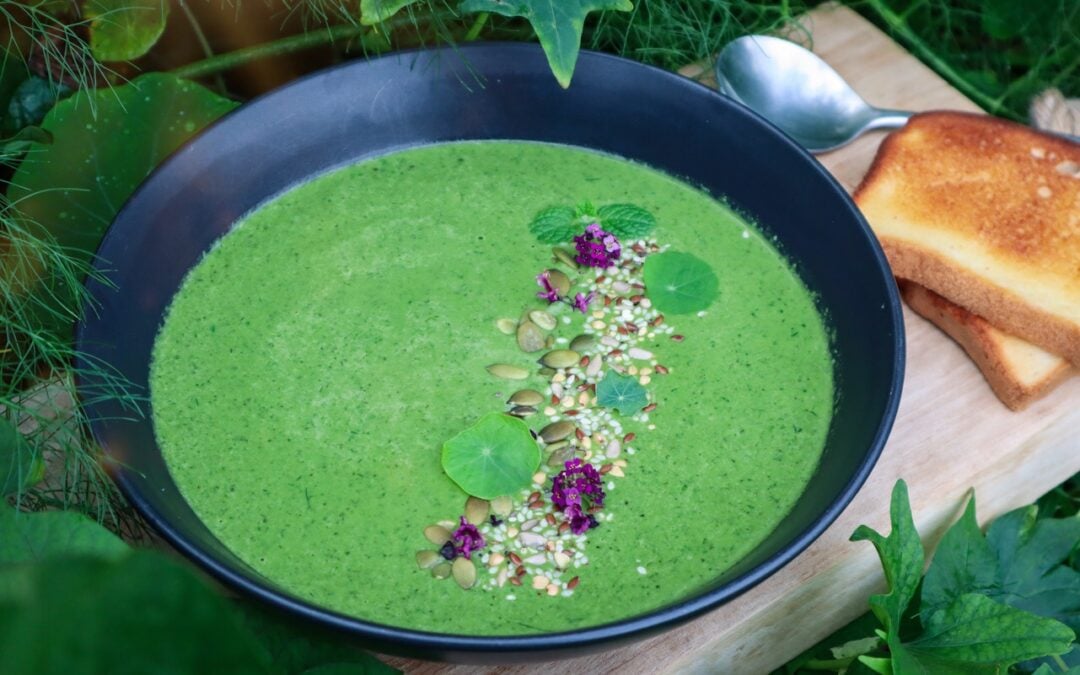
Winter greens are in abundance and it is the perfect time of year to enjoy warm, nourishing soups. This garden green soup is full of greens that are only lightly cooked, so they retain as much of their nutrients as possible. This soup will make the perfect winter starter or lunch and can be made using any greens you have growing in the garden.
Nourishing Garden Green Soup
Prep Time: 20 minutes
Cook Time: 20 minutes
Total Time: 40 minutes
Packed full of fresh nutritious greens from the garden, this soup is delicious served both warm and cold.
Ingredients
1 medium Brown Onion
2 cloves of Garlic
4-5 Rainbow chard leaves
10 Sweet Potato leaves
2 Broccoli or Cauliflower leaves
1 Sprig of Mint (10 leaves)
3 Sprigs of Fennel Frond leaves
2 Sprigs of Parsley (1/2 cup)
2-3 Nasturtium leaves
1 Tbsp Tamari (or soy sauce)
1 tsp ground Cinnamon
1 tsp ground Cumin
1/2 cup Coconut Milk
1 tsp Salt
1 Tbsp Cooking Oil
3/4 cup Water
Instructions
1. Finely dice the onion. Add oil to a frypan on medium-low heat and cook the onion for 10 minutes or until slightly golden.
2. Add in the garlic and cook for 1 minute. Add in the cumin and cinnamon and stir to mix, cooking for a further 1 minute.
3. Add in the coconut milk, Tamari, and 3/4 cup of water. Cook for 5 minutes, stirring regularly. Remove from the heat and allow to cool.
4. Rinse your greens and remove the stems.
5. Fill a wide bowl with cold water and ice and place it beside the stove. Place a wide pan, (or wok) on medium heat with 3-4 inches of water. Heat until the water is simmering.
6. Blanch your leaves in the simmering water and then add to the iced water to cool. This will lightly cook the leaves and help them remain bright vibrant green. Do this in stages with each type of leaf. Blanch the thicker leaves such as Rainbow chard, Broccoli, Cauliflower leaves, and Sweet Potato leaves for 45 seconds. The more delicate leaves such as Mint, Nasturtium, and fennel for 20-30seconds.
7. Strain off the green from the water.
8. Blitz up the cooled onion mixture and greens in a blender or similar (stick mixer, Nutribullet).
9. Transfer the mix to a saucepan and add salt (to taste) and reheat to serve or enjoy cold.
OPTIONAL: Top with mixed seeds (sesame, pumpkin, sunflower), edible flowers, and baby mint and nasturtium leaves. Serve with buttered Toast.
Notes
The Sweet potato and Broccoli leaves can be substituted with other garden greens you have growing in the garden such as Spinach, SilverBeet, Asian greens.
The darker the greens are in colour, the more vibrant green the soup will be.
Preserving herbs from your garden is a great way to make the most of their abundance and store them for the winter months when many herbs will not be growing. Herbs are a great way to add flavour to any dish and once you make your own dried mixed herbs you will never want to buy them ever again!
Click below to watch
In this video I share how I pick, dry and preserve my herbs for both a dried mixed herb blend and also to make tea blends.
Why Grow Herbs?
Herbs are the easiest thing to start growing because they are hardy and less susceptible to pests. They also do not require a lot of room to grow. So you can grow herbs in pots or containers if you do not have room for a garden. It is absolutely achievable and you never know where the journey will take you.
Grow Abundant Herbs
Nature provides so much abundance when we learn to see and utilise it. Sometimes cutting your plants can spark new growth and they will continue to flourish in new directions. Young new growth is much nicer to eat than the older woody growth too. Preserving your harvests also allows you to slow down and reconnect with where your food comes from. It just feels so right to go out to the garden and pick food that you know exactly what has gone into creating it. No chemicals, pesticides, or nasty sprays.
Basil is a warm climate herb and will start to die off as the temperatures decrease. So harvesting and storing basil will mean I will be able to have it available during winter. Basil also responds so well to being cut. Especially towards the end of the season as it starts going to flower. By cutting the tops off, it will grow out thicker and will also help prolong the life of the plant.
Take Cuttings for Gifts
My rosemary is growing a little wild and has even collapsed in the middle under the weight. So I am going to take some cutting to replant and also harvest a big bunch to dry and preserve. Taking cuttings to regrow will give me new plants to gift and trade. It is always good to have some on the go for last minute gifting.
When to Harvest Herbs?
The best time of day to harvest your herbs is first thing in the morning. This is when the plants are hydrated and full of life. As the day goes on they will lose moisture and not be as fresh and vibrant. Early in the morning, the bees are not yet active. As the sun comes up and the dew drys, the bees will be about in a hive of activity. So if you do pick later in the day just be slow and cautious not stress them out and avoid getting stung.
Take time to Slow Down
Spending time in the garden harvesting and caring for your plants allows so much time to observe and learn from your garden.
To slow down and reconnect. Giving your mind time to think. Some of my most creative ideas come when I can quiet the rest of the world. Harvesting also gives such a sense of pride. That you have grown all this delicious food is so special.
How to Preserve and Dry Herbs?
To preserve these herbs I first rinse them off in the sink. Next, I separate the stems and lay the leaves out on my dehydrator trays. I put a layer of brown baking paper to stop them from falling through the tray grid. I keep and reuse the brown baking paper for future dehydrating. I then pop them in the dehydrator on the lowest temperature setting. Between 20 and 30 degrees Celsius. You can also do this in the oven but just be aware it may take 5-8 hours to dry depending on the thickness of the herbs. So it is important you are home when using the oven. To air-dry your herbs, hang them upside down but make sure you have a dry and warm climate. If you live in an area with humidity I would avoid air-drying. You want the herbs to dry as fast as possible.
Dry the herbs until they feel crispy as you do not want any moisture still left in the leaves. If there is still moisture they may spoil or grow mould in the storage process.
Once they are completely dry you can pop them straight into clean, dry jars or storage containers. If you want to save room you can crush them up using a mortar and pestle. Mix some of your herbs together to make a mixed her blend ready for all your winter soups and meals.
Share and Inspire Others
These dried herbs also make great gifts. Taking gifts from your garden to friends and family is something that should become a regular ritual. They will so feel special and you will also feel joy and pride in sharing your homegrown produce. Sharing from the garden can also spark others to try to grow their own food too. You have no idea how many people can be inspired to make changes from your single action of sharing. It should be the way of the future. Because what we are doing in the world right now is not sustainable.
I hope you feel inspired to grow your own herbs at home and make your own dried mixed herbs. They are so easy to make and so vibrant and full of flavour. Nothing like the dull grey herbs you find at the supermarket.
If you have any questions leave me a comment below.
DISCLAIMER: Links included in this description might be affiliate links. If you purchase a product or service with the links that I provide I may receive a small commission. There is no additional charge for you! Thank you for supporting my page so I can continue to provide you with free content!
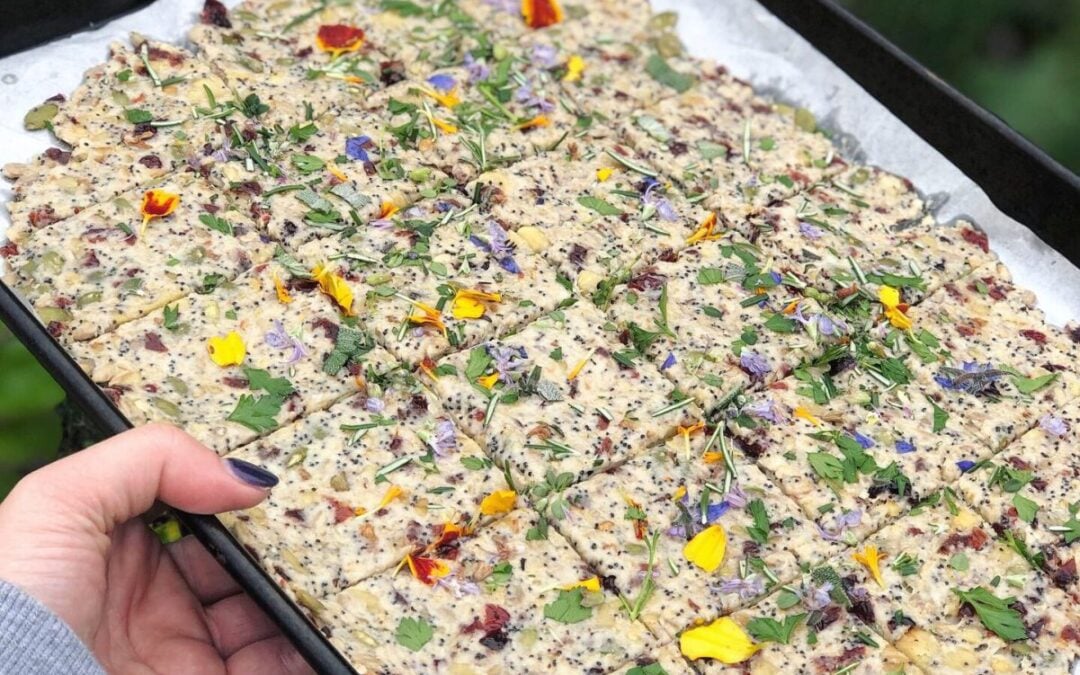
These Flower, Herb and Seed Botanical Crackers are the perfect addition for any cheese platter! The nuts and seeds could be adjusted to whatever you have available, I’m all for kitchen experiments!
Recipe
1/2 cup flour
1/3 cup oats
1/4 cup sunflower seeds
1/4 cup pumpkin/ pepita seeds
1/4 cup walnuts – chopped
1/4 cup dried cranberries – chopped
2 TBS Poppy Seeds
1/2 t salt
1/4 t black cracked pepper
1/8 t baking powder
2 TBS Olive Oil
1 TBS Honey
4 TBS Cold Water
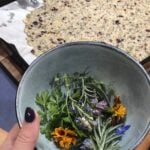
1 cup herbs and edible flowers roughly chopped. I used Marigold, parsley, thyme, rosemary, chive flower. Note: I did use borage but I wouldn’t recommend as it doesn’t look appealing after being cooked..
Method
Preheat oven to 200-220 Degrees Celcius.
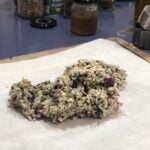
Place all ingredients in a bowl and mix to combine. Should be a sticky dough consistency.
Place mixture on a sheet of baking paper in the centre and make a rough ball.
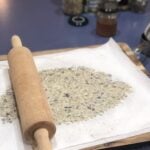
Place a second sheet of baking paper on top and using a rolling pin roll out as thin as you can. You should try and roll out to a rectangle or a shape that will fit onto your baking tray. It is important to try and get the centre rolled out nice and thin so it can crisp up.
Once rolled out remove the top layer of baking paper.
Scatter the chopped flowers and herb on top of the rolled dough and gently press in so they stick.
Grind some extra salt and pepper on top.
Cut the dough into the size you want your crackers. I did roughly 6cm x 4cm.
Place the baking paper with your dough onto an oven tray and bake for 12-14 minutes until golden. The ends may crisp up before the centre so I kept an eye on it and cut off the end rows with scissors and allowed the centre to cook for longer.
Once you have made your own Homemade Botanical Crackers you will never look back. The reat thing about this recipe is that you can mix and match the ingredients to whatever you have availble! Get creative and try new versions each time. Remebr it is important to get the mixture rolled out as thin and even as possible.
Let me know if you make your own version of these Botanical Crackers i would love to see. You can tag me on Instagam 🙂
MY GARDENING ESSENTIALS //
Fertiliser spray gun: https://bit.ly/366nL1t
Retractable Hose: https://bit.ly/2TSC0Bo
More gardening tools: https://bit.ly/32IQmbD
DISCLAIMER: Links included in this description might be affiliate links. If you purchase a product or service with the links that I provide I may receive a small commission. There is no additional charge to you! Thank you for supporting my page so I can continue to provide you with free content!