Have odd fruit and veggies to use up? This leftover breakfast loaf is a great way to reduce waste and make a delicious and healthy breakfast (or anytime) alternative. This recipe is flexible to allow a range of fruits, nuts, and seeds you have available.
Leftover Breakfast Loaf
Prep Time: 15 minutes
Cook Time: 45 minutes
Additional Time: 20 minutes
Total Time: 1 hour20 minutes
Have random odd fruit and veggies that need to be used up? This leftover breakfast loaf is a delicious way to make sure they don't go to waste.
Ingredients
Dry ingredients
2 cups flour
1 cup oats
1 tsp cinnamon
1 tsp mixed spice
1 TBSP Baking Powder
1/2 cup seeds (i used 50:50 pumpkin and sunflower)
1/2 cup walnuts (choose your favourite nuts)
1 TBSP Poppy Seeds
1/2 cup chopped mixed dried fruit (Goji berries, apricot, raisons)
Wet ingredients
1/2 cup coconut oil (liquid)
1/2 cup quality maple syrup
3/4 cup oat milk (or preferred milk)
Fruit & Veggies
1 cup grated zucchini
1 cup grated carrot
1 cup chopped greens/ spinach
1 cup grated pear (or apple)
1 cup diced Apricot & strawberry (swap for berries or cherries)
Instructions
Preheat oven to 180 degrees.
Mix dry ingredients in a bowl.
Grate and add chopped fruit and veggies to a bowl along with all the wet ingredients. Stir to combine.
Fold in the dry to the wet mix and combine with minimal mixing (don't over-mix).
Grease a loaf or bread tin and add in the mix. Bake for 45 minutes or until the skewer comes out clean.
If there is a little too much for the tin ( in my case) add to muffin trays (but these will only take 20 minutes).
Allow the tin to cool for 10 minutes then remove the loaf and cool for a further 10-15mins on a wire rack (do not slice straight out of the oven or it will fall apart and turn dry).
Notes
To freeze the extra loaf cut it into slices first and pop it in the compostable ziplock bags.
Mix and match fruit, veggies, nuts, and seeds to make your own delicious blends.
Frozen berries can be used add them in frozen don't thaw them out first.
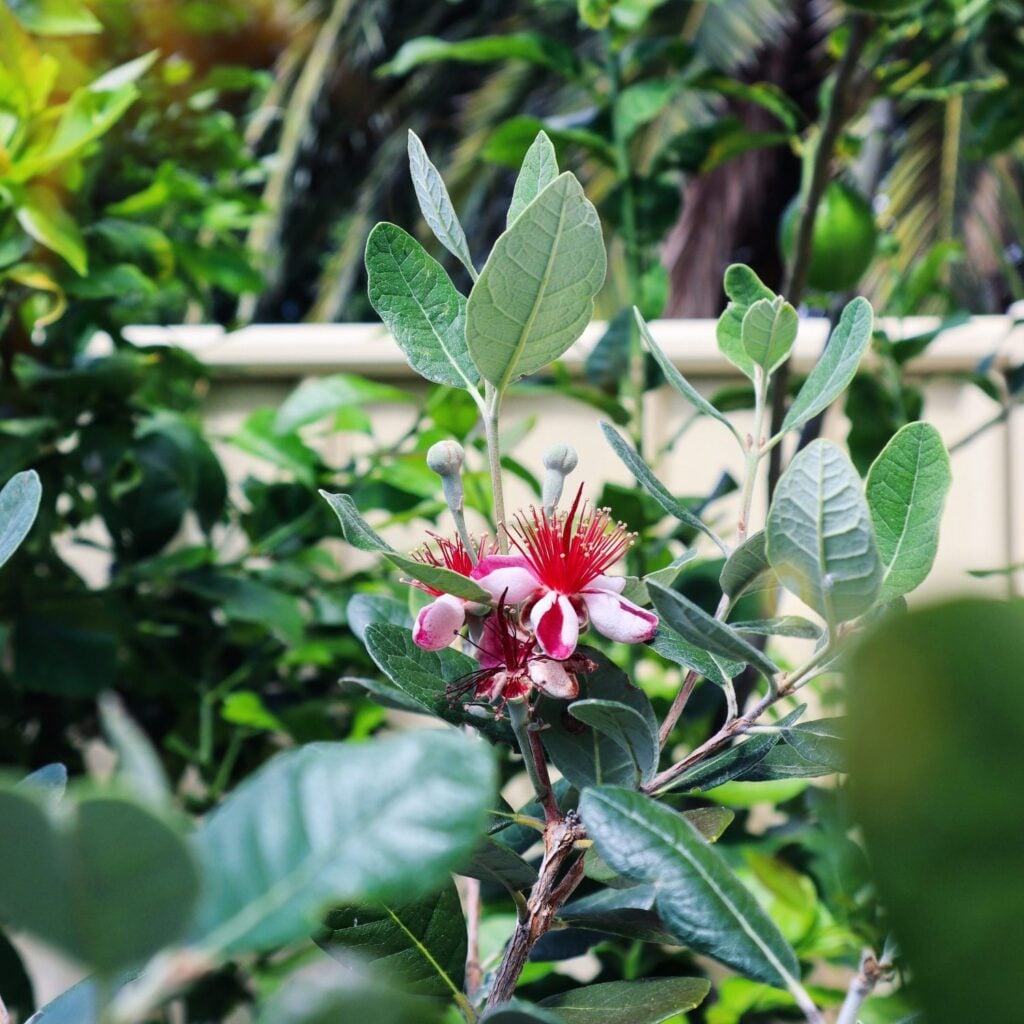
An edible food forest is a type of food-producing system that mimics nature and creates a low-maintenance edible garden. Food forest systems can be designed and adapted to suit small urban blocks, sloping sections, and large open spaces. The idea of creating a food forest is that you can let it go a little wild and allow nature to create balance. Food forests not only provide an abundance of food, but they also promote biodiversity, sequester carbon, attract wildlife, nurture the soil, and create a beautiful and tranquil place to be.
Watch the workshop
What is a Food Forest?
A food forest is a layered system of gardening that is designed to promote biodiversity and create an ecosystem that feeds off each other through mutually beneficial relationships. A food forest aims to mimic patterns and systems that occur in nature. Although, the food forest gardens we create are definitely not what occurs naturally eg: planting tomatoes with guavas, feijoa, and lettuce. It is more so about creating layers both above the surface with different heights and shapes, as well as below the surface with varying root structures. This way all the plants can get the space they need to thrive, provide nutrients, shade, and shelter to others, and work all together as one big family to grow abundant food supplies.
image credit: Graham Burnett
Why Create a Food Forest Garden?
If you are looking to create a low-maintenance garden that produces food all year round, is lush, tranquil, and attracts birds, bees, and other local wildlife, then a food forest may be the garden for you! Food forests are a great way to grow a huge variety of plants in a single area. The ground covers will smother weeds so there is one less job for you to do! The plants are mainly perennials so this means we don’t need to dig up the soil and replace plants each season. The less we dig up our soil the better as this promotes healthy microorganisms and soil life.
There are certain characteristics of a food forest that allow it to renew and support itself with little external input
Planting Density
It’s important to cover and protect the soil from the harsh sunlight
Planting densely creates a habitat for wildlife
More leaf matter to fall and nourish the soil
More roots to hold the soil together and reduce erosion
More flowers for the bees = more pollination and more food production
Dense planting will reduce the number of unwanted weeds
Having flowers and fruit trees planted close together can increase pollination as the bees and pollinators will be nearby
Growing a wide variety of plants
Planting a wide variety of plants will mean you have fruit, vegetables and flowers ready at all different times of the year
Diversity in plants not only provides you with a wide range of nutrients but also your garden and wildlife
Different root structures will provide the soil microbes with different secretions and reduce the severe depletion of nutrients in the soil. If you have all one crop planted in a single area they use up the same nutrients and the soil can become depleted. Having a wide variety can help keep it balanced.
Plants have different flowers which will attract different pollinators to your garden. Each pollinator will achieve different results for each plant. It’s important not only to have flowers available all year round but also a variety of different kinds.
Self Fertilising
With a variety of layers and heights in your food forest, the plants will drop their leaves and fruit which will act as a mulch and built-in fertiliser.
Some plants may get overgrown or die off (survival of the fittest!) which will also return nutrients to the soil.
From time to time you may need to trim your trees to reduce their height or width. This trimming can be put through a mulcher or cut up and returned back to the garden to feed the plants.
Self Seeding
By letting some plants go to flower and seed you will have new plants popping up each year. This can be an extremely easy way to grow more food for free.
At times fruit trees may grow beneath the canopy from the seeds of rotting fruit. It can be a good idea to move these as they won’t have adequate space to grow. Either, relocate them or pot them up to swap or trade.
How to Start a Food Forest Garden
Step 1: Choose a location and prep the soil
First up, we must decide on an area to start converting into a food forest system. This could be an old veggie patch, the front lawn, along the back fence line, or a large open field. The preparation needed will depend on the condition of the area selected. But in general, you will want to:
Clear any debris or unwanted structures
Remove or smother the grass. This can be done by laying down an old carpet for a few months to kill off all the grass. If the grass is still alive and present it can be hard to maintain. Another way is to use sheets of cardboard, as these will eventually breakdown once the grass has died.
If your location has never been used to grow before, the soil quality may be extremely poor or sandy. It could be a good idea to add a layer of compost or organic manure.
Cover your area in a thick layer of mulch. This will protect the soil and help keep any grasses or unwanted weeds away.
Give the area a good water and feed with a liquid seaweed solution.
Step 2: Selecting a plant list
We want to select plants that:
A: we want to eat and
B: provide benefits to other aspects of our garden (animal feed, mulch, birds, shade, etc).
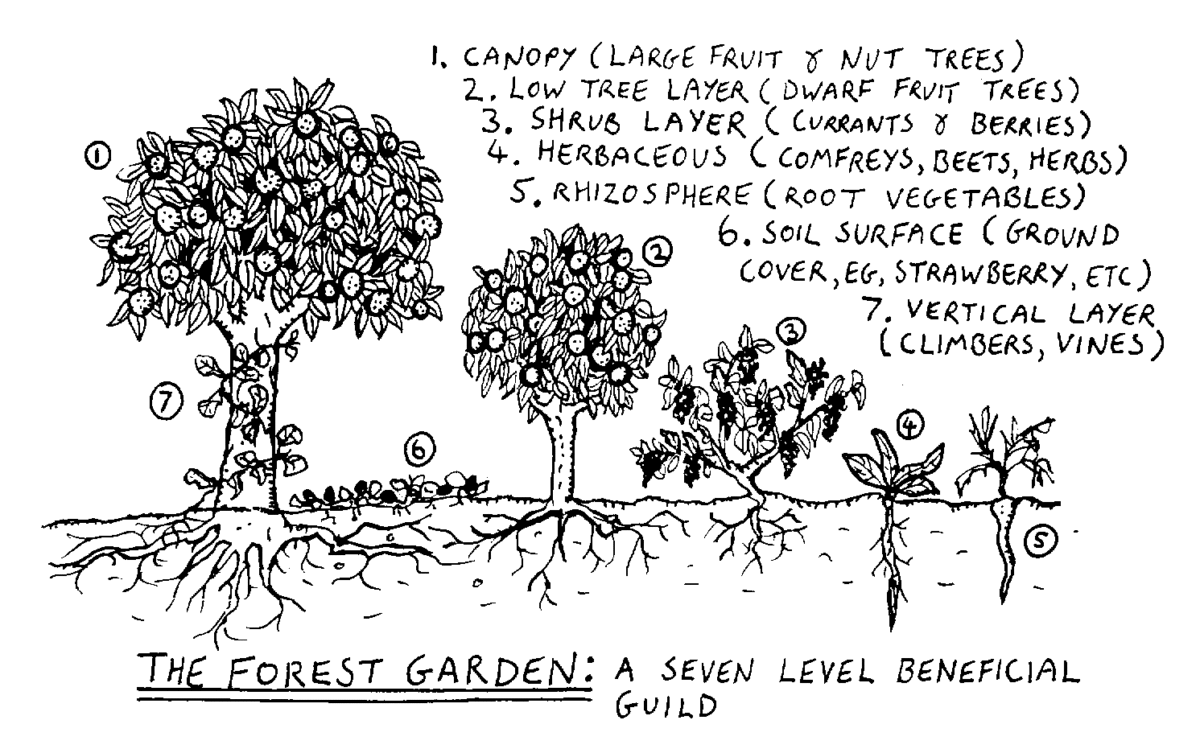
Below are the 7 layers of the food forest. Write down a wish list of plants for each layer and then you can start mapping out which plants will go where depending on their size, what “layer” they are, and how much light they will need to grow.
7 Layers of a Food Forest
1 Canopy Layer – Large trees that require full sun – fruit and nut trees (Avocado, Chestnut, Mango)
2 Understorey Trees – Dwarf fruit or small trees ( Citrus, Papaya)
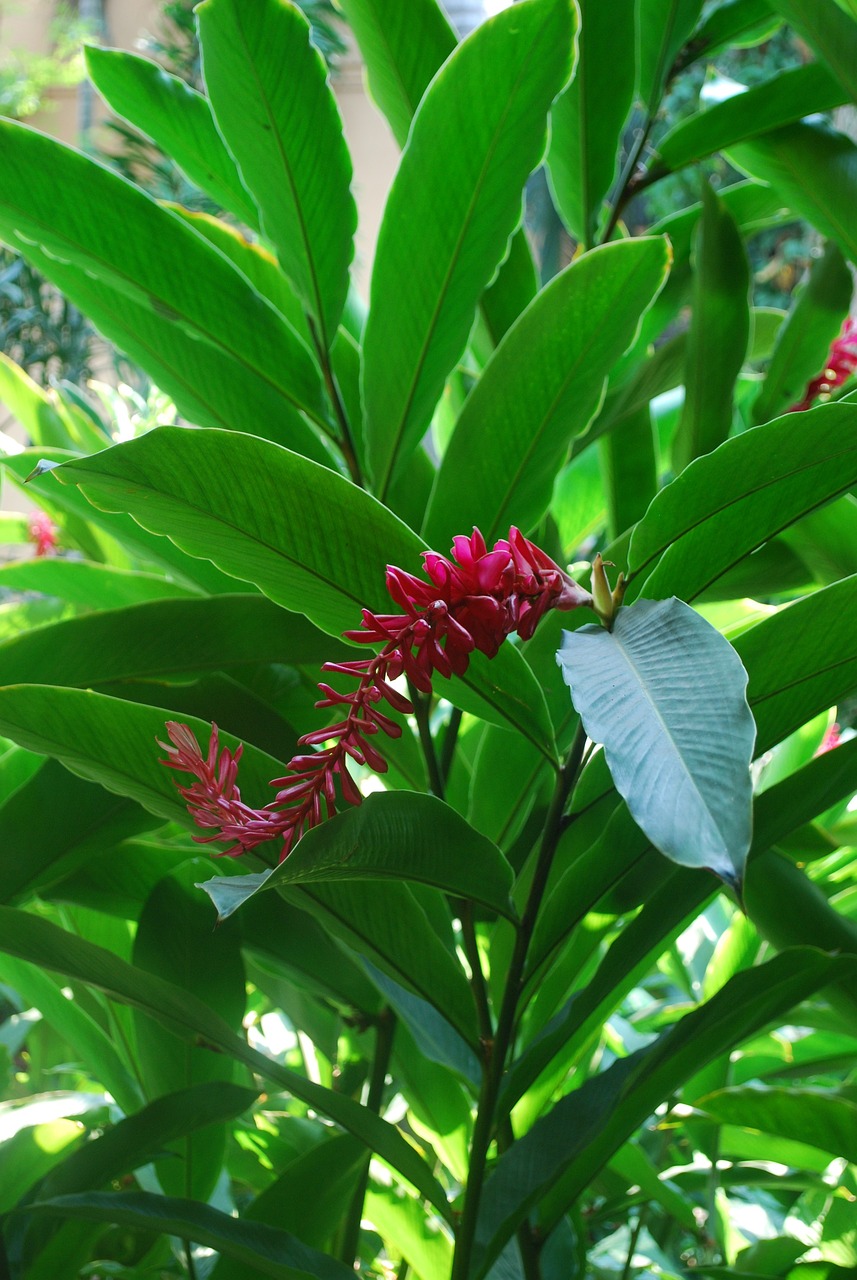
3 Perennial Shrubs – Small bushy plants (Berries, Ginger, Arrowroot)
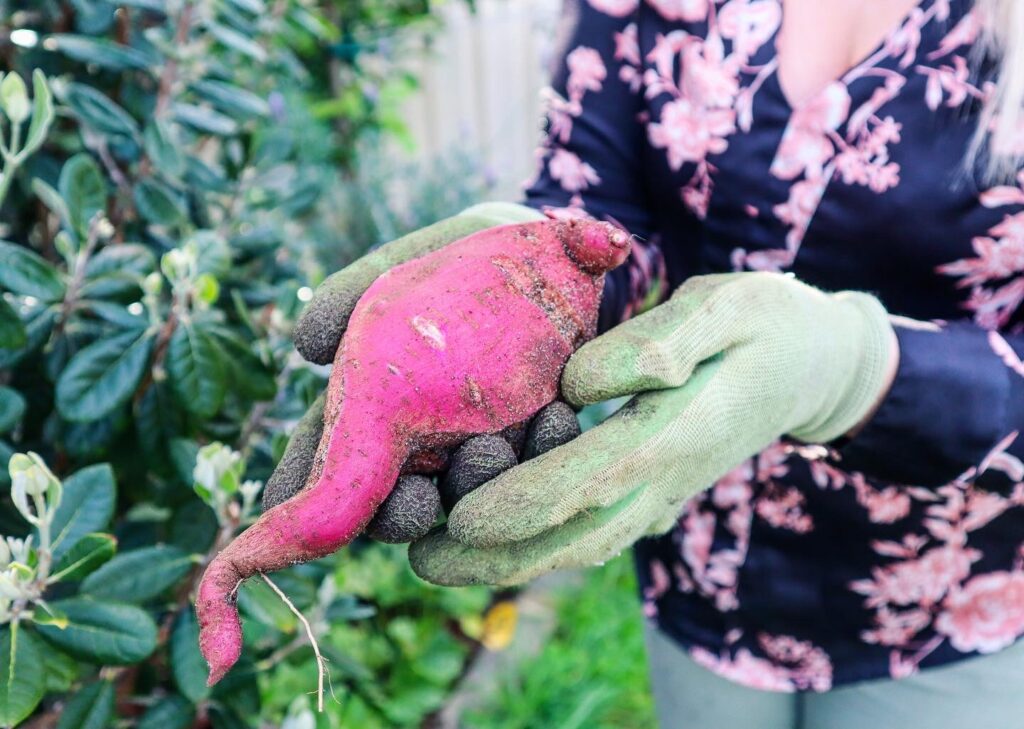
Some plants may fall into multiple categories – Sweet potato is a root crop but also a fantastic ground cover. Ginger is also a root crop but can make a great Perennial shrub layer.
Step 3: Designing
Mapping out a design can be as detailed or as rough as you like. It is important to come up with some kind of plan so that you can decide where to plant your larger trees so that they get enough sunlight. You don’t want to be digging up and moving things around. This should be your master plan not what you are starting with. So go big, add in all things you want so that you can plan for the future and ensure you can room.
How to map out your food forest design
1 Draw the outline of your location or property to scale
2 Add in any permanent structure (sheds, veggie patch, established trees, fences)
3 Map where the sun and shade come from. Mark areas as full sun, part sun, or full shade.
4 Add in your large Canopy trees and allow space for them to grow.
5 Add in your pathways or future large structures (pond, shed, chicken coop)
5 Add in your sub-canopy trees
6 Add in your scrubs, herbaceous layer, root crops, ground cover, and vertical layers.
7 Add seating, a table, or a place for you to view and enjoy your food forest.
Step 4: Planting
To start with you will want to select your large canopy trees and ensure there is enough space for them to grow. The height and width will be noted on the labels. Then you can start adding in your sub-canopy/dwarf trees. Large trees may take years to fully establish so your food forest may not look very ‘foresty’, to begin with. This is a great time to interplant with more annual crops (lettuce, tomatoes, broccoli, etc).
When I first started my back fence line in a food forest system, there were large gaps between the trees. This meant there was a lot more light and space available but I knew that eventually my canopy and sub-canopy trees would grow to fill the space. I used this time to grow seasonal veggies and edible flowers. As well as accumulating and establishing new shrub layers and ground covers.
How to Source Plants for your Food Forest?
Creating a food forest can involve a lot of new plants and the costs will quickly add up. This is where learning how to make cuttings can be extremely valuable. Not only can you reproduce your plants to grow in other areas of the garden but you can also swap, trade, and sell your plants to acquire new ones. Keep an eye out on local pages as you can pick up established trees for cheap or even free! I have managed to get established fruit trees that are already fruiting for less than $20. This can really speed up your food forest production.
Maintaining your Food Forest
The idea of creating your food forest is that it will require less care and attention. This can mean it will look a little wild from time to time (in a good way)
Pruning or trimming back excess trees can be a great way to propagate more or mulch to feed the garden. This can be done once the tree has finished fruiting.
Some trees will need to be staked and secured while they are young so that they don’t snap off.
Propagating plants to establish in other areas – it can take a while for some plants to establish so once they have you can start to reproduce them in other areas.
Harvesting fruit – this is important so that you can reduce the number of unwanted critters (such as rats). Rotting fruit on the ground can also promote fruit fly infestations which you do not want! So ensure all fruit is picked and preserved or composted.
Feeding – It can be beneficial especially in a young food forest to add in extra fertilisers. Try using natural products such as seaweed solution or creating your own from leftover plants and weeds.
Netting or bagging fruit – Depending on your location you may need to net or place net bags on your fruit. Fruit fly, bats, and birds can decimate crops in just a few hours.
Learn how to maximise your edible gardens and grow more food. I don’t follow the rules when it comes to spacing and companion planting. Working with nature to create long-term sustainable gardens.
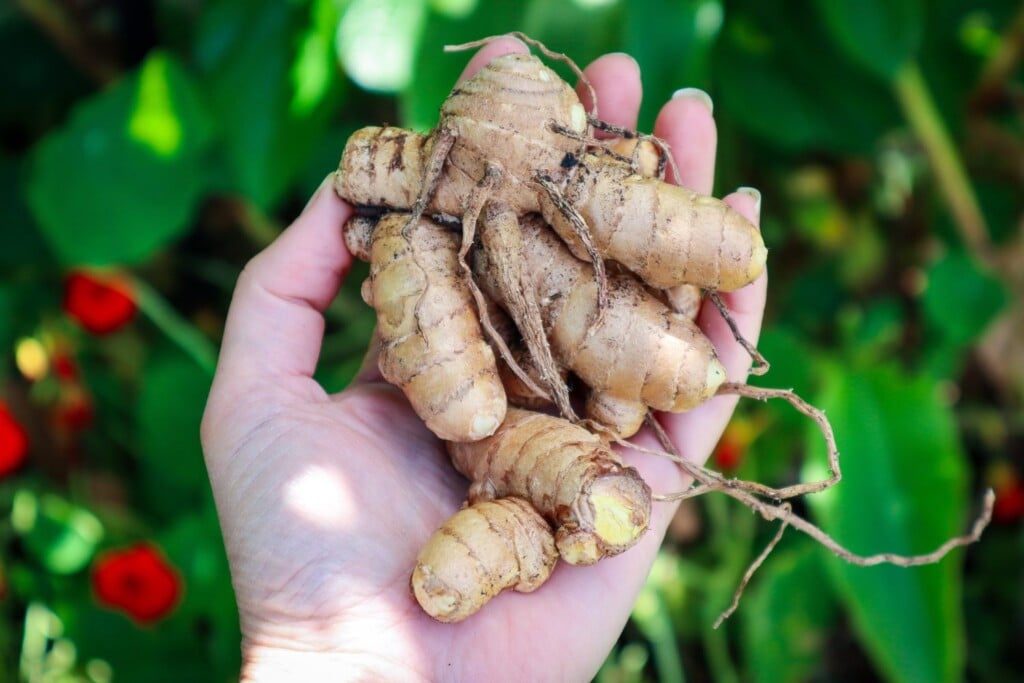
Ginger (Zingerber officinale) is a perennial herb with beautiful lush leaves and produces edible rhizomes that are both flavour-enhancing and medicinal. Ginger is a great addition to your edible garden as it can be grown in pots or as an understory part of your food forest. Ginger easily self propagates and you can divide the rhizomes up to regrow more and more ginger each year. Ginger is a staple for your medicinal garden.
Fertile, moist, well-drained soil. Plenty of compost.
LOCATION
Dappled or part shade position. Sheltered and warm.
CARE
Regular watering.
FERTILISE
Compost teas or liquid fertilisers.
PESTS
HARVEST
Harvest in autumn or 8-10 months after planting. When leaves die off. Harvest all at once or leave some to regrow.
REPRODUCE
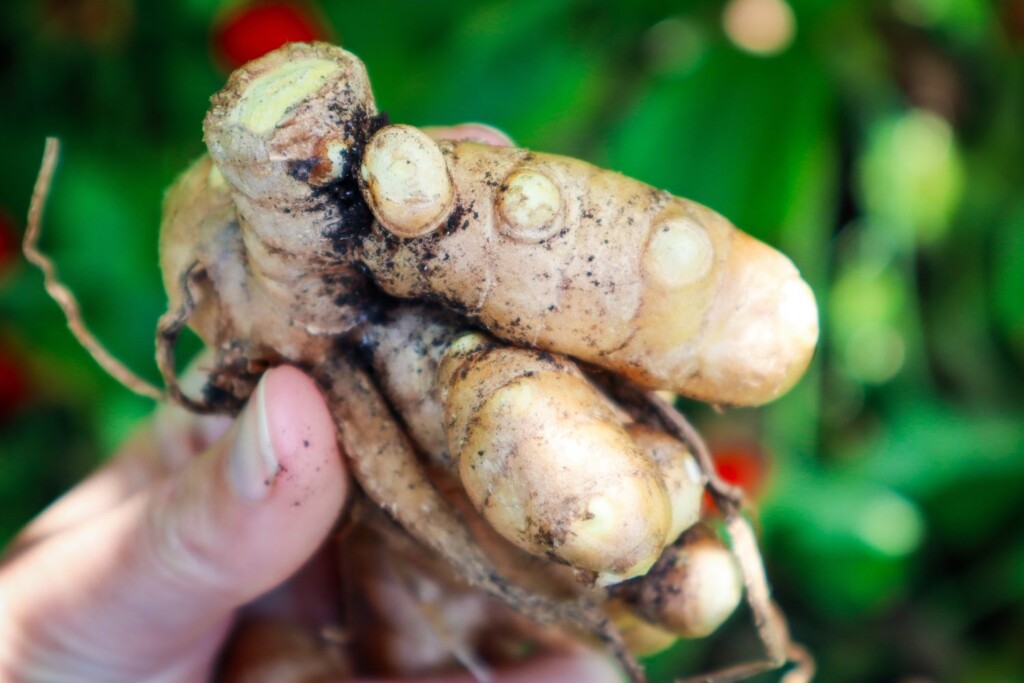
Cut the rhizomes into pieces with at least 2 “eyes”. Allow cuts to dry off before planting.
Why Grow Ginger?
Ginger is a slower grower but low maintenance and produces an abundance of rhizomes beneath the surface.
Here are some of the many reasons to grow Ginger
Easy to grow
Versatile produce
Low maintenance
Aids in nausea
Antioxidants
Flavour enhancer
Visual Aesthetics
Supports Immune health
Rich in Vitamin A,B,C
Can be eaten raw, cooked, or pickled
Anti-inflammatory properties
Popular Ginger Varieties
Ensure you have edible ginger plants before planting as there are many types of ornamental gingers that can be invasive. Selecting organic locally grown ginger rhizomes from the shops can be a good way to regrow ginger plants.
When to Plant Ginger
Ginger is a warm loving tropical plant. It thrives in humid conditions but can still be grown in a range of different climates. Plant ginger late winter-spring depending on how cold your climate is. Plant after the last frost when temperatures are warming up. Ginger likes temperatures between 20-30 degrees and needs at least 5-8 months to grow. If you live in a cooler climate you may need to start or finish your ginger of indoors or in a greenhouse to keep it warm.
How to Grow Ginger
Choose a sheltered, sunny spot with dappled or part shade.
Prepare the soil with rich compost or a pot at least 300mm wide.
Cut Rhyzomes into pieces with at least 2 “eyes each. The eyes are on the end of the knobs and have a little circle. Wait a few days until the cuts have dried off to prevent rot.
Plant 15cm apart.
You can also plant the whole piece in the ground without cutting it first.
Ginger can be a little slow to get growing and show through the soil so don’t stress. Keep them moist but not soggy.
Care/ Maintenance
Keep Ginger well-watered but not soggy. Ginger doesn’t like strong winds so protection using larger trees or plant in sheltered locations.
Once the leaves start to die off in Autumn reduce the watering and let the plants start to die down to put energy into the rhizomes.
You can harvest ginger throughout the growing period the young ginger or “green ginger” has a more mild flavour and can be used raw. Just ensure you don’t disturb the patch too much.
Once the leaves are all brown dig up the patch.
You can select some to regrow and plant straight back in the soil.
Rinse off the soil and remove the roots. These are the skinny smooth parts below the rhizomes.
Reproducing
Ginger is best reproduced by cutting up the rhizomes to produce more plants or left to repopulate on its own. Leaving ginger in the ground without harvesting can help produce an established patch. Then each year in Autumn harvest what you need and leave the rest to regrow.
Cooking and Using Ginger
Ginger can be eaten raw, cooked, pickled or fermented.
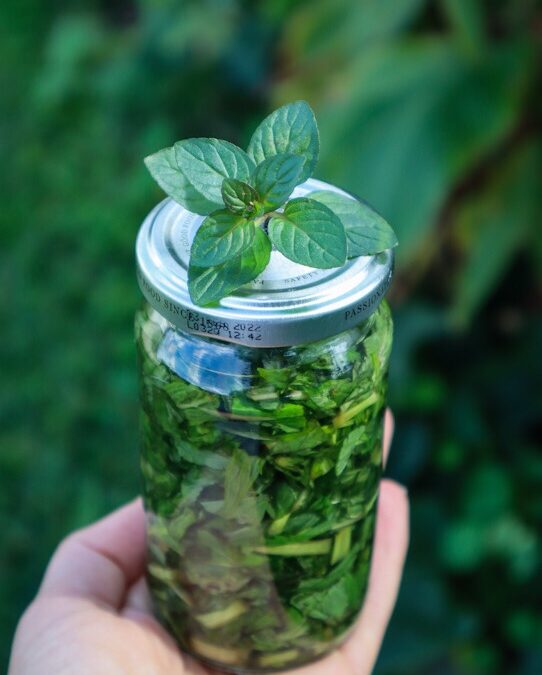
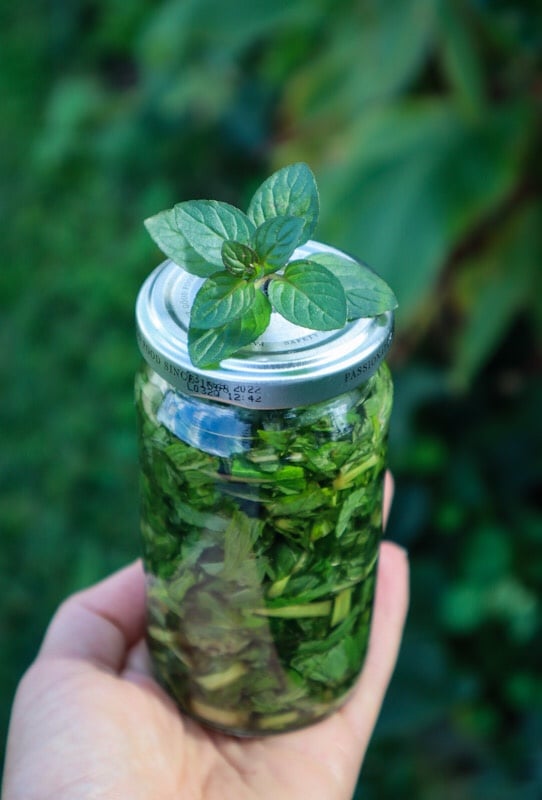
Mint Extract is a great way to preserve your abundant mint harvests. This recipe works well with chocolate mint or any type of mint you have growing in the garden. With two simple ingredients, you can create a flavour-enhancing extract to use in your cooking and baking. No need for the fake store-bought Mint extracts! This homemade mint extract is a great addition to your homestead.
Chocolate Mint Extract
Prep Time: 5 minutes
Additional Time: 1 month
Total Time: 1 month5 minutes
Capture and store the delicious minty flavours straight from your garden. Great for baking and cooking.
Ingredients
1 cup Mint
1 1/2 cups Vodka
Instructions
Wash the mint and pat dry to remove excess moisture.
Roughly chop the mint and add to a clean, sterilized jar.
Pour over the vodka and secure the lid.
Allow to steep for 1-2 months in a dark place. Shake the jar every few days to help infuse until the vodka smell is replaced by Mint.
Remove and strain off the Mint leaves and store in a clean, sterilized jar.
Notes
The ratios can be a little rough with this just make sure the leaves are covered with the vodka.
Will keep for a long time but I suggest using it within a year.
The leaves and mixture will go brown as they infuse. Dried leaves may hold their colour better.
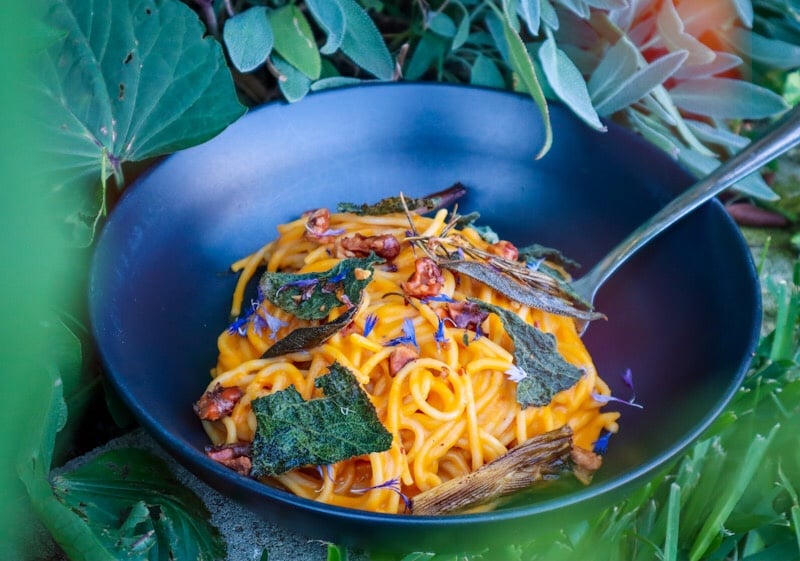
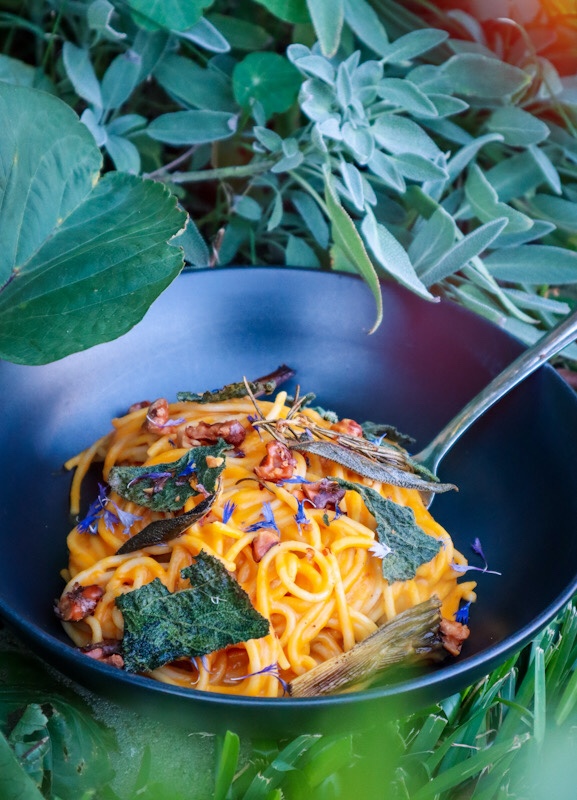
This Creamy Roast Pumpkin Pasta is the ultimate comfort food. The crispy pumpkin leaves make a delicious crunchy addition. The perfect Autumn and Winter meal. Make extra sauce and freeze for quick and easy meals.
Creamy Roast Pumpkin Pasta with Crispy Pumpkin Leaves
Prep Time: 15 minutes
Cook Time: 1 hour
Total Time: 1 hour15 minutes
Ingredients
Pumpkin (approx 600grams)
1 Spring onion
3 Garlic cloves
5-6 Sage leaves
2 sprigs Rosemary
1/2 cup walnuts or Pumpkin seeds
2 servings of spaghetti pasta
3 tbsp Coconut Cream
1 tsp Tamari or soy sauce
1/2 tsp ground cinnamon
1/2 tsp paprika
5 young pumpkin leaves
Instructions
Preheat the oven to 190 degrees celsius.
Slice the pumpkin into 1-inch wedges. In a roasting dish add the pumpkin, unpeeled garlic, rosemary, sage, and spring onion ( sliced into 1-inch pieces). Drizzle with olive oil and mix to coat.
Sprinkle over paprika and cinnamon and cook for 45min or until the pumpkin is cooked and slightly caramelized.
Cook the spaghetti as per instructions. Strain but do not discard the pasta water.
Once the pumpkin is cooked, remove and allow to cool.
Place the washed pumpkin leaves and walnuts on a baking tray, drizzle with olive oil and sprinkle with sea salt. Bake at 190 degrees celsius for 5 minutes or until crispy.
In a mixer add the pumpkin flesh, roast garlic, coconut cream, tamari, and 1/2 cup of the reserved pasta water. Season with salt and blitz until creamy.
Return the pasta and creamy pasta sauce to the saucepan and heat until warm. Taste and season with salt and pepper as required.
Place the pasta in a bowl and top with roasted seeds or nuts, crispy pumpkin leaves, crispy spring onion, and sage leaves.
Enjoy!
Notes
Freeze extra pasta sauce for quick and easy future meals.